ASP.NET Core 1.0 and Angular 2 are probably the hottest new frameworks in terms of both of them are entirely re-written from scratch. We, as web developers are more than eager to test both of these two super promising frameworks and get ready to build cutting-edge applications. After writing the Building Single Page Applications using Web API and angularJS post which was fortunately widely liked by thousands of readers, I have started receiving comments in order to upgrade the same application we built on the previous post to ASP.NET Core 1.0, Angular 2 and of course Typescript. Though it would be nice to do it and have two different versions of the same application, I have finally decided to build an entirely different application cause it’s always nice to be creative and new stuff give you that opportunity. Once again, this post gonna be quite large so we will break it in to the following sections. You are strongly recommended to grab a cup of coffee before start reading the rest of this post:
- What are we going to build: Present our Single Page Application application’s features with several screenshots.
- What are we going to use: Describe the technologies, frameworks, languages and tools we ‘ll use to build the application.
- Prerequisites: Prepare our development environment to build a cross-platform ASP.NET Core 1.0 application.
- Create and configure the application: Start with an empty ASP.NET Core application and configure it step by step for using ASP.NET MVC 6. We will also install all the server and client packages we ‘ll need to build the SPA (project.json, package.json (NPM), gulpfile.js (Gulp), bower.json (Bower)).
- Entity Framework Core: Configure EF Core Code First migrations and write a database initializer. We will also create the back-end infrastructure Entities, Reposistories and set the Dependency Injection as well.
- Single Page Application: Start building the Photo Gallery Single Page Application.
- Discussion: Discuss the choices we made and what comes next.
Are you ready? Let’s start!

What are we going to build
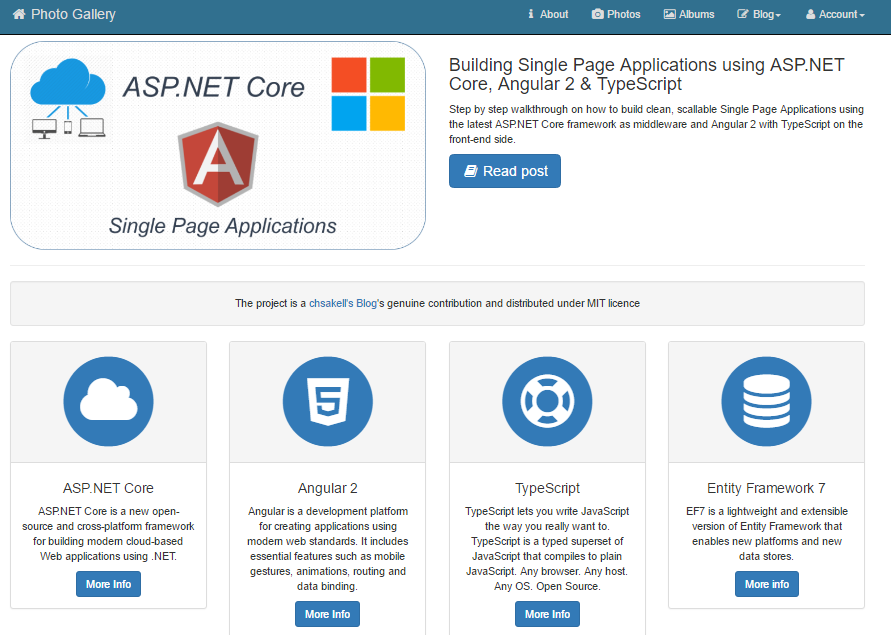
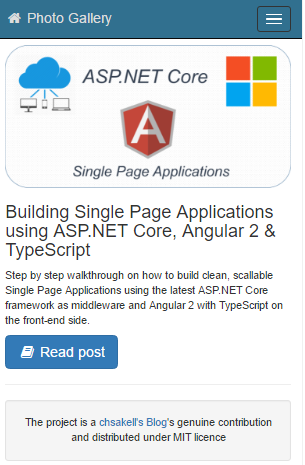
We will create a Single Page Application to display a gallery’s photos. The landing (default) view will present some information about the app such as the technologies used for building the application.
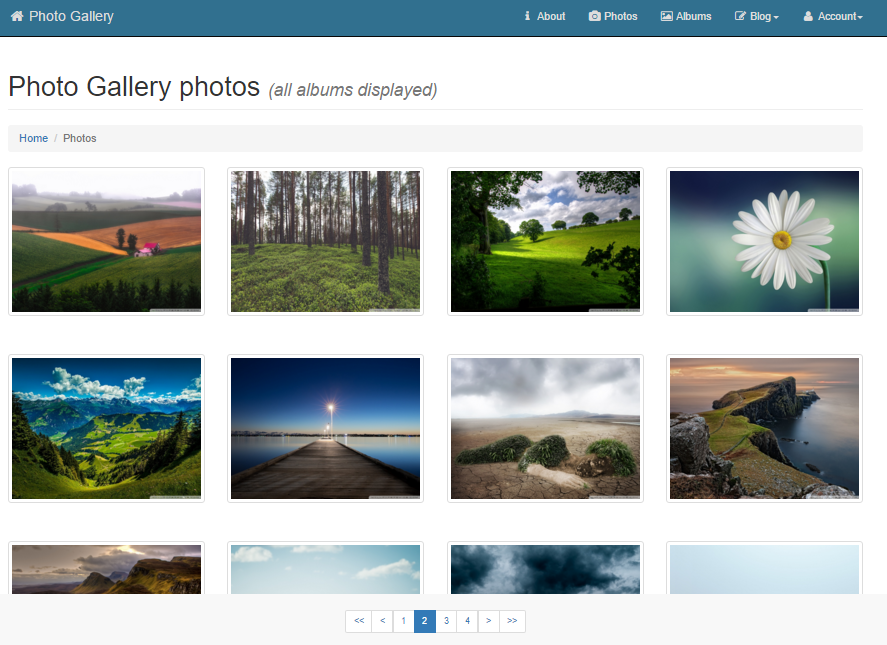
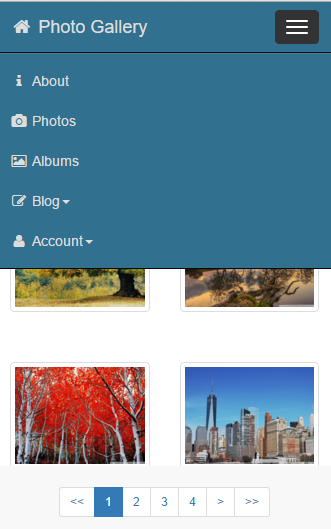
When user clicks the Photos tab the corresponding component is being rendered, displaying some photos to the user. Pagination is also supported.
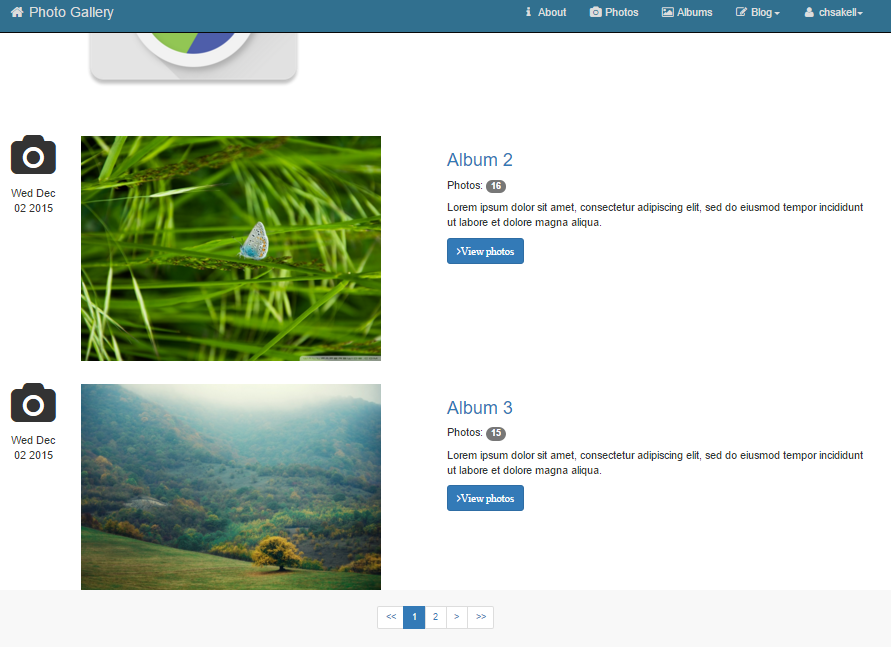
The Albums tab displays using pagination features the albums existing in the gallery. In order to view this component the user needs to be Authorized. This means that the user will be automatically redirected to the Login component if he hasn’t logged in yet.
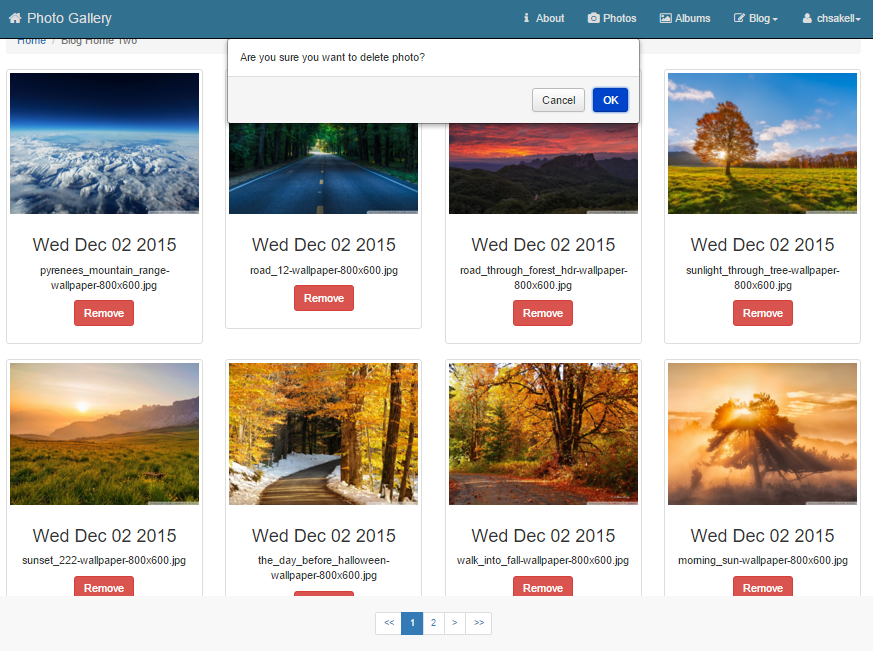
An authenticated user can click and display a specific albums’s photos where he can also remove any of them. Before removing a photo a confirmation popup message appears. More over, a notification service display success or error messages.
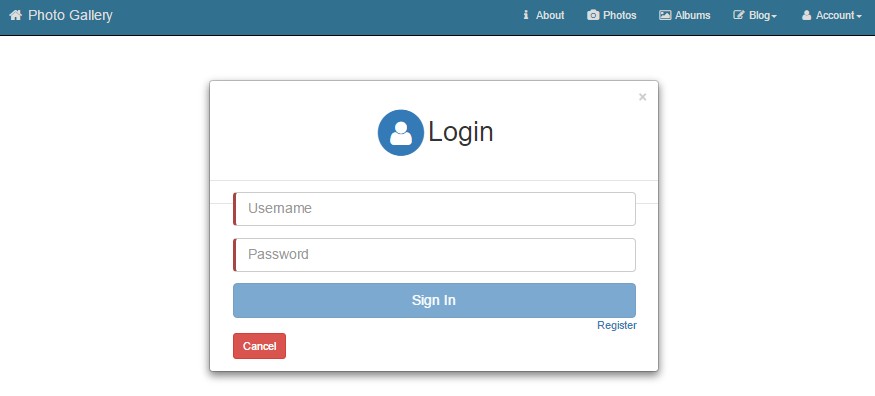
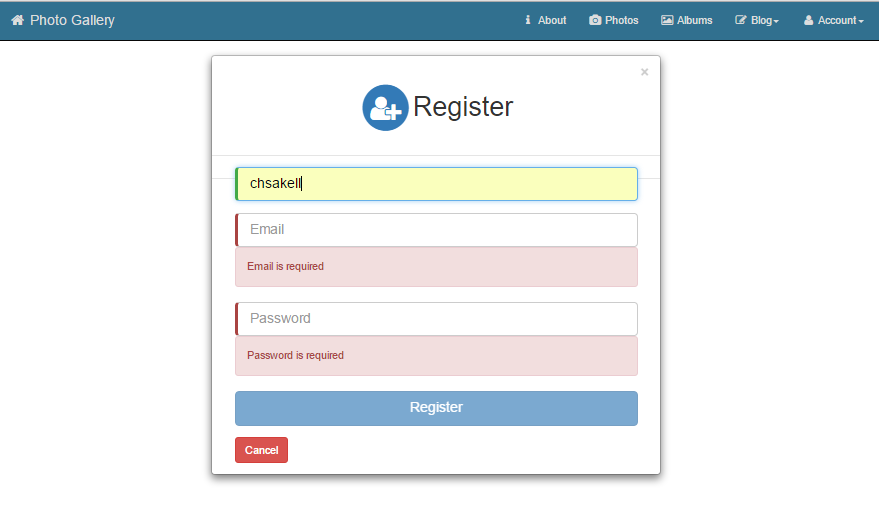
Sign in and Registration components are pretty much self-explanatory. Validation messages will inform the user for required fields.
All views should be rendered smoothly in all types of screens (desktops, tablets, mobiles..) giving the sense of a responsive application.
What are we going to use
The essence of post is the technologies, frameworks and tools we are going to use to build the PhotoGallery Single Page Application. It’s gonna be a pure modern web application built with the latest patterns and tools exist at the time this post is being written. Let’s view all of them in detail.
- ASP.NET Core 1.0: Microsoft’s redesigned, open source and cross-platform framework.
- Entity Framework Core: The latest version of the Entity Framework Object Relational Mapper.
- Angular 2: The famous AngularJS re-written and re-designed from scratch. Angular 2 is a development platform for building mobile and desktop applications
- TypeScript: A typed super-set of JavaScript that compiles to plain JavaScript. One of the best ways to write JavaScript applications.
- NPM: A Package Manager responsible to automate the installation and tracking of external packages.
- Bower: A Package Manager for the Web and as it’s official website says, optimized for the front-end.
- Gulp: A task runner that uses Node.js and works in a Streamline way.
- Integrated development environment (IDE): In this post we ‘ll use Visual Studio 2015 which you can download from here but you can also use Visual Studio Code which you can download from here. The latter is one way option for MAC and Linux users. At the end, the project should be able to run outside Visual Studio as well. In case you chose to install Visual Studio 2015, just make sure to specify that you want to include the Microsoft Web Developer Tools.
- ASP.NET Core 1.0. That’s the super promising, open-source and cross-platform Microsoft’s framework. Depending on which platform you want to start coding ASP.NET Core 1.0 applications, you need to follow the respective steps described here. Make sure to follow the exact instructions cause otherwise you may face unexpected errors. In my case I installed ASP.NET Core on a Windows 10 PRO computer. Started with the Visual Studio official MSI Installer…

And the NuGet Manager extension for Visual Studio..
If Microsoft releases a new version, I will always try to update the source-code. - NPM. We need to install NPM which is the Node.js Package Manager. Though Visual Studio 2015 has build in support for installing NPM or Bower packages, there are many times that it fails and then you need to run manually the command from a console. Installing node.js from here will also install NPM as well. Check it by typing the following command in a console.
npm -v
- Bower, Gulp, TypeScript, Typescript Definition Manager. Visual Studio can also run Gulp tasks right from its IDE but we supposed to make this app cross-platform available so make sure you install globally all the following by typing the commands on the console:
npm install -g bower
npm install -g gulp
npm install -g typescript
npm install -g tsd
npm install -g typings
- setup-vendors: Place all required external JavaScript, CSS, images and font files into the corresponding folder under lib.
- compile-typescript: Compiles all Typescript files under wwwroot/app folder and place the resulted ones into the respective folder under wwwroot/lib/spa/
- watch.ts: A listener to watch for Typescript file changes. If a change happens the run the compile-typescript task. This task will help you a lot during development.
- clean-lib: Deletes all the files under wwwroot/lib folder.
- build-spa: Runs the setup-vendors and compile-typescript tasks.
- AppComponent: The SPA’s root component. It acts as the root container component
- HomeComponent: The default component rendering when the application starts.
- PhotosComponent: The component responsible to display PhotoGallery photos. It supports pagination and is available to unauthenticated users.
- AlbumsComponent: The component responsible to display PhotoGallery albums. It requires authorization and supports pagination as well.
- AlbumPhotosComponent: Displays a specific album’s photos. User can remove photos from this album. Popup notifications are supported.
- AccountComponent: The root component related to membership. It has its own route configuration for navigating to LoginComponent or RegisterComponent components.
- LoginComponent: Displays a login template and allows users to authenticate themselves. After authentication redirect to home page.
- RegisterComponent: It holds the registration logic and template.
- Create and configure an ASP.NET Core 1.0 application to use MVC 6 services.
- Setup Entity Framework Core and dependency injection.
- Enable Entity Framework migrations.
- Resolve any dependency conflicts between different target frameworks.
- Setup an ASP.NET Core 1.0 application to start coding with Angular 2 and Typescript using NPM, Bower, Gulp.
- View in action several Angular 2 features such as Routing, nested routing, Components, HTTP requests.
- CRUD operations using Angular 2 and Typescript
- Form validation with Angular 2
The source code of the PhotoGallery app is available on GitHub and in case you haven't followed coding with me, you will also find detailed instructions to run it over there. You can submit your comments for this post on the comments area.

In case you find my blog’s content interesting, register your email to receive notifications of new posts and follow chsakell’s Blog on its Facebook or Twitter accounts.
Facebook Twitter .NET Web Application Development by Chris S. 

Categories: Angular, ASP.NET, asp.net core
-
This post assumes that you have at least a basic understanding of the last four pre-mentioned languages & tools (TypeScript, NPM, Bower and Gulp) but in case you don’t, that’s OK, this post will get you ready right away.
Prerequisites
In order to build modern and cross-platform Web Applications using the pre-mentioned tools, you need to prepare your development environment first. Let’s view them one by one.


Create and configure the application
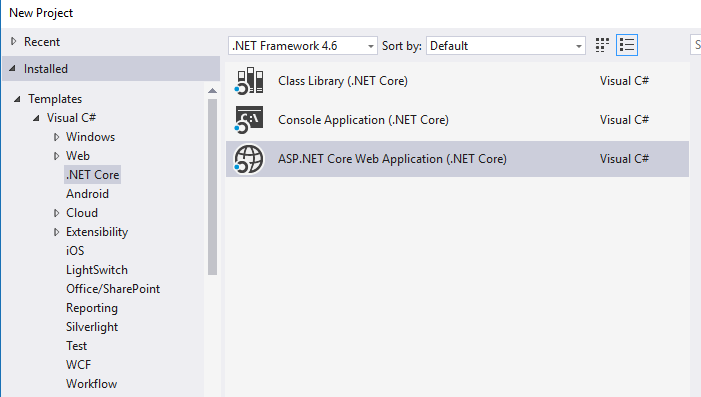
It is time to create the PhotoGallery Single Page Application which is going to be an ASP.NET MVC 6 application. In this section will create the solution and configure the ASP.NET Core 1.0 application to make use of the ASP.NET MVC 6 services. More over we will setup all the client tools (NPM/Bower packages, Gulp and Typescript) so we can start coding in both server and client side accordingly. In Visual Studio 2015 create an ASP.NET Core Web Application by selecting the Empty template.
Here is the default structure of an empty ASP.NET Core web application.
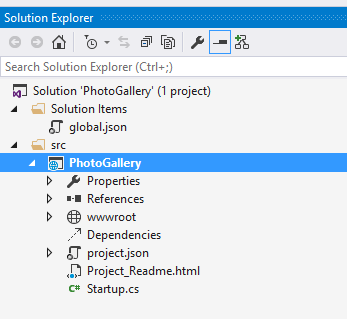
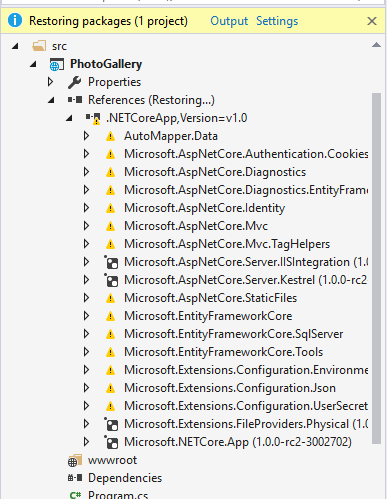
Feel free to remove the Project_Readme.html file. The project.json is a very important file where we declare what packages we want our application to use and what are the frameworks our application will target.
Alter the project.json file as follow and click save.
{
    "webroot": "wwwroot",
    "userSecretsId": "PhotoGallery",
    "version": "2.0.0-*",
    "buildOptions": {
        "emitEntryPoint": true,
        "preserveCompilationContext": true
    },

    "dependencies": {
        "AutoMapper.Data": "1.0.0-beta1",
        "Microsoft.AspNetCore.Authentication.Cookies": "1.0.0",
        "Microsoft.AspNetCore.Diagnostics": "1.0.0",
        "Microsoft.AspNetCore.Diagnostics.EntityFrameworkCore": "1.0.0",
        "Microsoft.AspNetCore.Identity": "1.0.0",
        "Microsoft.AspNetCore.Mvc": "1.0.0",
        "Microsoft.AspNetCore.Mvc.TagHelpers": "1.0.0",
        "Microsoft.AspNetCore.Server.IISIntegration": "1.0.0",
        "Microsoft.AspNetCore.Server.Kestrel": "1.0.0",
        "Microsoft.AspNetCore.StaticFiles": "1.0.0",
        "Microsoft.EntityFrameworkCore": "1.0.0",
        "Microsoft.EntityFrameworkCore.SqlServer": "1.0.0",
        "Microsoft.EntityFrameworkCore.Tools": {
            "version": "1.0.0-preview2-final",
            "type": "build"
        },
        "Microsoft.Extensions.Configuration.EnvironmentVariables": "1.0.0",
        "Microsoft.Extensions.Configuration.Json": "1.0.0",
        "Microsoft.Extensions.Configuration.UserSecrets": "1.0.0",
        "Microsoft.Extensions.FileProviders.Physical": "1.0.0",
        "Microsoft.NETCore.App": {
            "version": "1.0.0",
            "type": "platform"
        }
    },

    "tools": {
        "Microsoft.AspNetCore.Razor.Tools": {
            "version": "1.0.0-preview2-final",
            "imports": "portable-net45+win8+dnxcore50"
        },
        "Microsoft.AspNetCore.Server.IISIntegration.Tools": {
            "version": "1.0.0-preview2-final",
            "imports": "portable-net45+win8+dnxcore50"
        },
        "Microsoft.EntityFrameworkCore.Tools": {
            "version": "1.0.0-preview2-final",
            "imports": [
                "portable-net45+win8+dnxcore50",
                "portable-net45+win8"
            ]
        },
        "Microsoft.Extensions.SecretManager.Tools": {
            "version": "1.0.0-preview2-final",
            "imports": "portable-net45+win8+dnxcore50"
        },
        "Microsoft.VisualStudio.Web.CodeGeneration.Tools": {
            "version": "1.0.0-preview2-final",
            "imports": [
                "portable-net45+win8+dnxcore50",
                "portable-net45+win8"
            ]
        }
    },

    "frameworks": {
        "netcoreapp1.0": {
            "imports": [
                "dotnet5.6",
                "dnxcore50",
                "portable-net45+win8"
            ]
        }
    },

    "runtimeOptions": {
        "gcServer": true,
        "gcConcurrent": true
    },

    "publishOptions": {
        "include": [
            "wwwroot",
            "Views",
            "appsettings.json",
            "web.config"
        ],
        "exclude": [
            "node_modules"
        ]
    },

    "scripts": {
        "postpublish": [ "dotnet publish-iis --publish-folder %publish:OutputPath% --framework %publish:FullTargetFramework%" ]
    }
}
By the time you save the file, Visual Studio will try to restore all the packages.
If you were outside Visual Studio you would have to run the following command:
dotnet restore
..where dotnet comes from the .NET Core CLI which replaces the old DNX tooling. This means no more DNX, dnu or dnvm commands, only dotnet. Find more about their differences here. Let’s explain a little what we did in the project.json. First we declared some variables such as the webroot which we ‘ll read its value from the gulpfile.js later when we ‘ll declare some tasks. The userSecretsId is required in order to run Entity Framework Code First migrations related commands (acts as a unique ID for the application). Then we declared the dependencies or the packages if you prefer that our application needs. The first two of them are for hosting the app with or without IIS. The .Mvc related packages are required to add and use MVC services to the services container or in other words.. to use MVC 6 in our application. Then we declared the Entity Framework related packages in order to use EF 7 for data accessing. The Extensions packages will help us to easily access some .json files from the code. As you may have noticed we will make use of the Automapper package as well to map EF entities to the relative ViewModel objects. Last but not least is the Microsoft.AspNetCore.Authentication.Cookies which will ‘ll use in order to set Cookie based authentication. If i was to start my application outside IIS or Visual Studio, all I have to do is run the following command in the terminal.
dotnet run
Mind that you need to navigate to the root of your application folder (where the package.json exists) before running this command. We ‘ll use the EF command to run Entity Framework migration commands later on.
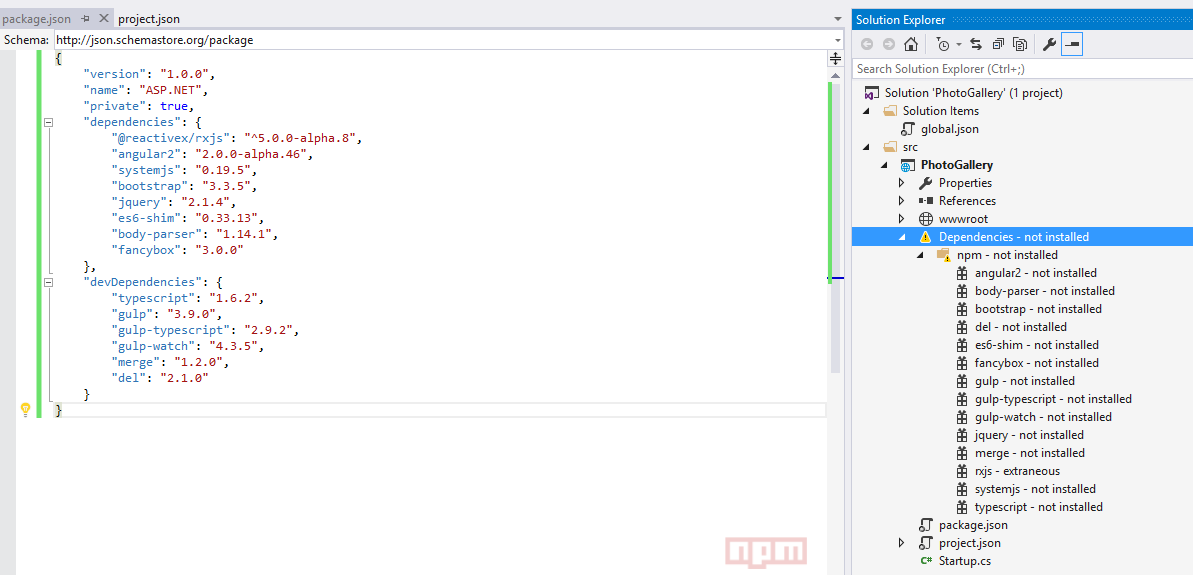
Let’s continue. Right click your application (not the solution) and add a new item of type NPM Configuration File. Leave its default name package.json. From now and on when I say application root i mean the src/PhotoGallery folder which is the actual root of the PhotoGallery application. Change the contents of the package.json as follow.
{
  "version": "1.0.0",
  "name": "ASP.NET",
  "private": true,
    "dependencies": {
        "@angular/common": "2.0.0",
        "@angular/compiler": "2.0.0",
        "@angular/core": "2.0.0",
        "@angular/forms": "2.0.0",
        "@angular/http": "2.0.0",
        "@angular/platform-browser": "2.0.0",
        "@angular/platform-browser-dynamic": "2.0.0",
        "@angular/router": "3.0.0",
        "@angular/upgrade": "2.0.0",

        "body-parser": "1.14.1",
        "bootstrap": "3.3.5",
        "es6-shim": "^0.35.0",
        "fancybox": "3.0.0",
        "jquery": "2.1.4",

        "core-js": "^2.4.1",
        "reflect-metadata": "^0.1.3",
        "rxjs": "5.0.0-beta.12",
        "systemjs": "0.19.27",
        "zone.js": "^0.6.23",
        "angular2-in-memory-web-api": "0.0.20"
    },
    "devDependencies": {
        "del": "2.1.0",
        "gulp": "3.9.0",
        "gulp-typescript": "^2.13.4",
        "gulp-watch": "4.3.5",
        "merge": "1.2.0",
        "typescript": "^2.0.2",
        "typings": "^1.3.3"
    },
  "scripts": {
    "postinstall": "typings install"
  }
}
By the time you save the file, Visual Studio will try to restore the NPM packakges into a node_modules folder. Unfortunately for some reason, it may fail to restore all packages.
All you have to do, is open the terminal, navigate at the application’s root folder and run the following command.
npm install
As soon as all packages have been restored, Visual Studio will also detect it and stop complaining (it may crash during package restoring but that’s OK..). As far as what packages we declared, it’s pretty obvious. We needed the required packages for Angular 2, some Gulp plugins to write our tasks and a few other ones such as fancybox or jQuery. Let’s configure the libraries we want to download via Bower. Right click the project and add a new item of type Bower Configuration File. Leave the default name bower.json. You will notice that under the bower.json file a .bowerrc file exists. Change it as follow in order to set the default folder when downloading packages via bower.
{
    "directory": "bower_components"
}
Set the bower.json contents as follow.
{
	"name": "ASP.NET",
	"private": true,
    "dependencies": {
        "bootstrap": "3.3.6",
        "components-font-awesome": "4.5.0",
        "alertify.js": "0.3.11"
    }
}
As soon as you save the file VS will try to restore the dependencies inside a bower_components folder. If it fails for the same reason as before, simple run the following command on the terminal.
bower install
Add the following typings.json file at the application’s root.
{
    "ambientDependencies": {
        "es6-shim": "registry:dt/es6-shim#0.31.2+20160317120654"
    },
    "globalDependencies": {
        "core-js": "registry:dt/core-js#0.0.0+20160725163759",
        "jasmine": "registry:dt/jasmine#2.2.0+20160621224255",
        "node": "registry:dt/node#6.0.0+20160909174046",
        "body-parser": "registry:dt/body-parser#0.0.0+20160317120654",
        "compression": "registry:dt/compression#0.0.0+20160501162003",
        "cookie-parser": "registry:dt/cookie-parser#1.3.4+20160316155526",
        "es6-shim": "registry:dt/es6-shim#0.31.2+20160317120654",
        "express": "registry:dt/express#4.0.0+20160317120654",
        "express-serve-static-core": "registry:dt/express-serve-static-core#0.0.0+20160322035842",
        "mime": "registry:dt/mime#0.0.0+20160316155526",
        "serve-static": "registry:dt/serve-static#0.0.0+20160317120654"
    }
}
Run the following command:
npm install typings
Now you can understand why it’s crucial to have those tools globally installed on our computer. Let’s finish this section by writing the gulp tasks. Right click your project and add a new item of type Gulp Configuration File. Leave its default name gulpfile.js and change its contents as follow.
var gulp = require('gulp'),
    ts = require('gulp-typescript'),
    merge = require('merge'),
    fs = require("fs"),
    del = require('del'),
    path = require('path');

eval("var project = " + fs.readFileSync("./project.json"));
var lib = "./" + project.webroot + "/lib/";

var paths = {
    npm: './node_modules/',
    tsSource: './wwwroot/app/**/*.ts',
    tsOutput: lib + 'spa/',
    tsDef: lib + 'definitions/',
    jsVendors: lib + 'js',
    jsRxJSVendors: lib + 'js/rxjs',
    cssVendors: lib + 'css',
    imgVendors: lib + 'img',
    fontsVendors: lib + 'fonts'
};


var tsProject = ts.createProject('./wwwroot/tsconfig.json');

gulp.task('setup-vendors', function (done) {
    gulp.src([
      'node_modules/jquery/dist/jquery.*js',
      'bower_components/bootstrap/dist/js/bootstrap*.js',
      'node_modules/fancybox/dist/js/jquery.fancybox.pack.js',
      'bower_components/alertify.js/lib/alertify.min.js',
      'systemjs.config.js'
    ]).pipe(gulp.dest(paths.jsVendors));

    gulp.src([
      'bower_components/bootstrap/dist/css/bootstrap.css',
      'node_modules/fancybox/dist/css/jquery.fancybox.css',
      'bower_components/components-font-awesome/css/font-awesome.css',
      'bower_components/alertify.js/themes/alertify.core.css',
      'bower_components/alertify.js/themes/alertify.bootstrap.css',
      'bower_components/alertify.js/themes/alertify.default.css'
    ]).pipe(gulp.dest(paths.cssVendors));

    gulp.src([
      'node_modules/fancybox/dist/img/blank.gif',
      'node_modules/fancybox/dist/img/fancybox_loading.gif',
      'node_modules/fancybox/dist/img/fancybox_loading@2x.gif',
      'node_modules/fancybox/dist/img/fancybox_overlay.png',
      'node_modules/fancybox/dist/img/fancybox_sprite.png',
      'node_modules/fancybox/dist/img/fancybox_sprite@2x.png'
    ]).pipe(gulp.dest(paths.imgVendors));

    gulp.src([
      'node_modules/bootstrap/fonts/glyphicons-halflings-regular.eot',
      'node_modules/bootstrap/fonts/glyphicons-halflings-regular.svg',
      'node_modules/bootstrap/fonts/glyphicons-halflings-regular.ttf',
      'node_modules/bootstrap/fonts/glyphicons-halflings-regular.woff',
      'node_modules/bootstrap/fonts/glyphicons-halflings-regular.woff2',
      'bower_components/components-font-awesome/fonts/FontAwesome.otf',
      'bower_components/components-font-awesome/fonts/fontawesome-webfont.eot',
      'bower_components/components-font-awesome/fonts/fontawesome-webfont.svg',
      'bower_components/components-font-awesome/fonts/fontawesome-webfont.ttf',
      'bower_components/components-font-awesome/fonts/fontawesome-webfont.woff',
      'bower_components/components-font-awesome/fonts/fontawesome-webfont.woff2',
    ]).pipe(gulp.dest(paths.fontsVendors));
});

gulp.task('compile-typescript', function (done) {
    var tsResult = gulp.src([
       "wwwroot/app/**/*.ts"
    ])
     .pipe(ts(tsProject), undefined, ts.reporter.fullReporter());
    return tsResult.js.pipe(gulp.dest(paths.tsOutput));
});

gulp.task('watch.ts', ['compile-typescript'], function () {
    return gulp.watch('wwwroot/app/**/*.ts', ['compile-typescript']);
});

gulp.task('watch', ['watch.ts']);

gulp.task('clean-lib', function () {
    return del([lib]);
});

gulp.task('build-spa', ['setup-vendors', 'compile-typescript']);
I know that it may seems large and difficult to understand but believe me it’s not. Before explaining the tasks we wrote I will show you the result of those tasks in solution level. This will make it easier to understand what those tasks are trying to accomplish.
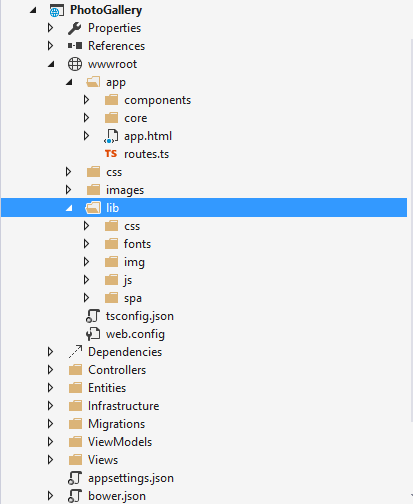
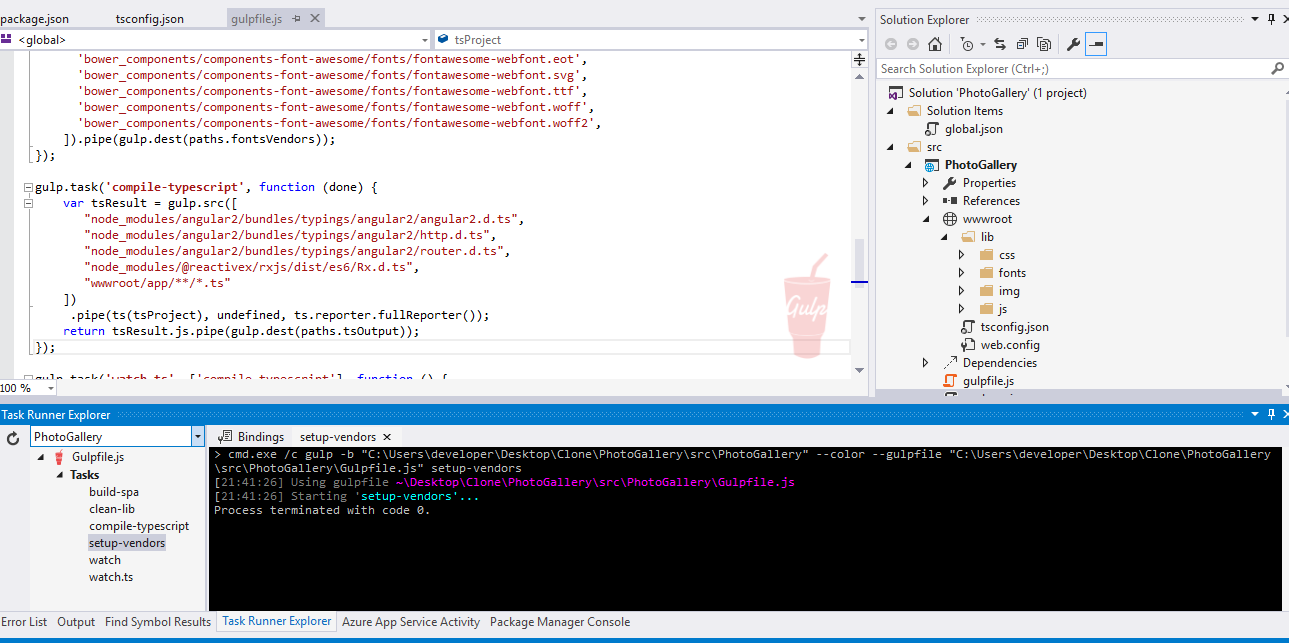
Pay attention at the wwwroot/lib folder. This folder is where the client-side dependency packages will end. The lib/css will hold files such as bootstrap.css, font-awsome.css and so on.. Similarly, the lib/js will hold all the JavaScript files we need to write Amgular 2 applications using TypeScript. You may wonder where exactly are we going to write the actual angular SPA? The spa will exist under the wwwroot/app folder with all the custom Typescript files. A specific task named compile-typescript will compile those files into pure JavaScript and place them in to the wwwroot/lib/spa. Let’s view the Gulp tasks:
It wasn’t that bad right? Now take a notice at the following line inside the gulpfile.js.
var tsProject = ts.createProject('./wwwroot/tsconfig.json');
In order to compile Typescript you need some Typescript specific compiler options. This is what the tsconfig.json file is for. Right click the wwwroot folder and create a new item of type Typescript JSON Configuration file. Leave the default name tsconfig.json and paste the following contents.
{
    "compilerOptions": {
        "emitDecoratorMetadata": true,
        "experimentalDecorators": true,
        "module": "commonjs",
        "moduleResolution": "node",
        "noEmitOnError": false,
        "noImplicitAny": false,
        "removeComments": false,
        "sourceMap": true,
        "target": "es5"
    },
    "exclude": [
        "node_modules/**/*.d.ts",
        "wwwroot",
        "typings/main",
        "typings/main.d.ts"
    ]
}
This configuration file not only will be used for compilation options but it will also be used from Visual Studio for intellisense related Typescript issues. Build the application and open the Task-runner window. Run the build-spa or the setup-vendors task. I know there are no Typescript files to compile but you can see the automatically created folders under wwwroot/lib with the files we defined. In case you have any troubles running the task, you can open a terminal and run the task as follow:
gulp setup-vendors
Entity Framework Core
The final goal of this section is to configure the services that our application will use, inside the Startup.cs file. At this point if you run the PhotoGallery application you will get a Hello World! message coming from the following code in the Startup class.
public void Configure(IApplicationBuilder app)
        {
            app.Run(async (context) =>
            {
                await context.Response.WriteAsync("Hello World!");
            });
        }
Let’s start by creating the Entities which will eventually be mapped to a database. Create a folder Entities at the root of the application and paste the following files/classes.
public interface IEntityBase
    {
        int Id { get; set; }
    }
public class Photo : IEntityBase
    {
        public int Id { get; set; }
        public string Title { get; set; }
        public string Uri { get; set; }
        public virtual Album Album { get; set; }
        public int AlbumId { get; set; }
        public DateTime DateUploaded { get; set; }
    }
public class Album : IEntityBase
    {
        public Album()
        {
            Photos = new List<Photo>();
        }
        public int Id { get; set; }
        public string Title { get; set; }

        public string Description { get; set; }
        public DateTime DateCreated { get; set; }
        public virtual ICollection<Photo> Photos { get; set; }
    }
public class Error : IEntityBase
    {
        public int Id { get; set; }
        public string Message { get; set; }
        public string StackTrace { get; set; }
        public DateTime DateCreated { get; set; }
    }
public class Role : IEntityBase
    {
        public int Id { get; set; }
        public string Name { get; set; }
    }
public class UserRole : IEntityBase
    {
        public int Id { get; set; }
        public int UserId { get; set; }
        public int RoleId { get; set; }
        public virtual Role Role { get; set; }
    }
public class User : IEntityBase
    {
        public User()
        {
            UserRoles = new List<UserRole>();
        }
        public int Id { get; set; }
        public string Username { get; set; }
        public string Email { get; set; }
        public string HashedPassword { get; set; }
        public string Salt { get; set; }
        public bool IsLocked { get; set; }
        public DateTime DateCreated { get; set; }

        public virtual ICollection<UserRole> UserRoles { get; set; }
    }
The schema we want to create is very simple. A Photo entity belongs to a single Album and an Album may have multiple Photo entities. A User may have multiple roles through many UserRole entities.

Let’s create the DbContext class that will allow us to access entities from the database. Create a folder named Infrastructure under the root of the application and add the following PhotoGalleryContext class.
public class PhotoGalleryContext : DbContext
    {
        public DbSet<Photo> Photos { get; set; }
        public DbSet<Album> Albums { get; set; }
        public DbSet<User> Users { get; set; }
        public DbSet<Role> Roles { get; set; }
        public DbSet<UserRole> UserRoles { get; set; }
        public DbSet<Error> Errors { get; set; }

        public PhotoGalleryContext(DbContextOptions options) : base(options)
        {
        }

        protected override void OnModelCreating(ModelBuilder modelBuilder)
        {
            foreach (var entity in modelBuilder.Model.GetEntityTypes())
            {
                entity.Relational().TableName = entity.DisplayName();
            }

            // Photos
            modelBuilder.Entity<Photo>().Property(p => p.Title).HasMaxLength(100);
            modelBuilder.Entity<Photo>().Property(p => p.AlbumId).IsRequired();

            // Album
            modelBuilder.Entity<Album>().Property(a => a.Title).HasMaxLength(100);
            modelBuilder.Entity<Album>().Property(a => a.Description).HasMaxLength(500);
            modelBuilder.Entity<Album>().HasMany(a => a.Photos).WithOne(p => p.Album);

            // User
            modelBuilder.Entity<User>().Property(u => u.Username).IsRequired().HasMaxLength(100);
            modelBuilder.Entity<User>().Property(u => u.Email).IsRequired().HasMaxLength(200);
            modelBuilder.Entity<User>().Property(u => u.HashedPassword).IsRequired().HasMaxLength(200);
            modelBuilder.Entity<User>().Property(u => u.Salt).IsRequired().HasMaxLength(200);

            // UserRole
            modelBuilder.Entity<UserRole>().Property(ur => ur.UserId).IsRequired();
            modelBuilder.Entity<UserRole>().Property(ur => ur.RoleId).IsRequired();

            // Role
            modelBuilder.Entity<Role>().Property(r => r.Name).IsRequired().HasMaxLength(50);
        }
    }
You should be able to resolve all the required namespaces because we have already installed the required packages. We ‘ll proceed with the data repositories and a membership service as well. Add a folder named Repositories with a subfolder named Abstract under Infrastructure. Add the following to files/classes.
public interface IEntityBaseRepository<T> where T : class, IEntityBase, new()
    {
        IEnumerable<T> AllIncluding(params Expression<Func<T, object>>[] includeProperties);
        Task<IEnumerable<T>> AllIncludingAsync(params Expression<Func<T, object>>[] includeProperties);
        IEnumerable<T> GetAll();
        Task<IEnumerable<T>> GetAllAsync();
        T GetSingle(int id);
        T GetSingle(Expression<Func<T, bool>> predicate);
        T GetSingle(Expression<Func<T, bool>> predicate, params Expression<Func<T, object>>[] includeProperties);
        Task<T> GetSingleAsync(int id);
        IEnumerable<T> FindBy(Expression<Func<T, bool>> predicate);
        Task<IEnumerable<T>> FindByAsync(Expression<Func<T, bool>> predicate);
        void Add(T entity);
        void Delete(T entity);
        void Edit(T entity);
        void Commit();
    }
Notice that I have added some operations with includeProperties parameters. I did this cause Entity Framework Core doesn’t support lazy loading by default and I’ m not even sure if it will in the future. With that kind of operations you can load any navigation properties you wish. For example if you want to load all the photos in an album you can write something like this.
Album _album = _albumRepository.GetSingle(a => a.Id == id, a => a.Photos);
Here we used the following operation.
T GetSingle(Expression<Func<T, bool>> predicate, params Expression<Func<T, object>>[] includeProperties);
..passing as includeProperties the Photos collection of the album.
public interface IAlbumRepository : IEntityBaseRepository<Album> { }

    public interface ILoggingRepository : IEntityBaseRepository<Error> { }

    public interface IPhotoRepository : IEntityBaseRepository<Photo> { }

    public interface IRoleRepository : IEntityBaseRepository<Role> { }

    public interface IUserRepository : IEntityBaseRepository<User>
    {
        User GetSingleByUsername(string username);
        IEnumerable<Role> GetUserRoles(string username);
    }

    public interface IUserRoleRepository : IEntityBaseRepository<UserRole> { }
Add the implementations of those interfaces under the Infrastructure/Repositories folder.
public class EntityBaseRepository<T> : IEntityBaseRepository<T>
            where T : class, IEntityBase, new()
    {

        private PhotoGalleryContext _context;

        #region Properties
        public EntityBaseRepository(PhotoGalleryContext context)
        {
            _context = context;
        }
        #endregion
        public virtual IEnumerable<T> GetAll()
        {
            return _context.Set<T>().AsEnumerable();
        }

        public virtual async Task<IEnumerable<T>> GetAllAsync()
        {
            return await _context.Set<T>().ToListAsync();
        }
        public virtual IEnumerable<T> AllIncluding(params Expression<Func<T, object>>[] includeProperties)
        {
            IQueryable<T> query = _context.Set<T>();
            foreach (var includeProperty in includeProperties)
            {
                query = query.Include(includeProperty);
            }
            return query.AsEnumerable();
        }

        public virtual async Task<IEnumerable<T>> AllIncludingAsync(params Expression<Func<T, object>>[] includeProperties)
        {
            IQueryable<T> query = _context.Set<T>();
            foreach (var includeProperty in includeProperties)
            {
                query = query.Include(includeProperty);
            }
            return await query.ToListAsync();
        }
        public T GetSingle(int id)
        {
            return _context.Set<T>().FirstOrDefault(x => x.Id == id);
        }

        public T GetSingle(Expression<Func<T, bool>> predicate)
        {
            return _context.Set<T>().FirstOrDefault(predicate);
        }

        public T GetSingle(Expression<Func<T, bool>> predicate, params Expression<Func<T, object>>[] includeProperties)
        {
            IQueryable<T> query = _context.Set<T>();
            foreach (var includeProperty in includeProperties)
            {
                query = query.Include(includeProperty);
            }

            return query.Where(predicate).FirstOrDefault();
        }

        public async Task<T> GetSingleAsync(int id)
        {
            return await _context.Set<T>().FirstOrDefaultAsync(e => e.Id == id);
        }
        public virtual IEnumerable<T> FindBy(Expression<Func<T, bool>> predicate)
        {
            return _context.Set<T>().Where(predicate);
        }

        public virtual async Task<IEnumerable<T>> FindByAsync(Expression<Func<T, bool>> predicate)
        {
            return await _context.Set<T>().Where(predicate).ToListAsync();
        }

        public virtual void Add(T entity)
        {
            EntityEntry dbEntityEntry = _context.Entry<T>(entity);
            _context.Set<T>().Add(entity);
        }

        public virtual void Edit(T entity)
        {
            EntityEntry dbEntityEntry = _context.Entry<T>(entity);
            dbEntityEntry.State = EntityState.Modified;
        }
        public virtual void Delete(T entity)
        {
            EntityEntry dbEntityEntry = _context.Entry<T>(entity);
            dbEntityEntry.State = EntityState.Deleted;
        }

        public virtual void Commit()
        {
            _context.SaveChanges();
        }
    }
public class PhotoRepository : EntityBaseRepository<Photo>, IPhotoRepository
    {
        public PhotoRepository(PhotoGalleryContext context)
            : base(context)
        { }
    }
public class AlbumRepository : EntityBaseRepository<Album>, IAlbumRepository
    {
        public AlbumRepository(PhotoGalleryContext context)
            : base(context)
        { }
    }
public class LoggingRepository : EntityBaseRepository<Error>, ILoggingRepository
    {
        public LoggingRepository(PhotoGalleryContext context)
            : base(context)
        { }

        public override void Commit()
        {
            try
            {
                base.Commit();
            }
            catch { }
        }
    }
Notice that we don’t want to get an exception when logging errors..
public class RoleRepository : EntityBaseRepository<Role>, IRoleRepository
    {
        public RoleRepository(PhotoGalleryContext context)
            : base(context)
        { }
    }
public class UserRoleRepository : EntityBaseRepository<UserRole>, IUserRoleRepository
    {
        public UserRoleRepository(PhotoGalleryContext context)
            : base(context)
        { }
    }
public class UserRepository : EntityBaseRepository<User>, IUserRepository
    {
        IRoleRepository _roleReposistory;
        public UserRepository(PhotoGalleryContext context, IRoleRepository roleReposistory)
            : base(context)
        {
            _roleReposistory = roleReposistory;
        }

        public User GetSingleByUsername(string username)
        {
            return this.GetSingle(x => x.Username == username);
        }

        public IEnumerable<Role> GetUserRoles(string username)
        {
            List<Role> _roles = null;

            User _user = this.GetSingle(u => u.Username == username, u => u.UserRoles);
            if(_user != null)
            {
                _roles = new List<Role>();
                foreach (var _userRole in _user.UserRoles)
                    _roles.Add(_roleReposistory.GetSingle(_userRole.RoleId));
            }

            return _roles;
        }
    }
There are so many ways to implement data repositories that I won’t even discuss. We have seen much better and scalable implementations many times on this blog but that’s more than enough for this application. Let’s create now the two services required for membership purposes. Add a folder named Services under Infrastructure and create a subfolder named Abstact with the following interfaces.
public interface IEncryptionService
    {
        /// <summary>
        /// Creates a random salt
        /// </summary>
        /// <returns></returns>
        string CreateSalt();
        /// <summary>
        /// Generates a Hashed password
        /// </summary>
        /// <param name="password"></param>
        /// <param name="salt"></param>
        /// <returns></returns>
        string EncryptPassword(string password, string salt);
    }
public interface IMembershipService
    {
        MembershipContext ValidateUser(string username, string password);
        User CreateUser(string username, string email, string password, int[] roles);
        User GetUser(int userId);
        List<Role> GetUserRoles(string username);
    }
Add their implementations under Infrastructure/Services folder.
public class EncryptionService : IEncryptionService
    {
        public string CreateSalt()
        {
            var data = new byte[0x10];

            var cryptoServiceProvider = System.Security.Cryptography.RandomNumberGenerator.Create();
            cryptoServiceProvider.GetBytes(data);
            return Convert.ToBase64String(data);
        }

        public string EncryptPassword(string password, string salt)
        {
            using (var sha256 = SHA256.Create())
            {
                var saltedPassword = string.Format("{0}{1}", salt, password);
                byte[] saltedPasswordAsBytes = Encoding.UTF8.GetBytes(saltedPassword);
                return Convert.ToBase64String(sha256.ComputeHash(saltedPasswordAsBytes));
            }
        }
    }
public class MembershipService : IMembershipService
    {
        #region Variables
        private readonly IUserRepository _userRepository;
        private readonly IRoleRepository _roleRepository;
        private readonly IUserRoleRepository _userRoleRepository;
        private readonly IEncryptionService _encryptionService;
        #endregion
        public MembershipService(IUserRepository userRepository, IRoleRepository roleRepository,
        IUserRoleRepository userRoleRepository, IEncryptionService encryptionService)
        {
            _userRepository = userRepository;
            _roleRepository = roleRepository;
            _userRoleRepository = userRoleRepository;
            _encryptionService = encryptionService;
        }

        #region IMembershipService Implementation

        public MembershipContext ValidateUser(string username, string password)
        {
            var membershipCtx = new MembershipContext();

            var user = _userRepository.GetSingleByUsername(username);
            if (user != null && isUserValid(user, password))
            {
                var userRoles = GetUserRoles(user.Username);
                membershipCtx.User = user;

                var identity = new GenericIdentity(user.Username);
                membershipCtx.Principal = new GenericPrincipal(
                    identity,
                    userRoles.Select(x => x.Name).ToArray());
            }

            return membershipCtx;
        }
        public User CreateUser(string username, string email, string password, int[] roles)
        {
            var existingUser = _userRepository.GetSingleByUsername(username);

            if (existingUser != null)
            {
                throw new Exception("Username is already in use");
            }

            var passwordSalt = _encryptionService.CreateSalt();

            var user = new User()
            {
                Username = username,
                Salt = passwordSalt,
                Email = email,
                IsLocked = false,
                HashedPassword = _encryptionService.EncryptPassword(password, passwordSalt),
                DateCreated = DateTime.Now
            };

            _userRepository.Add(user);

            _userRepository.Commit();

            if (roles != null || roles.Length > 0)
            {
                foreach (var role in roles)
                {
                    addUserToRole(user, role);
                }
            }

            _userRepository.Commit();

            return user;
        }

        public User GetUser(int userId)
        {
            return _userRepository.GetSingle(userId);
        }

        public List<Role> GetUserRoles(string username)
        {
            List<Role> _result = new List<Role>();

            var existingUser = _userRepository.GetSingleByUsername(username);

            if (existingUser != null)
            {
                foreach (var userRole in existingUser.UserRoles)
                {
                    _result.Add(userRole.Role);
                }
            }

            return _result.Distinct().ToList();
        }
        #endregion

        #region Helper methods
        private void addUserToRole(User user, int roleId)
        {
            var role = _roleRepository.GetSingle(roleId);
            if (role == null)
                throw new Exception("Role doesn't exist.");

            var userRole = new UserRole()
            {
                RoleId = role.Id,
                UserId = user.Id
            };
            _userRoleRepository.Add(userRole);

            _userRepository.Commit();
        }

        private bool isPasswordValid(User user, string password)
        {
            return string.Equals(_encryptionService.EncryptPassword(password, user.Salt), user.HashedPassword);
        }

        private bool isUserValid(User user, string password)
        {
            if (isPasswordValid(user, password))
            {
                return !user.IsLocked;
            }

            return false;
        }
        #endregion
    }
Data repositories will automatically be injected into MembershipService instances. This will be configured in the Startup services later on. And of course we need the MembershipContext which holds the IPrincipal information for the current user. Add the class inside a new folder named Core under Infrastructure.
public class MembershipContext
    {
        public IPrincipal Principal { get; set; }
        public User User { get; set; }
        public bool IsValid()
        {
            return Principal != null;
        }
    }
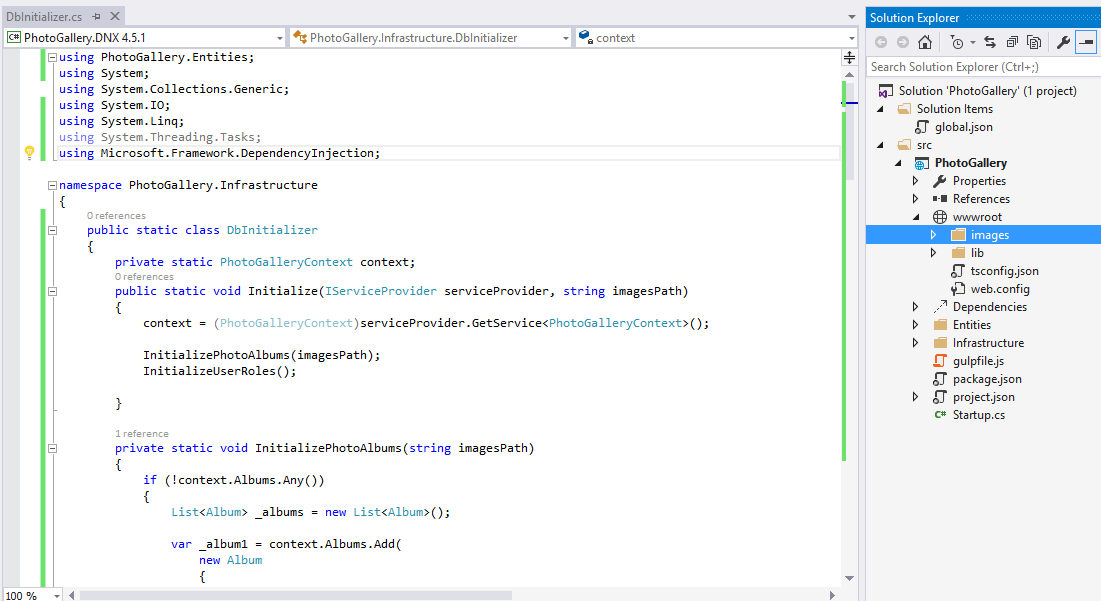
One last thing remained to do before configuring the services is to create a Database Initializer class to run the first time you run the application. The initializer will store some photos, create an admin role and a default user (username: chsakell, password: photogallery). Of course when we finish the app you can register your own users as well. Add the DbInitializer under the Infrastructure folder.
public static class DbInitializer
    {
        private static PhotoGalleryContext context;
        public static void Initialize(IServiceProvider serviceProvider, string imagesPath)
        {
            context = (PhotoGalleryContext)serviceProvider.GetService(typeof(PhotoGalleryContext));

            InitializePhotoAlbums(imagesPath);
            InitializeUserRoles();

        }

        private static void InitializePhotoAlbums(string imagesPath)
        {
            if (!context.Albums.Any())
            {
                List<Album> _albums = new List<Album>();

                var _album1 = context.Albums.Add(
                    new Album
                    {
                        DateCreated = DateTime.Now,
                        Title = "Album 1",
                        Description = "Lorem ipsum dolor sit amet, consectetur adipiscing elit, sed do eiusmod tempor incididunt ut labore et dolore magna aliqua."
                    }).Entity;
                var _album2 = context.Albums.Add(
                    new Album
                    {
                        DateCreated = DateTime.Now,
                        Title = "Album 2",
                        Description = "Lorem ipsum dolor sit amet, consectetur adipiscing elit, sed do eiusmod tempor incididunt ut labore et dolore magna aliqua."
                    }).Entity;
                var _album3 = context.Albums.Add(
                    new Album
                    {
                        DateCreated = DateTime.Now,
                        Title = "Album 3",
                        Description = "Lorem ipsum dolor sit amet, consectetur adipiscing elit, sed do eiusmod tempor incididunt ut labore et dolore magna aliqua."
                    }).Entity;
                var _album4 = context.Albums.Add(
                    new Album
                    {
                        DateCreated = DateTime.Now,
                        Title = "Album 4",
                        Description = "Lorem ipsum dolor sit amet, consectetur adipiscing elit, sed do eiusmod tempor incididunt ut labore et dolore magna aliqua."
                    }).Entity;

                _albums.Add(_album1); _albums.Add(_album2); _albums.Add(_album3); _albums.Add(_album4);

                string[] _images = Directory.GetFiles(Path.Combine(imagesPath, "images"));
                Random rnd = new Random();

                foreach (string _image in _images)
                {
                    int _selectedAlbum = rnd.Next(1, 4);
                    string _fileName = Path.GetFileName(_image);

                    context.Photos.Add(
                        new Photo()
                        {
                            Title = _fileName,
                            DateUploaded = DateTime.Now,
                            Uri = _fileName,
                            Album = _albums.ElementAt(_selectedAlbum)
                        }
                        );
                }

                context.SaveChanges();
            }
        }

        private static void InitializeUserRoles()
        {
            if (!context.Roles.Any())
            {
                // create roles
                context.Roles.AddRange(new Role[]
                {
                new Role()
                {
                    Name="Admin"
                }
                });

                context.SaveChanges();
            }

            if (!context.Users.Any())
            {
                context.Users.Add(new User()
                {
                    Email = "chsakells.blog@gmail.com",
                    Username = "chsakell",
                    HashedPassword = "9wsmLgYM5Gu4zA/BSpxK2GIBEWzqMPKs8wl2WDBzH/4=",
                    Salt = "GTtKxJA6xJuj3ifJtTXn9Q==",
                    IsLocked = false,
                    DateCreated = DateTime.Now
                });

                // create user-admin for chsakell
                context.UserRoles.AddRange(new UserRole[] {
                new UserRole() {
                    RoleId = 1, // admin
                    UserId = 1  // chsakell
                }
            });
                context.SaveChanges();
            }
        }
    }
The photos will be initialized from a folder wwwroot/images where I have already stored some images. This means that you need to add an images folder under wwwroot and add some images. You can find the images I placed here. I recommend you to copy-paste at least the thumbnail-default.png and the aspnet5-agnular2-03.png images cause the are used directly from the app.
Now let’s switch and change the Startup class as follow:
using System;
using System.Collections.Generic;
using System.Linq;
using System.Threading.Tasks;
using Microsoft.AspNetCore.Builder;
using Microsoft.AspNetCore.Hosting;
using Microsoft.AspNetCore.Http;
using Microsoft.Extensions.DependencyInjection;
using Microsoft.Extensions.PlatformAbstractions;
using Microsoft.Extensions.Configuration;
using PhotoGallery.Infrastructure;
using Microsoft.EntityFrameworkCore;
using PhotoGallery.Infrastructure.Repositories;
using PhotoGallery.Infrastructure.Services;
using PhotoGallery.Infrastructure.Mappings;
using PhotoGallery.Infrastructure.Core;
using System.Security.Claims;
using Microsoft.AspNetCore.StaticFiles;
using System.IO;
using Microsoft.Extensions.FileProviders;
using Newtonsoft.Json.Serialization;

namespace PhotoGallery
{
    public class Startup
    {
        private static string _applicationPath = string.Empty;
        private static string _contentRootPath = string.Empty;
        public Startup(IHostingEnvironment env)
        {
            _applicationPath = env.WebRootPath;
            _contentRootPath = env.ContentRootPath;
            // Setup configuration sources.

            var builder = new ConfigurationBuilder()
                .SetBasePath(_contentRootPath)
                .AddJsonFile("appsettings.json")
                .AddJsonFile($"appsettings.{env.EnvironmentName}.json", optional: true);

            if (env.IsDevelopment())
            {
                // This reads the configuration keys from the secret store.
                // For more details on using the user secret store see http://go.microsoft.com/fwlink/?LinkID=532709
                builder.AddUserSecrets();
            }
            builder.AddEnvironmentVariables();
            Configuration = builder.Build();
        }

        public IConfigurationRoot Configuration { get; set; }
        // This method gets called by the runtime. Use this method to add services to the container.
        // For more information on how to configure your application, visit http://go.microsoft.com/fwlink/?LinkID=398940
        public void ConfigureServices(IServiceCollection services)
        {
            services.AddDbContext<PhotoGalleryContext>(options =>
                options.UseSqlServer(Configuration["Data:PhotoGalleryConnection:ConnectionString"]));


            // Repositories
            services.AddScoped<IPhotoRepository, PhotoRepository>();
            services.AddScoped<IAlbumRepository, AlbumRepository>();
            services.AddScoped<IUserRepository, UserRepository>();
            services.AddScoped<IUserRoleRepository, UserRoleRepository>();
            services.AddScoped<IRoleRepository, RoleRepository>();
            services.AddScoped<ILoggingRepository, LoggingRepository>();

            // Services
            services.AddScoped<IMembershipService, MembershipService>();
            services.AddScoped<IEncryptionService, EncryptionService>();

            services.AddAuthentication();

            // Polices
            services.AddAuthorization(options =>
            {
                // inline policies
                options.AddPolicy("AdminOnly", policy =>
                {
                    policy.RequireClaim(ClaimTypes.Role, "Admin");
                });

            });

            // Add MVC services to the services container.
            services.AddMvc()
            .AddJsonOptions(opt =>
            {
                var resolver = opt.SerializerSettings.ContractResolver;
                if (resolver != null)
                {
                    var res = resolver as DefaultContractResolver;
                    res.NamingStrategy = null;
                }
            });
        }

        // This method gets called by the runtime. Use this method to configure the HTTP request pipeline.
        public void Configure(IApplicationBuilder app, IHostingEnvironment env)
        {
            // this will serve up wwwroot
            app.UseFileServer();

            // this will serve up node_modules
            var provider = new PhysicalFileProvider(
                Path.Combine(_contentRootPath, "node_modules")
            );
            var _fileServerOptions = new FileServerOptions();
            _fileServerOptions.RequestPath = "/node_modules";
            _fileServerOptions.StaticFileOptions.FileProvider = provider;
            _fileServerOptions.EnableDirectoryBrowsing = true;
            app.UseFileServer(_fileServerOptions);

            AutoMapperConfiguration.Configure();

            app.UseCookieAuthentication(new CookieAuthenticationOptions
            {
                AutomaticAuthenticate = true,
                AutomaticChallenge = true
            });

            // Custom authentication middleware
            //app.UseMiddleware<AuthMiddleware>();

            // Add MVC to the request pipeline.
            app.UseMvc(routes =>
            {
                routes.MapRoute(
                    name: "default",
                    template: "{controller=Home}/{action=Index}/{id?}");

                // Uncomment the following line to add a route for porting Web API 2 controllers.
                //routes.MapWebApiRoute("DefaultApi", "api/{controller}/{id?}");
            });

            DbInitializer.Initialize(app.ApplicationServices, _applicationPath);
        }

        // Entry point for the application.
        public static void Main(string[] args)
        {
            var host = new WebHostBuilder()
              .UseKestrel()
              .UseContentRoot(Directory.GetCurrentDirectory())
              .UseIISIntegration()
              .UseStartup<Startup>()
              .Build();

            host.Run();
        }
    }
}
Lots of stuff here so let’s explain from the top to bottom. The constructor simply sets the base path for discover files for file-based providers. Then sets an appsettings.json file to this configuration which means that we can read this file through a instance of IConfigurationRoot. The question is what do we want the appsettings.json for? Well.. we want it to store the connection string over there (Say good riddance to Web.config..). Add an appsettings.json JSON file under the root of PhotoGallery application and paste the following code.
{
  "Data": {
    "PhotoGalleryConnection": {
      "ConnectionString": "Server=(localdb)\\v11.0;Database=PhotoGallery;Trusted_Connection=True;MultipleActiveResultSets=true"
    }
  }
}
Alter the connection string to reflect your database environment. Moving on, the ConfigureServices function adds the services we want to the container. Firstly, we add Entity Framework services by configuring the connection string for the PhotoGalleryContext DbContext. Notice how we read the appsettings.json file to capture the connection string value. Then we registered all the data repositories and services we created before to be available through dependency injection. That’s a new feature in ASP.NET 5 and it’s highly welcomed. We added Authentication and Authorization services as well by registering a new Policy. The Policy is a new authorization feature in ASP.NET Core 1.0 where you can declare requirements that must be met for authorizing a request. In our case we created a new policy named AdminOnly by declaring that this policy requires that the user making the request must be assigned to role Admin. If you think about it this is quite convenient. Before ASP.NET Core 1.0, if you wanted to authorized certain roles you would have to write something like this.
[Authorize(Roles="Admin, OtherRole, AnotherRole")]
public class AdminController : Controller
{
   // . . .
}
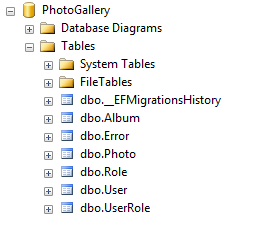
Now you can create a Policy where you can declare that if one of those roles are assigned then the request is marked as authorized. Last but not least, we added the MVC services to the container. The Configure method is much simpler, we declared that we can serve static files, we added Cookie based authentication to the pipeline and of course we defined a default MVC route. At the end, we called the database initializer we wrote to bootstrap some data when the application fires for the first time. I have left an AutoMapperConfiguration.Configure() call commented out but we ‘ll un-commented it when the time comes. At this point we can run some Entity Framework commands and initialize the database. In order to enable migrations open a terminal at the root of the application where the project.json leaves and run the command:
dotnet ef migrations add initial
This command will enable migrations and create the first one as well.
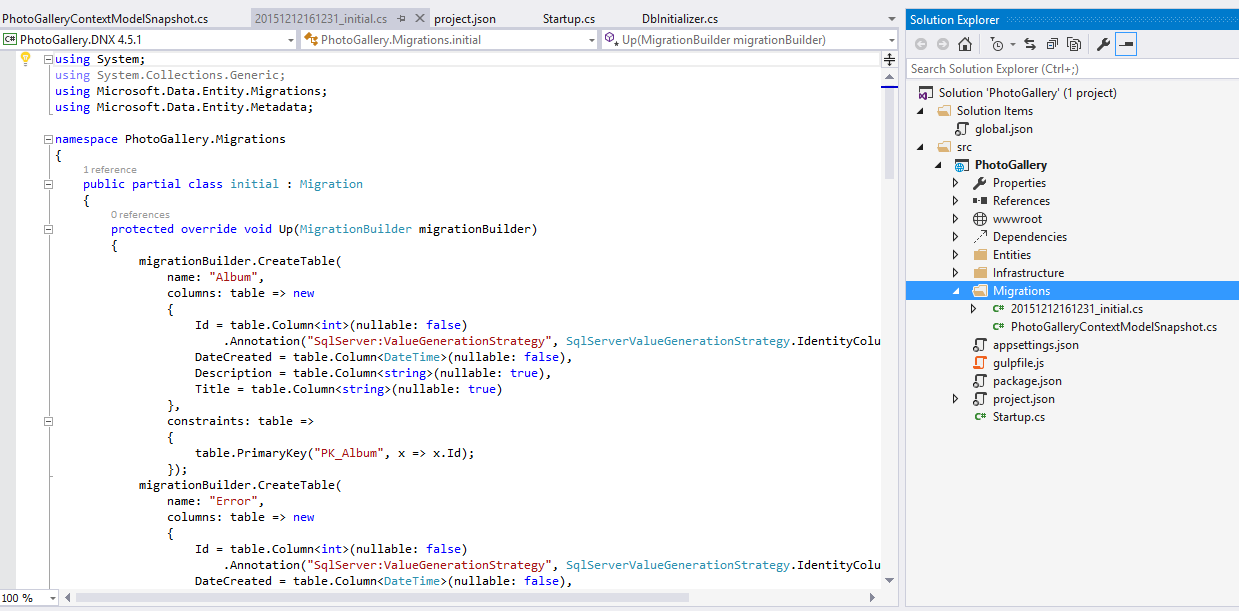
In case you run the command through VS package manager console, make sure to navigate to src/PhotoGallery path first by typing cd path_to_src_PhotoGallery.
In order to update and sync the database with the model run the following command:
dotnet ef database update
Single Page Application
This section is where all the fun happen, where ASP.NET MVC 6, Angular 2 and Typescript will fit together. Since this is an MVC 6 application it makes sense to start with HomeController MVC controller class, so go ahead and add it under a Controllers folder at the root of PhotoGallery.
public class HomeController : Controller
    {
        // GET: /<controller>/
        public IActionResult Index()
        {
            return View();
        }
    }
We have to manually create the Index.cshtml view but first let’s create a common layout page. Add a Views folder at the root and add a new item of type MVC View Start Page in it. Leave the default name _ViewStart.cshtml.
@{
    Layout = "_Layout";
}
Add a folder named Shared inside the Views folder and create a new item of type MVC View Layout Page named _Layout.cshtml. This is an important item in our application cause this page can act as the entry point for multiple SPAs in our application, in case we decided to scale it.
<!DOCTYPE html>

<html>
<head>
    <meta charset="utf-8">
    <meta http-equiv="X-UA-Compatible" content="IE=edge">
    <meta name="viewport" content="width=device-width, initial-scale=1">
    <title>@ViewBag.Title</title>
    @*<base href="/">*@

    <link href="~/lib/css/bootstrap.css" rel="stylesheet" />
    <link href="~/lib/css/font-awesome.css" rel="stylesheet" />
    @RenderSection("styles", required: false)

    @*Solve IE 11 issues *@
    @*<script src="https://cdnjs.cloudflare.com/ajax/libs/es6-shim/0.33.3/es6-shim.min.js"></script>
    <script src="https://cdnjs.cloudflare.com/ajax/libs/systemjs/0.19.20/system-polyfills.js"></script>
    <script src="https://npmcdn.com/angular2/es6/dev/src/testing/shims_for_IE.js"></script>*@

    <!-- 1. Load libraries -->
    <!-- Polyfill(s) for older browsers -->
    <script src="node_modules/core-js/client/shim.min.js"></script>
    <script src="node_modules/zone.js/dist/zone.js"></script>
    <script src="node_modules/reflect-metadata/Reflect.js"></script>
    <script src="node_modules/systemjs/dist/system.src.js"></script>

    <!-- 2. Configure SystemJS -->
    <script src="~/lib/js/systemjs.config.js"></script>

    <script src="~/lib/js/jquery.js"></script>
    <script src="~/lib/js/bootstrap.js"></script>
</head>
<body>
    <div>
        @RenderBody()
    </div>

    @RenderSection("scripts", required: false)
    <script type="text/javascript">
        @RenderSection("customScript", required: false)
    </script>
</body>
</html>
If you take a look at this page you will notice that this page contains everything that an Angular 2 application needs to get bootstrapped. No top-bar or side-bar components exist here but only Angular 2 related stuff. More over there are some custom sections that an MVC View can use to inject any custom required scripts or stylesheets. One more thing to notice is the src references that starts with ~/lib which actually point to wwwroot/lib.
At this point create the systemjs configuration which will instruct systemjs how to load any module our application needs. Create the required SystemJS configuration in an systemjs.config.js file at application’s root:
/**
 * System configuration for Angular 2 samples
 * Adjust as necessary for your application needs.
 */
(function (global) {
    System.config({
        paths: {
            // paths serve as alias
            'npm:': 'node_modules/'
        },
        // map tells the System loader where to look for things
        map: {
            // our app is within the app folder
            app: 'lib/spa',
            // angular bundles
            '@angular/core': 'npm:@angular/core/bundles/core.umd.js',
            '@angular/common': 'npm:@angular/common/bundles/common.umd.js',
            '@angular/compiler': 'npm:@angular/compiler/bundles/compiler.umd.js',
            '@angular/platform-browser': 'npm:@angular/platform-browser/bundles/platform-browser.umd.js',
            '@angular/platform-browser-dynamic': 'npm:@angular/platform-browser-dynamic/bundles/platform-browser-dynamic.umd.js',
            '@angular/http': 'npm:@angular/http/bundles/http.umd.js',
            '@angular/router': 'npm:@angular/router/bundles/router.umd.js',
            '@angular/forms': 'npm:@angular/forms/bundles/forms.umd.js',
            // other libraries
            'rxjs': 'npm:rxjs',
            'angular2-in-memory-web-api': 'npm:angular2-in-memory-web-api',
        },
        // packages tells the System loader how to load when no filename and/or no extension
        packages: {
            app: {
                main: './main.js',
                defaultExtension: 'js'
            },
            rxjs: {
                defaultExtension: 'js'
            },
            'angular2-in-memory-web-api': {
                main: './index.js',
                defaultExtension: 'js'
            }
        }
    });
})(this);
Add a folder named Home inside the Views and create the MVC View Page named Index.cshtml. Alter it as follow.
@{
    ViewBag.Title = "PhotoGallery";
}

@section styles
{
    <link href="~/lib/css/bootstrap.css" rel="stylesheet" />
    <link href="~/lib/css/jquery.fancybox.css" rel="stylesheet" />
    <link href="~/css/site.css" rel="stylesheet" />
    <link href="~/lib/css/alertify.core.css" rel="stylesheet" />
    <link href="~/lib/css/alertify.bootstrap.css" rel="stylesheet" />
    @*<link href="~/lib/css/alertify.default.css" rel="stylesheet" />*@
}

<div id="nav-separator"></div>

<photogallery-app>
    <div class="loading">Loading</div>
</photogallery-app>

@section scripts
{
    <script src="~/lib/js/jquery.fancybox.pack.js"></script>
    <script src="~/lib/js/alertify.min.js"></script>
}

@section customScript
{
    System.import('app').catch(console.log.bind(console));
    $(document).ready(function() {
        $('.fancybox').fancybox();
    });
}
Apparently there is going to be an Angular 2 component with a selector of photogallery-app bootstrapped from a file named app.js. This file will be the compiled JavaScript of a Typescript file named app.ts. I have also included a custom css file named site.css which you can find here. Place this file in a new folder named css under wwwroot. You may expect me now to show you the app.ts code but believe it’s better to leave it last. The reason is that it requires files (or components if you prefer) that we haven’t coded yet. Instead we ‘ll view all the components one by one explaining its usage in our spa. First of all I want to show you the final result or the architecture of PhotoGallery spa in the Angular 2 level. This will make easier for you to understand the purpose of each component.
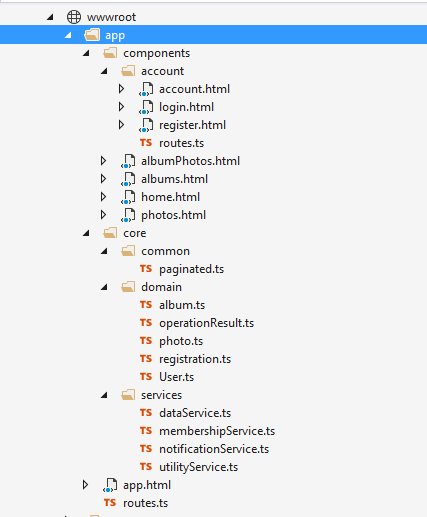
The design is quite simple. The components folder hosts angular 2 components with a specific functionality and html template as well. Notice that the .html templates have an arrow which is new feature in Visual Studio. It means that this .html file has a related Typescript file with the same name under it. When we want to render the Home view, then the home.html template will be rendered and the code behind file the template will be a Home Angular 2 component. I have placed all components related to membership under an account folder. The core folder contains reusable components and classes to be shared across the spa. Let’s start with the simplest one the domain classes. Add a folder named app under wwwroot and a sub-folder named core. Then create the domain folder under core. Add a new Typescript file name photo.ts to represent photo items.
export class Photo {
    Id: number;
    Title: string;
    Uri: string;
    AlbumId: number;
    AlbumTitle: string;
    DateUploaded: Date

    constructor(id: number,
        title: string,
        uri: string,
        albumId: number,
        albumTitle: string,
        dateUploaded: Date) {
        this.Id = id;
        this.Title = title;
        this.Uri = uri;
        this.AlbumId = albumId;
        this.AlbumTitle = albumTitle;
        this.DateUploaded = dateUploaded;
    }
}
Since this is the first Typescript file we added in our spa, you can test the Gulp task compile-typescript and ensure that everything works fine with Typescript compilation.
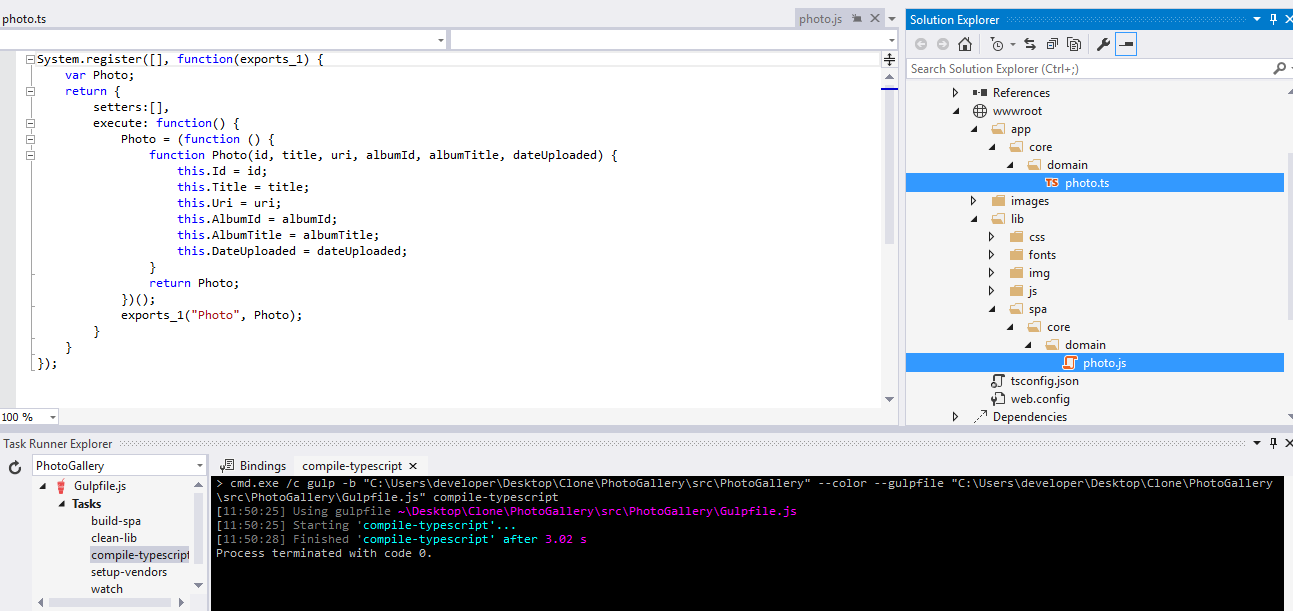
You could run the task from command line as well.
gulp compile-typescript
This photo Typescript class will be used to map photo items come from the server and more particularly, ViewModel photo items. For each Typescript domain class there will be a corresponding ViewModel class on the server-side. Create a folder named ViewModels under the root of PhotoGallery application and add the first ViewModel PhotoViewModel.
public class PhotoViewModel
    {
        public int Id { get; set; }
        public string Title { get; set; }
        public string Uri { get; set; }
        public int AlbumId { get; set; }
        public string AlbumTitle { get; set; }
        public DateTime DateUploaded { get; set; }
    }
Similarly, add the album.ts, registration.ts and user.ts Typescript files inside the domain and the corresponding C# ViewModels inside the ViewModels folders.
export class Album {
    Id: number;
    Title: string;
    Description: string;
    Thumbnail: string;
    DateCreated: Date;
    TotalPhotos: number;

    constructor(id: number,
        title: string,
        description: string,
        thumbnail: string,
        dateCreated: Date,
        totalPhotos: number) {
        this.Id = id;
        this.Title = title;
        this.Description = description;
        this.Thumbnail = thumbnail;
        this.DateCreated = dateCreated;
        this.TotalPhotos = totalPhotos;
    }
}
export class Registration {
    Username: string;
    Password: string;
    Email: string;

    constructor(username: string,
        password: string,
        email: string) {
        this.Username = username;
        this.Password = password;
        this.Email = email;
    }
}
export class User {
    Username: string;
    Password: string;

    constructor(username: string,
        password: string) {
        this.Username = username;
        this.Password = password;
    }
}
public class AlbumViewModel
    {
        public int Id { get; set; }
        public string Title { get; set; }
        public string Description { get; set; }
        public string Thumbnail { get; set; }
        public DateTime DateCreated { get; set; }
        public int TotalPhotos { get; set; }
    }
public class RegistrationViewModel
    {
        [Required]
        public string Username { get; set; }
        [Required]
        public string Password { get; set; }
        [Required]
        [EmailAddress]
        public string Email { get; set; }
    }
public class LoginViewModel
    {
        public string Username { get; set; }
        public string Password { get; set; }
    }
Also add the operationResult.ts Typescript file inside the domain.
export class OperationResult {
    Succeeded: boolean;
    Message: string;

    constructor(succeeded: boolean, message: string) {
        this.Succeeded = succeeded;
        this.Message = message;
    }
}
We will add the coresponding ViewModel inside a new folder named Core under Infrastructure cause this isn’t an Entity mapped to our database. Name the class GenericResult.
public class GenericResult
    {
        public bool Succeeded { get; set; }
        public string Message { get; set; }
    }
The next thing we are going implement are some services using the @Injectable() attribute. (I’m gonna call them services during the post but there are actually injectable modules..) We ‘ll start with a service for making Http requests to the server, named dataService. Add a folder named services under app/core and create the following Typescript file.
import { Http, Response } from '@angular/http';
import { Injectable } from '@angular/core';
import { Observable } from 'rxjs/Observable';

@Injectable()
export class DataService {

    public _pageSize: number;
    public _baseUri: string;

    constructor(public http: Http) {

    }

    set(baseUri: string, pageSize?: number): void {
        this._baseUri = baseUri;
        this._pageSize = pageSize;
    }

    get(page: number) {
        var uri = this._baseUri + page.toString() + '/' + this._pageSize.toString();

        return this.http.get(uri)
            .map(response => (<Response>response));
    }

    post(data?: any, mapJson: boolean = true) {
        if (mapJson)
            return this.http.post(this._baseUri, data)
                .map(response => <any>(<Response>response).json());
        else
            return this.http.post(this._baseUri, data);
    }

    delete(id: number) {
        return this.http.delete(this._baseUri + '/' + id.toString())
            .map(response => <any>(<Response>response).json())
    }

    deleteResource(resource: string) {
        return this.http.delete(resource)
            .map(response => <any>(<Response>response).json())
    }
}
We imported the required modules from ‘@angular/http’ and ‘@angular/core’ and we decorated our DataService class with the @Injectable attribute. With that we will be able to inject instances of DataService in the constructor of our components in the same way we injected here http. This is how Angular 2 works, we import whichever module we want to use. I have written here some get and CRUD operations but you can add any others if you wish. Let’s implement a membershipService which allow us to sign in and log off from our application. Add the membership.service.ts file in the services folder as well.
import { Http, Response, Request } from '@angular/http';
import { Injectable } from '@angular/core';
import { DataService } from './data.service';
import { Registration } from '../domain/registration';
import { User } from '../domain/user';

@Injectable()
export class MembershipService {

    private _accountRegisterAPI: string = 'api/account/register/';
    private _accountLoginAPI: string = 'api/account/authenticate/';
    private _accountLogoutAPI: string = 'api/account/logout/';

    constructor(public accountService: DataService) { }

    register(newUser: Registration) {

        this.accountService.set(this._accountRegisterAPI);

        return this.accountService.post(JSON.stringify(newUser));
    }

    login(creds: User) {
        this.accountService.set(this._accountLoginAPI);
        return this.accountService.post(JSON.stringify(creds));
    }

    logout() {
        this.accountService.set(this._accountLogoutAPI);
        return this.accountService.post(null, false);
    }

    isUserAuthenticated(): boolean {
        var _user: User = localStorage.getItem('user');
        if (_user != null)
            return true;
        else
            return false;
    }

    getLoggedInUser(): User {
        var _user: User;

        if (this.isUserAuthenticated()) {
            var _userData = JSON.parse(localStorage.getItem('user'));
            _user = new User(_userData.Username, _userData.Password);
        }

        return _user;
    }
}
Quite interesting service right? Notice how we imported our custom domain classes and the DataService as well. We also marked this service with the @Injectable() attribute as well. This service is going to be injected in to the Login and Register components later on. The login and register operations of the service, simply sets the api URI and makes a POST request to the server. We also created two functions to check if the user is authenticated and if so get user’s properties. We will see them in action later. There are two more services to implement but since we finished the membershipService why don’t we implement the corresponding server-side controller? Add the following AccountController Web API Controller class inside the Controllers folder.
[Route("api/[controller]")]
    public class AccountController : Controller
    {
        private readonly IMembershipService _membershipService;
        private readonly IUserRepository _userRepository;
        private readonly ILoggingRepository _loggingRepository;

        public AccountController(IMembershipService membershipService,
            IUserRepository userRepository,
            ILoggingRepository _errorRepository)
        {
            _membershipService = membershipService;
            _userRepository = userRepository;
            _loggingRepository = _errorRepository;
        }


        [HttpPost("authenticate")]
        public async Task<IActionResult> Login([FromBody] LoginViewModel user)
        {
            IActionResult _result = new ObjectResult(false);
            GenericResult _authenticationResult = null;

            try
            {
                MembershipContext _userContext = _membershipService.ValidateUser(user.Username, user.Password);

                if (_userContext.User != null)
                {
                    IEnumerable<Role> _roles = _userRepository.GetUserRoles(user.Username);
                    List<Claim> _claims = new List<Claim>();
                    foreach (Role role in _roles)
                    {
                        Claim _claim = new Claim(ClaimTypes.Role, "Admin", ClaimValueTypes.String, user.Username);
                        _claims.Add(_claim);
                    }
                    await HttpContext.Authentication.SignInAsync(CookieAuthenticationDefaults.AuthenticationScheme,
                        new ClaimsPrincipal(new ClaimsIdentity(_claims, CookieAuthenticationDefaults.AuthenticationScheme)),
                        new Microsoft.AspNetCore.Http.Authentication.AuthenticationProperties {IsPersistent = user.RememberMe });


                    _authenticationResult = new GenericResult()
                    {
                        Succeeded = true,
                        Message = "Authentication succeeded"
                    };
                }
                else
                {
                    _authenticationResult = new GenericResult()
                    {
                        Succeeded = false,
                        Message = "Authentication failed"
                    };
                }
            }
            catch (Exception ex)
            {
                _authenticationResult = new GenericResult()
                {
                    Succeeded = false,
                    Message = ex.Message
                };

                _loggingRepository.Add(new Error() { Message = ex.Message, StackTrace = ex.StackTrace, DateCreated = DateTime.Now });
                _loggingRepository.Commit();
            }

            _result = new ObjectResult(_authenticationResult);
            return _result;
        }

        [HttpPost("logout")]
        public async Task<IActionResult> Logout()
        {
            try
            {
                await HttpContext.Authentication.SignOutAsync("Cookies");
                return Ok();
            }
            catch (Exception ex)
            {
                _loggingRepository.Add(new Error() { Message = ex.Message, StackTrace = ex.StackTrace, DateCreated = DateTime.Now });
                _loggingRepository.Commit();

                return BadRequest();
            }

        }

        [Route("register")]
        [HttpPost]
        public IActionResult Register([FromBody] RegistrationViewModel user)
        {
            IActionResult _result = new ObjectResult(false);
            GenericResult _registrationResult = null;

            try
            {
                if (ModelState.IsValid)
                {
                    User _user = _membershipService.CreateUser(user.Username, user.Email, user.Password, new int[] { 1 });

                    if (_user != null)
                    {
                        _registrationResult = new GenericResult()
                        {
                            Succeeded = true,
                            Message = "Registration succeeded"
                        };
                    }
                }
                else
                {
                    _registrationResult = new GenericResult()
                    {
                        Succeeded = false,
                        Message = "Invalid fields."
                    };
                }
            }
            catch (Exception ex)
            {
                _registrationResult = new GenericResult()
                {
                    Succeeded = false,
                    Message = ex.Message
                };

                _loggingRepository.Add(new Error() { Message = ex.Message, StackTrace = ex.StackTrace, DateCreated = DateTime.Now });
                _loggingRepository.Commit();
            }

            _result = new ObjectResult(_registrationResult);
            return _result;
        }
    }
Here we can see the magic of Dependency Injection in ASP.NET Core 1.0. Required repositories and services are automatically injected into the constructor. The Login, Logout and Register actions are self-explanatory. Let’s finish with the Angular services by adding the following two helpers into the app/core/services folder.
import { Injectable } from '@angular/core';
import {Router} from '@angular/router';

@Injectable()
export class UtilityService {

    private _router: Router;

    constructor(router: Router) {
        this._router = router;
    }

    convertDateTime(date: Date) {
        var _formattedDate = new Date(date.toString());
        return _formattedDate.toDateString();
    }

    navigate(path: string) {
        this._router.navigate([path]);
    }

    navigateToSignIn() {
        this.navigate('/account/login');
    }
}
This service will be used for common functions such as converting Date objects or changing route in our spa.
import { Injectable } from '@angular/core';

declare var alertify: any;

@Injectable()
export class NotificationService {
    private _notifier: any = alertify;
    constructor() {
    }

    printSuccessMessage(message: string) {

        this._notifier.success(message);
    }

    printErrorMessage(message: string) {
        this._notifier.error(message);
    }

    printConfirmationDialog(message: string, okCallback: () => any) {
        this._notifier.confirm(message, function (e) {
            if (e) {
                okCallback();
            } else {
            }
        });
    }
}
This is a very interesting service as well and I created it for a reason. I wanted to support notifications in our SPA so that user receives success or error notifications. The thing is that I couldn’t find any external library available to use it with Typescript so I thought.. why not use a JavaScript one? After all, Typescript or not at the end only JavaScript survives. I ended up with the alertify.js which we have already included in our app using bower. I studied a little the library and I figured out that there is an alertify object that has all the required notification functionality. And this is what we did in our Angular service. We made the trick to store this variable as any so that we can call its methods without any intellisense errors.
private _notifier: any = alertify;
On the other hand the alertify variable is unknown to the NotificationService class and we get an intellisense error. More over if you try to compile the Typescript using the compile-typescript task you will also get a relative error Cannot find name ‘alertify’.
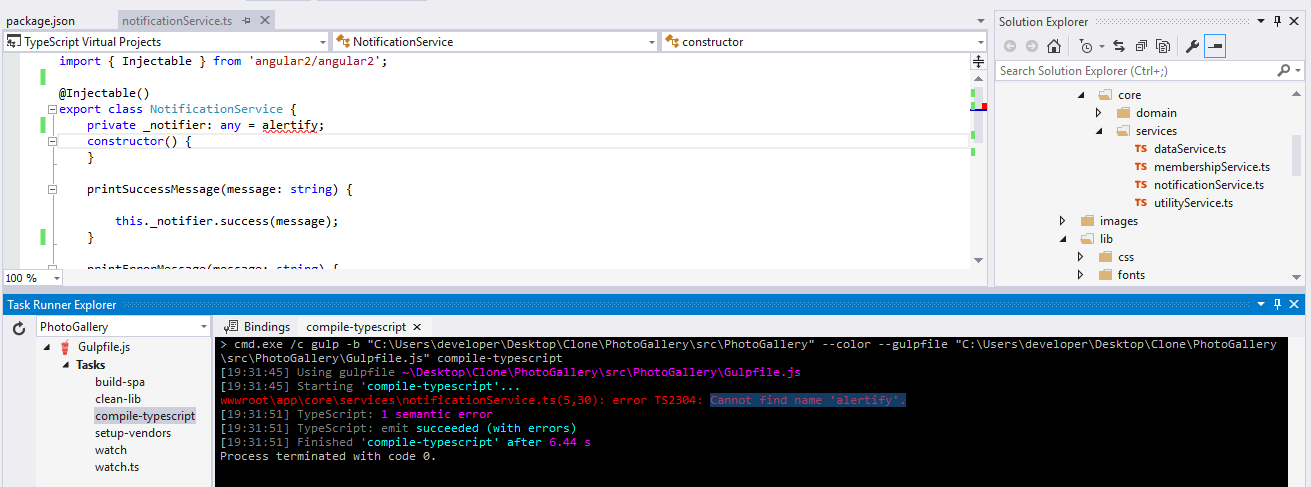
The question is.. can we live with that? YES we can.. but we have to make sure that we will allow Typescript to be compiled and emit outputs despite the type checking errors occurred. How did we achieve it? We have already declared it in the tsconfig.json file as follow:
"compilerOptions": {
        "noImplicitAny": false,
        "module": "system",
        "moduleResolution": "node",
        "experimentalDecorators": true,
        "emitDecoratorMetadata": true,
        "noEmitOnError": false,
        "removeComments": false,
        "sourceMap": true,
        "target": "es5"
    }
Of course, when the page loads, no JavaScript errors appear on the client.
Update!
It turns out there’s an easy way to use external JavaScript libraries and bypass that type of errors too. All you have to do in our case is change the notificationService.ts as follow:
import { Injectable } from '@angular/core';

declare var alertify: any;

@Injectable()
export class NotificationService {
    private _notifier: any = alertify;
    constructor() {
    }
    // code ommited
This means that if the external JavaScript library contains a variable or function you want to use it in your TypeScript class, you declare it outside the class. It’s very important to declare it outside the class, otherwise the local variable will override the one defined in the external library. The following code would crash.
import { Injectable } from 'angular2/core';

@Injectable()
export class NotificationService {
    private alertify: any;
    private _notifier: any = this.alertify;
    constructor() {
    }
	// code ommited
Angular 2 Components
The next thing we are going to implement are the basic Components of our application. Each component encapsulates a specific logic and is responsible to render the appropriate template as well. Let’s number them along with their specifications (click them to view the template they render).
Add a folder named components under wwwroot/app and create the first component Home in a home.component.ts Typescript file.
import {Component} from '@angular/core';

@Component({
    selector: 'home',
    templateUrl: './app/components/home.component.html'
})
export class HomeComponent {

    constructor() {

    }
}
This is by far the simplest Angular component you will ever seen. We used the @Component annotation and we declared that when this component is active, a template named home.html existing inside app/components will be rendered. Add the home.html template underapp/components. This is simple html with no Angular related code and that’s why I won’t paste it here. You can copy-paste its code though from here. The next component will spice things up. It’s the PhotosComponent, the one responsible to display all photos existing in PhotoGallery app with pagination support as well. It will be the first time that we ‘ll use the dataService injectable to make some HTTP GET requests to the server. Add the photos.component.ts file under app/components folder.
import { Component, OnInit } from '@angular/core';
import { Photo } from '../core/domain/photo';
import { Paginated } from '../core/common/paginated';
import { DataService } from '../core/services/data.service';

@Component({
    selector: 'photos',
    templateUrl: './app/components/photos.component.html'
})
export class PhotosComponent extends Paginated implements OnInit {
    private _photosAPI: string = 'api/photos/';
    private _photos: Array<Photo>;

    constructor(public photosService: DataService) {
        super(0, 0, 0);
    }

    ngOnInit() {
        this.photosService.set(this._photosAPI, 12);
        this.getPhotos();
    }

    getPhotos(): void {
        let self = this;
        self.photosService.get(self._page)
            .subscribe(res => {

                var data: any = res.json();

                self._photos = data.Items;
                self._page = data.Page;
                self._pagesCount = data.TotalPages;
                self._totalCount = data.TotalCount;
            },
            error => console.error('Error: ' + error));
    }

    search(i): void {
        super.search(i);
        this.getPhotos();
    };
}
The getPhotos() function invokes the DataService.get method which returns an Objervable<any>. Then we used the .subscribe function which registers handlers for handling emitted values, error and completions from that observable and executes the observable’s subscriber function. We used it to bound the result come from the server to the Array of photos items to be displayed. We also set some properties such as this._page or this._pageCount which are being used for pagination purposes. At the moment you cannot find those properties cause they are inherited from the Paginated class. I have created this re-usable class in order to be used from all components need to support pagination. It doesn’t matter if the component needs to iterate photos, albums or tomatos.. this re-usable component holds the core functionality to support pagination for any type of items. Add the paginated.ts Typescript file inside a new folder named common under app/core.
export class Paginated {
    public _page: number = 0;
    public _pagesCount: number = 0;
    public _totalCount: number = 0;

    constructor(page: number, pagesCount: number, totalCount: number) {
        this._page = page;
        this._pagesCount = pagesCount;
        this._totalCount = totalCount;
    }

    range(): Array<any> {
        if (!this._pagesCount) { return []; }
        var step = 2;
        var doubleStep = step * 2;
        var start = Math.max(0, this._page - step);
        var end = start + 1 + doubleStep;
        if (end > this._pagesCount) { end = this._pagesCount; }

        var ret = [];
        for (var i = start; i != end; ++i) {
            ret.push(i);
        }

        return ret;
    };

    pagePlus(count: number): number {
        return + this._page + count;
    }

    search(i): void {
        this._page = i;
    };
}
The properties of t this class are used to render a paginated list (we ‘ll view it soon in action). When the user click a number or an first/previous/next/last arrow, the component that inherits this class, the only thing needs to do is to set the current page and make the request. All the other stuff happens automatically. Let’s view the app/components/photos.component.html template now.
<div class="container">

    <div class="row">
        <div class="col-lg-12">
            <h1 class="page-header">
                Photo Gallery photos
                <small><i>(all albums displayed)</i></small>
            </h1>
            <ol class="breadcrumb">
                <li>
                    <a [routerLink]="['/Home']">Home</a>
                </li>
                <li class="active">Photos</li>
            </ol>
        </div>
    </div>

    <div class="row">
        <div class="col-lg-3 col-md-4 col-xs-6 picture-box" *ngFor="let image of _photos">
            <a class="fancybox" rel="gallery" href="{{image.Uri}}">
                <img src="{{image.Uri}}" alt="{{image.Title}}" class="img img-responsive full-width thumbnail" />
            </a>
        </div>
    </div>
</div>

<footer class="navbar navbar-fixed-bottom">
    <div class="text-center">
        <div ng-hide="(!_pagesCount || _pagesCount < 2)" style="display:inline">
            <ul class="pagination pagination-sm">
                <li><a *ngIf="page != 0_" (click)="search(0)"><<</a></li>
                <li><a *ngIf="_page != 0" (click)="search(_page-1)"><</a></li>
                <li *ngFor="let n of range()" [ngClass]="{active: n == _page}">
                    <a (click)="search(n)" *ngIf="n != _page">{{n+1}}</a>
                    <span *ngIf="n == _page">{{n+1}}</span>
                </li>
                <li><a *ngIf="_page != (_pagesCount - 1)" (click)="search(pagePlus(1))">></a></li>
                <li><a *ngIf="_page != (_pagesCount - 1)" (click)="search(_pagesCount - 1)">>></a></li>
            </ul>
        </div>
    </div>
</footer>
The [routerLink] will create a link to the Home component. We used the new angular directive to iterate an array of photo items.
*ngFor="let image of _photos"
The footer element is the one that will render the paginated list depending on the total items fetched from the server and the paginated properties being set. Those properties are going to be set from the server using a new class named PaginatedSet.
Let’s switch and prepare the server-side infrastructure for this component. Add the following class inside the Infrastructure/Core folder.
public class PaginationSet<T>
    {
        public int Page { get; set; }

        public int Count
        {
            get
            {
                return (null != this.Items) ? this.Items.Count() : 0;
            }
        }

        public int TotalPages { get; set; }
        public int TotalCount { get; set; }

        public IEnumerable<T> Items { get; set; }
    }
And now the controller. Add the PhotosController Web API Controller class inside the Controllers folder.
[Route("api/[controller]")]
    public class PhotosController : Controller
    {
        IPhotoRepository _photoRepository;
        ILoggingRepository _loggingRepository;
        public PhotosController(IPhotoRepository photoRepository, ILoggingRepository loggingRepository)
        {
            _photoRepository = photoRepository;
            _loggingRepository = loggingRepository;
        }

        [HttpGet("{page:int=0}/{pageSize=12}")]
        public PaginationSet<PhotoViewModel> Get(int? page, int? pageSize)
        {
            PaginationSet<PhotoViewModel> pagedSet = null;

            try
            {
                int currentPage = page.Value;
                int currentPageSize = pageSize.Value;

                List<Photo> _photos = null;
                int _totalPhotos = new int();


                _photos = _photoRepository
                    .AllIncluding(p => p.Album)
                    .OrderBy(p => p.Id)
                    .Skip(currentPage * currentPageSize)
                    .Take(currentPageSize)
                    .ToList();

                _totalPhotos = _photoRepository.GetAll().Count();

                IEnumerable<PhotoViewModel> _photosVM = Mapper.Map<IEnumerable<Photo>, IEnumerable<PhotoViewModel>>(_photos);

                pagedSet = new PaginationSet<PhotoViewModel>()
                {
                    Page = currentPage,
                    TotalCount = _totalPhotos,
                    TotalPages = (int)Math.Ceiling((decimal)_totalPhotos / currentPageSize),
                    Items = _photosVM
                };
            }
            catch (Exception ex)
            {
                _loggingRepository.Add(new Error() { Message = ex.Message, StackTrace = ex.StackTrace, DateCreated = DateTime.Now });
                _loggingRepository.Commit();
            }

            return pagedSet;
        }

        [HttpDelete("{id:int}")]
        public IActionResult Delete(int id)
        {
            IActionResult _result = new ObjectResult(false);
            GenericResult _removeResult = null;

            try
            {
                Photo _photoToRemove = this._photoRepository.GetSingle(id);
                this._photoRepository.Delete(_photoToRemove);
                this._photoRepository.Commit();

                _removeResult = new GenericResult()
                {
                    Succeeded = true,
                    Message = "Photo removed."
                };
            }
            catch (Exception ex)
            {
                _removeResult = new GenericResult()
                {
                    Succeeded = false,
                    Message = ex.Message
                };

                _loggingRepository.Add(new Error() { Message = ex.Message, StackTrace = ex.StackTrace, DateCreated = DateTime.Now });
                _loggingRepository.Commit();
            }

            _result = new ObjectResult(_removeResult);
            return _result;
        }
    }
The Get action returns a PaginatedSet containing the PhotoViewModel items to be displayed and the required paginated information to create a client paginated list. The thing is that we haven’t set any Automapper configuration yet and if you recall, I have told you to keep an Automapper related line in the Startup class commented out until the time comes. Well.. why don’t we configure it right now? Add a new folder named Mappings under Infrastructure and create the following class.
public class DomainToViewModelMappingProfile : Profile
    {
        protected override void Configure()
        {
            Mapper.CreateMap<Photo, PhotoViewModel>()
               .ForMember(vm => vm.Uri, map => map.MapFrom(p => "/images/" + p.Uri));

            Mapper.CreateMap<Album, AlbumViewModel>()
                .ForMember(vm => vm.TotalPhotos, map => map.MapFrom(a => a.Photos.Count))
                .ForMember(vm => vm.Thumbnail, map =>
                    map.MapFrom(a => (a.Photos != null && a.Photos.Count > 0) ?
                    "/images/" + a.Photos.First().Uri :
                    "/images/thumbnail-default.png"));
        }
    }
The code creates mappings for both Photo to PhotoViewModel and Album to AblumViewModel objects. For the former we only add an images prefix for the photo URI so that can be mapped to wwwroot/images folder and for the latter we set the TotalPhotos property as well. In the same folder add the AutoMapperConfiguration class as follow.
public class AutoMapperConfiguration
    {
        public static void Configure()
        {
            Mapper.Initialize(x =>
            {
                x.AddProfile<DomainToViewModelMappingProfile>();
            });
        }
    }
Now you can safely uncomment the following line from the Configure(IApplicationBuilder app) function in the Startup class.
AutoMapperConfiguration.Configure();
The albums angular component is almost identical to the photos one with one exception. It uses a routing related directive [routerLink] in order to redirect to the albumphotos component when user clicks on a specific album. Thus before showing the code I believe it is necessary to introduce you to the routing configuration our SPA will follow. Let’s discuss the architecture shown in the following schema.

As of Angular 2 RC.5 and later we are recommended to create three files to bootstrap an angular app. An app.module.ts to declare our app’s module, an app.component.ts to act as the root container-shell and a main.ts to bootstrap the main module. We can add routing configuration inside our module and since we can define as many modules as we wish, each module may have its own routing configuration. In our case, we ‘ll define the basic routes in app.module.ts and all routes related to membership in an account.module.ts. We will define the basic routs inside a routes.ts file under the app folder.
import { ModuleWithProviders }  from '@angular/core';
import { Routes, RouterModule } from '@angular/router';

import { HomeComponent } from './components/home.component';
import { PhotosComponent } from './components/photos.component';
import { AlbumsComponent } from './components/albums.component';
import { AlbumPhotosComponent } from './components/album-photos.component';
import { accountRoutes, accountRouting } from './components/account/routes';


const appRoutes: Routes = [
    {
        path: '',
        redirectTo: '/home',
        pathMatch: 'full'
    },
    {
        path: 'home',
        component: HomeComponent
    },
    {
        path: 'photos',
        component: PhotosComponent
    },
    {
        path: 'albums',
        component: AlbumsComponent
    },
    {
        path: 'albums/:id/photos',
        component: AlbumPhotosComponent
    }
];

export const routing: ModuleWithProviders = RouterModule.forRoot(appRoutes);
We set nothing here, we have only defined an object with an array of Routes. The Routes variable reflects exactly the previous picture. Pay attention the way we ‘ll pass an id paramater when we navigate to view a specific album’s photos. At this point we haven’t coded that component yet but that’s OK, we ‘ll do it a little bit later. Let’s continue from where we have stopped, the Albums component. Add the albums.component.ts Typescript file under app/components.
import { Component, OnInit } from '@angular/core';
import { Album } from '../core/domain/album';
import { Paginated } from '../core/common/paginated';
import { DataService } from '../core/services/data.service';
import { UtilityService } from '../core/services/utility.service';
import { NotificationService } from '../core/services/notification.service';

@Component({
    selector: 'albums',
    templateUrl: './app/components/albums.component.html'
})
export class AlbumsComponent extends Paginated implements OnInit {
    private _albumsAPI: string = 'api/albums/';
    private _albums: Array<Album>;

    constructor(public albumsService: DataService,
        public utilityService: UtilityService,
        public notificationService: NotificationService) {
        super(0, 0, 0);
    }

    ngOnInit() {
        this.albumsService.set(this._albumsAPI, 3);
        this.getAlbums();
    }

    getAlbums(): void {
        this.albumsService.get(this._page)
            .subscribe(res => {
                var data: any = res.json();
                this._albums = data.Items;
                this._page = data.Page;
                this._pagesCount = data.TotalPages;
                this._totalCount = data.TotalCount;
            },
            error => {

                if (error.status == 401 || error.status == 404) {
                    this.notificationService.printErrorMessage('Authentication required');
                    this.utilityService.navigateToSignIn();
                }
            });
    }

    search(i): void {
        super.search(i);
        this.getAlbums();
    };

    convertDateTime(date: Date) {
        return this.utilityService.convertDateTime(date);
    }
}
I have intentionally made the DataService.get() method to return an Observable<Response> rather than the JSON serialized result because I know that my API call my return an unauthorized code. Hence, if an error occurred and the status is 401 we navigate to the login template else we proceed to serialize the result. It’s up to you what you prefer, I just wanted to show you some options that you have. Let’s view the related template albums.component.html. Add it under the same folder app/components.
<div class="container">
    <div class="row">
        <div class="col-lg-12">
            <h1 class="page-header">
                Photo Gallery albums
                <small>Page {{_page + 1}} of {{_pagesCount}}</small>
            </h1>
            <ol class="breadcrumb">
                <li>
                    <a [routerLink]="['/Home']">Home</a>
                </li>
                <li class="active">Albums</li>
            </ol>
        </div>
    </div>
    <!-- /.row -->
    <div class="row album-box" *ngFor="let album of _albums">
        <div class="col-md-1 text-center">
            <p>
                <i class="fa fa-camera fa-4x"></i>
            </p>
            <p>{{convertDateTime(album.DateCreated)}}</p>
        </div>
        <div class="col-md-5">
            <a class="fancybox" rel="gallery" href="{{album.Thumbnail}}" title="{{album.Title}}">
                <img class="media-object img-responsive album-thumbnail" src="{{album.Thumbnail}}" alt="" />
            </a>
        </div>
        <div class="col-md-6">
            <h3>
                <a [routerLink]="['/albums/:id/photos', {id: album.Id}]">{{album.Title}}</a>
            </h3>
            <p>
                Photos: <span class="badge">{{album.TotalPhotos}}</span>
            </p>
            <p>{{album.Description}}</p>
            <a *ngIf="album.TotalPhotos > 0" class="btn btn-primary" [routerLink]="['/albums/:id/photos', {id: album.Id}]">View photos <i class="fa fa-angle-right"></i></a>
        </div>
        <hr/>
    </div>
    <hr>
</div>

<footer class="navbar navbar-fixed-bottom">
    <div class="text-center">
        <div ng-hide="(!_pagesCount || _pagesCount < 2)" style="display:inline">
            <ul class="pagination pagination-sm">
                <li><a *ngIf="_page != 0_" (click)="search(0)"><<</a></li>
                <li><a *ngIf="_page != 0" (click)="search(_page-1)"><</a></li>
                <li *ngFor="let n of range()" [ngClass]="{active: n == _page}">
                    <a (click)="search(n)" *ngIf="n != _page">{{n+1}}</a>
                    <span *ngIf="n == _page">{{n+1}}</span>
                </li>
                <li><a *ngIf="_page != (_pagesCount - 1)" (click)="search(pagePlus(1))">></a></li>
                <li><a *ngIf="_page != (_pagesCount - 1)" (click)="search(_pagesCount - 1)">>></a></li>
            </ul>
        </div>
    </div>
</footer>
We assign the value of the [routerLink] directive equal to the name of the route where we want to navigate. We can do it either hard coded..
<a [routerLink]="['/Home']">Home</a>
..or using the routes variable..
<a [routerLink]="[routes.albumPhotos.name, {id: album.Id}]">{{album.Title}}</a>
In the last one we can see how to pass the id parameter required for the albumPhotos route. Let’s implement the Web API Controller AlbumsController now. Add the class inside Controllers folder.
   [Route("api/[controller]")]
    public class AlbumsController : Controller
    {
        private readonly IAuthorizationService _authorizationService;
        IAlbumRepository _albumRepository;
        ILoggingRepository _loggingRepository;
        public AlbumsController(IAuthorizationService authorizationService,
                                IAlbumRepository albumRepository,
                                ILoggingRepository loggingRepository)
        {
            _authorizationService = authorizationService;
            _albumRepository = albumRepository;
            _loggingRepository = loggingRepository;
        }

        [Authorize(Policy = "AdminOnly")]
        [HttpGet("{page:int=0}/{pageSize=12}")]
        public async Task<IActionResult> Get(int? page, int? pageSize)
        {
            PaginationSet<AlbumViewModel> pagedSet = new PaginationSet<AlbumViewModel>();

            try
            {
                if (await _authorizationService.AuthorizeAsync(User, "AdminOnly"))
                {
                    int currentPage = page.Value;
                    int currentPageSize = pageSize.Value;

                    List<Album> _albums = null;
                    int _totalAlbums = new int();


                    _albums = _albumRepository
                        .AllIncluding(a => a.Photos)
                        .OrderBy(a => a.Id)
                        .Skip(currentPage * currentPageSize)
                        .Take(currentPageSize)
                        .ToList();

                    _totalAlbums = _albumRepository.GetAll().Count();

                    IEnumerable<AlbumViewModel> _albumsVM = Mapper.Map<IEnumerable<Album>, IEnumerable<AlbumViewModel>>(_albums);

                    pagedSet = new PaginationSet<AlbumViewModel>()
                    {
                        Page = currentPage,
                        TotalCount = _totalAlbums,
                        TotalPages = (int)Math.Ceiling((decimal)_totalAlbums / currentPageSize),
                        Items = _albumsVM
                    };
                }
                else
                {
                    CodeResultStatus _codeResult = new CodeResultStatus(401);
                    return new ObjectResult(_codeResult);
                }
            }
            catch (Exception ex)
            {
                _loggingRepository.Add(new Error() { Message = ex.Message, StackTrace = ex.StackTrace, DateCreated = DateTime.Now });
                _loggingRepository.Commit();
            }

            return new ObjectResult(pagedSet);
        }


        [Authorize(Policy = "AdminOnly")]
        [HttpGet("{id:int}/photos/{page:int=0}/{pageSize=12}")]
        public PaginationSet<PhotoViewModel> Get(int id, int? page, int? pageSize)
        {
            PaginationSet<PhotoViewModel> pagedSet = null;

            try
            {
                int currentPage = page.Value;
                int currentPageSize = pageSize.Value;

                List<Photo> _photos = null;
                int _totalPhotos = new int();

                Album _album = _albumRepository.GetSingle(a => a.Id == id, a => a.Photos);

                _photos = _album
                            .Photos
                            .OrderBy(p => p.Id)
                            .Skip(currentPage * currentPageSize)
                            .Take(currentPageSize)
                            .ToList();

                _totalPhotos = _album.Photos.Count();

                IEnumerable<PhotoViewModel> _photosVM = Mapper.Map<IEnumerable<Photo>, IEnumerable<PhotoViewModel>>(_photos);

                pagedSet = new PaginationSet<PhotoViewModel>()
                {
                    Page = currentPage,
                    TotalCount = _totalPhotos,
                    TotalPages = (int)Math.Ceiling((decimal)_totalPhotos / currentPageSize),
                    Items = _photosVM
                };
            }
            catch (Exception ex)
            {
                _loggingRepository.Add(new Error() { Message = ex.Message, StackTrace = ex.StackTrace, DateCreated = DateTime.Now });
                _loggingRepository.Commit();
            }

            return pagedSet;
        }
    }
The highlighted lines shows you the way you can check programmatically if the current request is authorized to access a specific part of code. We used an instance of Microsoft.AspNet.Authorization.IAuthorizationService to check if the ClaimsPrincipal user fullfiles the requirements of the AdminOnly policy. If not we return a new object of type StatusCodeResult with a 401 status and a message. You can add that class inside the Infrastructure/Core folder.
public class StatusCodeResult
    {
        private int _status;
        private string _message;
        public int Status {
            get
            {
                return _status;
            }
            private set { }
        }
        public string Message
        {
            get
            {
                return _message;
            }
            private set { }
        }

        public StatusCodeResult(int status)
        {
            if (status == 401)
                _message = "Unauthorized access. Login required";

            _status = status;
        }

        public StatusCodeResult(int code, string message)
        {
            _status = code;
            _message = message;
        }
    }
OK, we prevented access to the api/albums/get API but was this the right way to do it? Of course not because the way we implemented it we do allow the request to dispatch in our controller’s action and later on we forbid the action. What we would like to have though is a cleaner way to prevent unauthorized access before requests reach the action and of course without the use of the Microsoft.AspNet.Authorization.IAuthorizationService. All you have to do, is decorate the action you want to prevent access to with the [Authorize(Policy = “AdminOnly”)] attribute. Do if for both the actions in the AlbumsController. You can now safely remove the code that programmatically checks if the user fullfiles the AdminOnly policy.
[Authorize(Policy = "AdminOnly")]
[HttpGet("{page:int=0}/{pageSize=12}")]
public async Task<IActionResult> Get(int? page, int? pageSize)
{
    PaginationSet<AlbumViewModel> pagedSet = new PaginationSet<AlbumViewModel>();

    try
    {
    // Code omitted
We will procceed with the AlbumPhotosComponent angular component which is responsible to display a respective album’s photos using pagination. We will see two new features on this component: The first one is the ActivatedRoute which will allow us to extract the :id parameter from the route api/albums/:id/photos. The second one is a confirmation message which will ask the user to confirm photo removal. Add the albums-photos.component.ts file inside the app/components folder.
import { Component, OnInit } from '@angular/core';
import { Router, ActivatedRoute }  from '@angular/router';
import { Photo } from '../core/domain/photo';
import { Paginated } from '../core/common/paginated';
import { DataService } from '../core/services/data.service';
import { UtilityService } from '../core/services/utility.service';
import { NotificationService } from '../core/services/notification.service';
import { OperationResult } from '../core/domain/operationResult';
import { Subscription }  from 'rxjs/Subscription';

@Component({
    selector: 'album-photo',
    providers: [NotificationService],
    templateUrl: './app/components/album-photos.component.html'
})
export class AlbumPhotosComponent extends Paginated implements OnInit {
    private _albumsAPI: string = 'api/albums/';
    private _photosAPI: string = 'api/photos/';
    private _albumId: string;
    private _photos: Array<Photo>;
    private _displayingTotal: number;
    private _albumTitle: string;
    private sub: Subscription;

    constructor(public dataService: DataService,
                public utilityService: UtilityService,
                public notificationService: NotificationService,
                private route: ActivatedRoute,
                private router: Router) {
                super(0, 0, 0);
    }

    ngOnInit() {

        this.sub = this.route.params.subscribe(params => {
            this._albumId = params['id']; // (+) converts string 'id' to a number
            this._albumsAPI += this._albumId + '/photos/';
            this.dataService.set(this._albumsAPI, 12);
            this.getAlbumPhotos();
        });
    }

    getAlbumPhotos(): void {
        this.dataService.get(this._page)
            .subscribe(res => {

                var data: any = res.json();

                this._photos = data.Items;
                this._displayingTotal = this._photos.length;
                this._page = data.Page;
                this._pagesCount = data.TotalPages;
                this._totalCount = data.TotalCount;
                this._albumTitle = this._photos[0].AlbumTitle;
            },
            error => {

                if (error.status == 401 || error.status == 302) {
                    this.utilityService.navigateToSignIn();
                }

                console.error('Error: ' + error)
            },
            () => console.log(this._photos));
    }

    search(i): void {
        super.search(i);
        this.getAlbumPhotos();
    };

    convertDateTime(date: Date) {
        return this.utilityService.convertDateTime(date);
    }

    delete(photo: Photo) {
        var _removeResult: OperationResult = new OperationResult(false, '');

        this.notificationService.printConfirmationDialog('Are you sure you want to delete the photo?',
            () => {
                this.dataService.deleteResource(this._photosAPI + photo.Id)
                    .subscribe(res => {
                        _removeResult.Succeeded = res.Succeeded;
                        _removeResult.Message = res.Message;
                    },
                    error => console.error('Error: ' + error),
                    () => {
                        if (_removeResult.Succeeded) {
                            this.notificationService.printSuccessMessage(photo.Title + ' removed from gallery.');
                            this.getAlbumPhotos();
                        }
                        else {
                            this.notificationService.printErrorMessage('Failed to remove photo');
                        }
                    });
            });
    }
}
When user clicks to delete a photo, a confirmation dialog pops up. This comes from the notificationService.printConfirmationDialog method, that accepts a callback function to be called in case user clicks OK.
printConfirmationDialog(message: string, okCallback: () => any) {
        this._notifier.confirm(message, function (e) {
            if (e) {
                okCallback();
            } else {
            }
        });
    }
If removal succeeded we display a success message and refresh the album photos. It’s time to implement the membership’s related components. As we have allready mentioned, there is a nested routing configuration for those components so let’s start by creating this first. Add a new folder named account under app/components and create the following routes.ts file.
import { ModuleWithProviders }  from '@angular/core';
import { Routes, RouterModule } from '@angular/router';

import { AccountComponent } from './account.component';
import { LoginComponent } from './login.component';
import { RegisterComponent } from './register.component';

export const accountRoutes: Routes = [
    {
        path: 'account',
        component: AccountComponent,
        children: [
            { path: 'register', component: RegisterComponent },
            { path: 'login', component: LoginComponent }
        ]
    }
];

export const accountRouting: ModuleWithProviders = RouterModule.forChild(accountRoutes);
This file is almost identical with the one we created under app with the difference that difines different routes. Those routes will be added in the account.module.ts file. Add the LoginComponent component in a login.component.ts Typescript file under app/components/account.
import { Component, OnInit } from '@angular/core';
import { Router } from '@angular/router';
import { User } from '../../core/domain/user';
import { OperationResult } from '../../core/domain/operationResult';
import { MembershipService } from '../../core/services/membership.service';
import { NotificationService } from '../../core/services/notification.service';

@Component({
    selector: 'albums',
    templateUrl: './app/components/account/login.component.html'
})
export class LoginComponent implements OnInit {
    private _user: User;

    constructor(public membershipService: MembershipService,
                public notificationService: NotificationService,
                public router: Router) { }

    ngOnInit() {
        this._user = new User('', '');
    }

    login(): void {
        var _authenticationResult: OperationResult = new OperationResult(false, '');

        this.membershipService.login(this._user)
            .subscribe(res => {
                _authenticationResult.Succeeded = res.Succeeded;
                _authenticationResult.Message = res.Message;
            },
            error => console.error('Error: ' + error),
            () => {
                if (_authenticationResult.Succeeded) {
                    this.notificationService.printSuccessMessage('Welcome back ' + this._user.Username + '!');
                    localStorage.setItem('user', JSON.stringify(this._user));
                    this.router.navigate(['home']);
                }
                else {
                    this.notificationService.printErrorMessage(_authenticationResult.Message);
                }
            });
    };
}
We inject the MemberhipService in the constructor and when the user clicks to sign in we call the membershipService.login method passing as a parameter user’s username and password. We subscribe the result of the login operation in a OperationResult object and if the authentication succeeded we store user’s credentials in a ‘user’ key using the localStorage.setItem function. Add the related login template in a login.component.html file under app/account/components.
<div id="loginModal" class="modal show" tabindex="-1" role="dialog" aria-hidden="true">
    <div class="modal-dialog">
        <div class="modal-content">
            <div class="modal-header">
                <button type="button" class="close" data-dismiss="modal" aria-hidden="true">×</button>
                <h1 class="text-center">
                    <span class="fa-stack fa-1x">
                        <i class="fa fa-circle fa-stack-2x text-primary"></i>
                        <i class="fa fa-user fa-stack-1x fa-inverse"></i>
                    </span>Login
                </h1>
            </div>
            <div class="modal-body">
                <form class="form col-md-12 center-block" #loginForm="ngForm">
                    <div class="form-group">
                        <input type="text" class="form-control input-lg" placeholder="Username" [(ngModel)]="_user.Username"
                               name="username" id="username" #username="ngModel" required />
                        <div [hidden]="username.valid || username.untouched" class="alert alert-danger">
                            Username is required
                        </div>
                    </div>
                    <div class="form-group">
                        <input type="password" class="form-control input-lg" placeholder="Password" [(ngModel)]="_user.Password"
                               name="password" id="password" #password="ngModel" required/>
                        <div [hidden]="password.valid || password.untouched" class="alert alert-danger">
                            Password is required
                        </div>
                    </div>
                    <div class="form-group">
                        <button class="btn btn-primary btn-lg btn-block" (click)="login()" [disabled]="!loginForm.form.valid">Sign In</button>
                        <span class="pull-right">
                            <a [routerLink]="['/account/register']">Register</a>
                        </span>
                    </div>
                    <div class="checkbox">
                        <label>
                            <input type="checkbox" [(ngModel)]="_user.RememberMe" name="remember"> Remember me
                        </label>
                    </div>
                </form>
            </div>
            <div class="modal-footer">
                <div class="col-md-12">
                    <a class="btn btn-danger pull-left" [routerLink]="['/home']" data-dismiss="modal" aria-hidden="true">Cancel</a>
                </div>
            </div>
        </div>
    </div>
</div>
Local variables are important for accessing validation states..
#username
.. and we used it to show or hide a validity error as follow..
<div [hidden]="username.valid || username.untouched" class="alert alert-danger">
     Username is required
</div>
We also disable the Sign in button till the form is valid.
<button class="btn btn-primary btn-lg btn-block" (click)="login()" [disabled]="!loginForm.form.valid">Sign In</button>
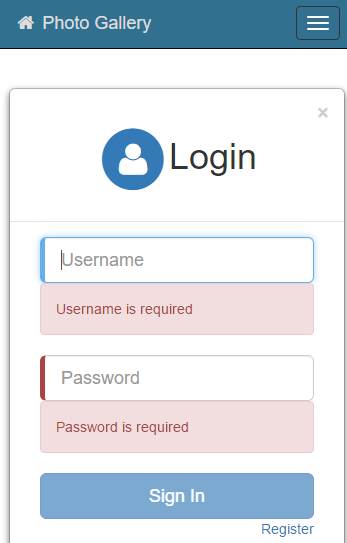
The RegisterComponent component and its template follow the same logic as the login’s one so just create the register.component.ts and register.html files under the app/components/account folder.
import { Component, OnInit} from '@angular/core';
import { Router } from '@angular/router';
import { Registration } from '../../core/domain/registration';
import { OperationResult } from '../../core/domain/operationResult';
import { MembershipService } from '../../core/services/membership.service';
import { NotificationService } from '../../core/services/notification.service';

@Component({
    selector: 'register',
    providers: [MembershipService, NotificationService],
    templateUrl: './app/components/account/register.component.html'
})
export class RegisterComponent implements OnInit {

    private _newUser: Registration;

    constructor(public membershipService: MembershipService,
                public notificationService: NotificationService,
                public router: Router) { }

    ngOnInit() {
        this._newUser = new Registration('', '', '');
    }

    register(): void {
        var _registrationResult: OperationResult = new OperationResult(false, '');
        this.membershipService.register(this._newUser)
            .subscribe(res => {
                _registrationResult.Succeeded = res.Succeeded;
                _registrationResult.Message = res.Message;

            },
            error => console.error('Error: ' + error),
            () => {
                if (_registrationResult.Succeeded) {
                    this.notificationService.printSuccessMessage('Dear ' + this._newUser.Username + ', please login with your credentials');
                    this.router.navigate(['account/login']);
                }
                else {
                    this.notificationService.printErrorMessage(_registrationResult.Message);
                }
            });
    };
}
<div id="registerModal" class="modal show" tabindex="-1" role="dialog" aria-hidden="true">
    <div class="modal-dialog">
        <div class="modal-content">
            <div class="modal-header">
                <button type="button" class="close" data-dismiss="modal" aria-hidden="true">×</button>
                <h1 class="text-center">
                    <span class="fa-stack fa-1x">
                        <i class="fa fa-circle fa-stack-2x text-primary"></i>
                        <i class="fa fa-user-plus fa-stack-1x fa-inverse"></i>
                    </span>Register
                </h1>
            </div>
            <div class="modal-body">
                <form class="form col-md-12 center-block" #registerForm="ngForm">
                    <div class="form-group">
                        <input type="text" class="form-control input-lg" placeholder="Username" [(ngModel)]="_newUser.Username"
                               name="username" #username="ngModel" required>
                        <div [hidden]="username.valid || username.untouched" class="alert alert-danger">
                            Username is required
                        </div>
                    </div>
                    <div class="form-group">
                        <input type="email" class="form-control input-lg" placeholder="Email" [(ngModel)]="_newUser.Email"
                               name="email" #email="ngModel" required>
                        <div [hidden]="email.valid || email.untouched" class="alert alert-danger">
                            Email is required
                        </div>
                    </div>
                    <div class="form-group">
                        <input type="password" class="form-control input-lg" placeholder="Password" [(ngModel)]="_newUser.Password"
                               name="password" #password="ngModel" required>
                        <div [hidden]="password.valid || password.untouched" class="alert alert-danger">
                            Password is required
                        </div>
                    </div>
                    <div class="form-group">
                        <button class="btn btn-primary btn-lg btn-block" (click)="register()" [disabled]="!registerForm.form.valid">Register</button>
                    </div>
                </form>
            </div>
            <div class="modal-footer">
                <div class="col-md-12">
                    <a class="btn btn-danger pull-left" [routerLink]="['/account/login']" data-dismiss="modal" aria-hidden="true">Cancel</a>
                </div>
            </div>
        </div>
    </div>
</div>
Let us create the AccountComponent component which will act as the root container for account related components. Add the account.component.ts file under app/components/account.
import {Component} from '@angular/core'

@Component({
    selector: 'account',
    templateUrl: './app/components/account/account.component.html'
})

export class AccountComponent {
    constructor() {

    }
}
The <i>account.component.html</i>..

<div class="container">
    <router-outlet></router-outlet>
</div>
And now the module under account folder as well..
import { NgModule }       from '@angular/core';
import { FormsModule }    from '@angular/forms';
import { CommonModule }   from '@angular/common';

import { DataService } from '../../core/services/data.service';
import { MembershipService } from '../../core/services/membership.service';
import { NotificationService } from '../../core/services/notification.service';

import { AccountComponent } from './account.component';
import { LoginComponent } from './login.component';
import { RegisterComponent }   from './register.component';

import { accountRouting } from './routes';

@NgModule({
    imports: [
        CommonModule,
        FormsModule,
        accountRouting
    ],
    declarations: [
        AccountComponent,
        LoginComponent,
        RegisterComponent
    ],

    providers: [
        DataService,
        MembershipService,
        NotificationService
    ]
})
export class AccountModule { }
Here is where all account related components are bound together. In an NgModule we declare any component we are going to use, directive, pipe or custom services. We also declare the routing configuration we want to use. Now its time for the application's root module where we also are going to define the AccountModule as well. Let's create first the app.module.ts file under the app folder.
import { NgModule }      from '@angular/core';
import { BrowserModule } from '@angular/platform-browser';
import { HttpModule } from '@angular/http';
import { FormsModule } from '@angular/forms';
import { Location, LocationStrategy, HashLocationStrategy } from '@angular/common';
import { Headers, RequestOptions, BaseRequestOptions} from '@angular/http';

import { AccountModule } from './components/account/account.module';
import { AppComponent }  from './app.component';
import { AlbumPhotosComponent } from './components/album-photos.component';
import { HomeComponent } from './components/home.component';
import { PhotosComponent } from './components/photos.component';
import { AlbumsComponent } from './components/albums.component';
import { routing } from './routes';

import { DataService } from './core/services/data.service';
import { MembershipService } from './core/services/membership.service';
import { UtilityService } from './core/services/utility.service';
import { NotificationService } from './core/services/notification.service';

class AppBaseRequestOptions extends BaseRequestOptions {
    headers: Headers = new Headers();

    constructor() {
        super();
        this.headers.append('Content-Type', 'application/json');
        this.body = '';
    }
}

@NgModule({
    imports: [
        BrowserModule,
        FormsModule,
        HttpModule,
        routing,
        AccountModule
    ],
    declarations: [AppComponent, AlbumPhotosComponent, HomeComponent, PhotosComponent, AlbumsComponent],
    providers: [DataService, MembershipService, UtilityService, NotificationService,
        { provide: LocationStrategy, useClass: HashLocationStrategy },
        { provide: RequestOptions, useClass: AppBaseRequestOptions }],
    bootstrap: [AppComponent]
})
export class AppModule { }
We imported all modules that our app needs in order to function properly. Notice the AccountModule import which internally defines its own routing system as we saw previously. We also declare the components and services to be used by our app. Here is the app.component.ts definition.
/// <reference path="../../typings/globals/es6-shim/index.d.ts" />

import { Component, OnInit } from '@angular/core';
import { Location } from '@angular/common';
import 'rxjs/add/operator/map';
import {enableProdMode} from '@angular/core';

enableProdMode();
import { MembershipService } from './core/services/membership.service';
import { User } from './core/domain/user';

@Component({
    selector: 'photogallery-app',
    templateUrl: './app/app.component.html'
})
export class AppComponent implements OnInit {

    constructor(public membershipService: MembershipService,
                public location: Location) { }

    ngOnInit() {
        this.location.go('/');
    }

    isUserLoggedIn(): boolean {
        return this.membershipService.isUserAuthenticated();
    }

    getUserName(): string {
        if (this.isUserLoggedIn()) {
            var _user = this.membershipService.getLoggedInUser();
            return _user.Username;
        }
        else
            return 'Account';
    }

    logout(): void {
        this.membershipService.logout()
            .subscribe(res => {
                localStorage.removeItem('user');
            },
            error => console.error('Error: ' + error),
            () => { });
    }
}
The component exposes some membership related functions (login, logout, getUsername) which will allow us to display the user's name and a logout button if authenticated and a login button if not. As of Angular 2 RC.5 we need to define an NgModule. Add the following app.module.ts under wwwroot/app.
import { NgModule }      from '@angular/core';
import { BrowserModule } from '@angular/platform-browser';
import { HttpModule } from '@angular/http';
import { FormsModule } from '@angular/forms';
import { Location, LocationStrategy, HashLocationStrategy } from '@angular/common';
import { Headers, RequestOptions, BaseRequestOptions} from '@angular/http';

import { AccountModule } from './components/account/account.module';
import { AppComponent }  from './app.component';
import { AlbumPhotosComponent } from './components/album-photos.component';
import { HomeComponent } from './components/home.component';
import { PhotosComponent } from './components/photos.component';
import { AlbumsComponent } from './components/albums.component';
import { routing } from './routes';

import { DataService } from './core/services/data.service';
import { MembershipService } from './core/services/membership.service';
import { UtilityService } from './core/services/utility.service';
import { NotificationService } from './core/services/notification.service';

class AppBaseRequestOptions extends BaseRequestOptions {
    headers: Headers = new Headers();

    constructor() {
        super();
        this.headers.append('Content-Type', 'application/json');
        this.body = '';
    }
}

@NgModule({
    imports: [
        BrowserModule,
        FormsModule,
        HttpModule,
        routing,
        AccountModule
    ],
    declarations: [AppComponent, AlbumPhotosComponent, HomeComponent, PhotosComponent, AlbumsComponent],
    providers: [DataService, MembershipService, UtilityService, NotificationService,
        { provide: LocationStrategy, useClass: HashLocationStrategy },
        { provide: RequestOptions, useClass: AppBaseRequestOptions }],
    bootstrap: [AppComponent]
})
export class AppModule { }
We created a BaseRequestOption class in order to override the default options used by Http to create and send Requests. We declared that we want the Content-Type header to be equal to application/json when making http requests to our Web API back-end infrastructure. We have also made our custom services available through our application. Add the following main.ts file under wwwroot/app as well.
import { platformBrowserDynamic } from '@angular/platform-browser-dynamic';
import { AppModule } from './app.module';

platformBrowserDynamic().bootstrapModule(AppModule);
This file is responsible to bootstrap the SPA. The app.component.html template the will host two important features. The first one is the navigation top-bar and of course the main router-outlet. Add it under wwwroot/app folder.
<!-- Navigation -->
<nav class="navbar navbar-inverse navbar-fixed-top" role="navigation">
<div class="container">
<div class="navbar-header">
<button type="button" class="navbar-toggle" data-toggle="collapse" data-target="#bs-example-navbar-collapse-1">
<span class="sr-only">Toggle navigation</span>
<span class="icon-bar"></span>
<span class="icon-bar"></span>
<span class="icon-bar"></span>
</button>
<a class="navbar-brand" [routerLink]="['/home']"><i class="fa fa-home fa-fw"></i> Photo Gallery</a>
</div>
<div class="collapse navbar-collapse" id="bs-example-navbar-collapse-1">
<ul class="nav navbar-nav navbar-right">
<li>
<a href="http://wp.me/p3mRWu-11L" target="_blank"><i class="fa fa-info fa-fw"></i> About</a>
</li>
<li>
<a [routerLink]="['/photos']"><i class="fa fa-camera fa-fw"></i> Photos</a>
</li>
<li>
<li><a [routerLink]="['/albums']"><i class="fa fa-picture-o fa-fw"></i> Albums</a></li>
<li class="dropdown">
<a href="#" class="dropdown-toggle" data-toggle="dropdown"><i class="fa fa-pencil-square-o fa-fw"></i> Blog<b class="caret"></b></a>
<ul class="dropdown-menu">
<li>
<a href="https://github.com/chsakell" target="_blank"><i class="fa fa-github fa-fw"></i> Github</a>
</li>
<li>
<a href="https://twitter.com/chsakellsblog" target="_blank"><i class="fa fa-twitter fa-fw"></i> Twitter</a>
</li>
<li>
<a href="https://www.facebook.com/chsakells.blog" target="_blank"><i class="fa fa-facebook fa-fw"></i> Facebook</a>
</li>
<li>
<a href="https://chsakell.com/2015/08/23/building-single-page-applications-using-web-api-and-angularjs-free-e-book/" target="_blank"><i class="fa fa-backward fa-fw"></i> Previous version</a>
</li>
</ul>
</li>
<li class="dropdown">
<a href="#" class="dropdown-toggle" data-toggle="dropdown"><i class="fa fa-user fa-fw"></i> {{getUserName()}}<b class="caret"></b></a>
<ul class="dropdown-menu">
<li *ngIf="!isUserLoggedIn()">
<a [routerLink]="['/account/login']"><i class="fa fa-unlock-alt fa-fw"></i> Sign in</a>
</li>
<li *ngIf="isUserLoggedIn()">
<a [routerLink]="['/home']" (click)="logout()"><i class="fa fa-power-off fa-fw"></i> Logout</a>
</li>
</ul>
</li>
</ul>
</div>
</div>
</nav>
<div>
<router-outlet></router-outlet>
</div>
Since the top-bar is html elements of the base host component, it will be always displayed whichever component and route is active. Believe it or not, we have finished building the PhotoGallery cross-platform ASP.NET Core 1.0 Single Page Application. At this point you can run the build-spa Gulp task, build and run the application. Let's view the final result with a .gif: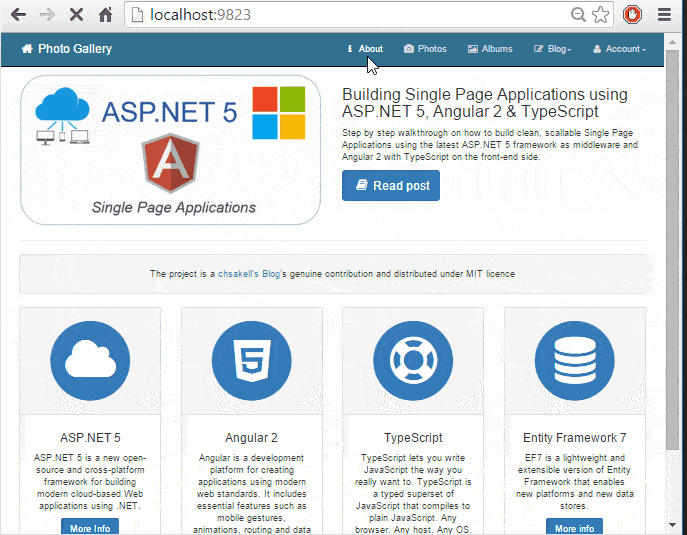 .
.
Discussion
Single Page Application Scalability
One thing you may wonder at the moment is.. I cannot remember referensing all those components we have coded (e.g. Home, Login, Albums..) in any page, so how is this even working? The answer to this question will show us the way to scale this app in case we wanted to provide multiple views. Let me remind you first that when the compile-typescript task runs all the transpiled files end in the wwwroot/lib/spa folder. Hense, we should wait to find the transpiled result of our root component AppRoot in a wwwroot/lib/spa/app.js file. This is the only file you need to reference in your page that will eventually host this single page application. And which is that page? The Index.cshtml of course..
<photogallery-app>
    <div class="loading">Loading</div>
</photogallery-app>

@section scripts
{
    <script src="~/lib/js/jquery.fancybox.pack.js"></script>
    <script src="~/lib/js/alertify.min.js"></script>
}

@section customScript
{
    System.import('app').catch(console.log.bind(console));
    $(document).ready(function() {
       $('.fancybox').fancybox();
    });
}
All the required components and their javascript-transpiled files will be automatically loaded as required using the universal dynamic module loader SystemJS. Let's assume now that we need to scale this app and create a new MVC View named Test.cshtml and of course we want to bootstrap a hall new different Single Page Application. This Test.cshtml could use the default _Layout.cshtml page which is a bootstrap template that references only the basic libraries to start coding Angular 2 applications. All you have to do now is create a new root component, for example AppRootTest in a typescript file named apptest.ts under wwwroot/app. This component will probably has its own routes, so you could create them as well. If you see that your application gets too large and you code too many root components, you can place all of them under a new folder named wwwroot/app/bootstrappers. Then part of the Test.cshtml page could look like this.
<photogallery-apptest>
    <div class="loading">Loading</div>
</photogallery-apptest>

@section scripts
{
    <script src="~/lib/js/jquery.fancybox.pack.js"></script>
    <script src="~/lib/js/alertify.min.js"></script>
}

@section customScript
{
    System.import('./lib/spa/apptest.js').catch(console.log.bind(console));
    $(document).ready(function() {
    $('.fancybox').fancybox();
    });
}
As you can see this page will only load the root component AppTest and its related files as well.
ASP.NET Core 1.0 architecture
In case this isn't your first time you visit my blog, you will know that I always try to keep things clean as far as instrastrure concerns. Yet, on this application I kept all data repositories and services inside the web app. I did it for a reason. First of all I excluded the classic c# class libraries. ASP.NET Core 1.0 is a cross-platform framework, it isn't supposed to work directly with those libraries. MAC and linux users have probably no clue what a c# class library is. So an alternative option may would be to use ASP.NET Core 1.0 class libraries (packages). Those types of projects are cross-platform compiled and can target multiple frameworks. At the time though this post was written, I found that they weren't that much stable to use them in this app so I decided to focus on the Web only. I am very sure that time will show us the best way to architect the different components in a ASP.NET Core 1.0 application. When this time comes, I will certainly post about it.
Conlusion
Building the PhotoGallery application was a great experience for me and I hope so for you as well. I believe that ASP.NET Core 1.0 will help us build more robust, scalable and feature-focused applications. The option where we can only install what we only want to use is simply great. The idea that you have no unnecessary packages installed or unnecessary code running behind the scenes makes you think that you build super lightweighted and fast applications. Same applies for Angular 2 for which I found that coding with it had a lot of fun. Import only what you actually want to use, inject only what actually need to inject, nothing more. Let's recap at this point the best features we saw on this post.

Excellent. Thank you for a very detailed and comprehensive tutorial.
This is by far the best article where ASP.NET 5 and Angular 2 are combined. Thank you very much Chris, keep up the good work!
Another great post, Chris! You’re on fire!
Great post Chris
Can you make another detailed post like this about
How to create a blog using these tools
That’s gonna be a great and the first post about that
Thanks
Excellent. You are realy safe a lot of my day. Can you help please, how can i add option “remember me” to autentication?
Hi Vladimir,
This is a nice suggestion actually. The most important thing you need to do, is to change the HttpContext.Authentication.SignInAsync method in the AccountController as follow:
await HttpContext.Authentication.SignInAsync(CookieAuthenticationDefaults.AuthenticationScheme,
      new ClaimsPrincipal(new ClaimsIdentity(_claims, CookieAuthenticationDefaults.AuthenticationScheme)),
      new Microsoft.AspNet.Http.Authentication.AuthenticationProperties {IsPersistent = user.RememberMe });
As you can see you need to use a different overload passing an instance of AuthenticationProperties. You also need to add a new boolean property in the LoginViewModel view model to hold the RememberMe value. You have to do the same in the Angular 2 part. I have made and committed all of these changes on the repository. You can find them here.

thank a lot!!!
Stunning… Outstanding… Where is the book?? 🙂
No book this time.. 🙂
I could manage to use PathLocationStrategy by decorating the HomeController Index entry with
[Route(“{*url}”)]
This forces all browser refreshes on” HTML 5 URLs” to to the SPA way via the bootstrapping MVC view again. The rest is done by the client side router 🙂
BTW: Did you consider to use JWT at any point and if yes, why didn’t you use it? It would give you the chance to open your API for non-browser clients, even CORS enabled. The more because Angular will rule the smart device world sooner or later (see Ionic and friends) Also sharing user details as well as roles between client and server would be easier.
Thanks for sharing this with us neil. The full resolution is on GitHub here.
We will view the JWT example in a future post along with ASP.NET Identity.
Yes. The same “Neil” was working there 🙂
Awesome post! Love the clarity of your work. In your future post will you use this example but incorporate ASP.NET Identity? Is there any reason you chose to write your own membership service?
I ‘ll make sure to use ASP.NET Identity in a future post related to security. Some people feel more comfortable when implementing their own security infrastructure. I like both of the approaches.
Best project I’ve seen so far for asp.net 5/typescript/angular 2. Great instructions on github too. Only project I had was with dnx commands (command not found) which was fixed here.
Typescript Debugging
I was not able to run the project in IE 11, but Chrome and Edge worked fine. The reason why I wanted to debug the project in IE is because I’ve been trying unsuccessfully to debug *.ts files in asp.net 5 projects. I can debug *.ts files in the VS 2015 TypeScript template but not in an asp.net 5 project – including yours.
Any ideas would be most appreciated,
Thanks,
Jim
Very thorough and informative post. Thank you.
thanks a lot Chris, it’s really helpful!
excellent Post, thank you… I try to run use iis express and got 404 .. any suggestion to handle this? i need to use iis and want to test it host in my windows server
Hi freddi,
check that you have set correctly the MVC services in the Startup.cs file.
app.UseMvc(routes => { routes.MapRoute( name: "default", template: "{controller=Home}/{action=Index}/{id?}"); // Uncomment the following line to add a route for porting Web API 2 controllers. //routes.MapWebApiRoute("DefaultApi", "api/{controller}/{id?}"); });i do have set that, i am sure i miss something about route, even there `s no error found… any way i got better understanding using angularjs 2 and TS after following the sample ( that is the best part for me )
Superb implementation and documentation. I thoroughly enjoyed reading it and love the fundamental patterns and practice that are used. Just a quick one … are you going to replace tds (obsolete) with https://github.com/typings/typings? I would certainly enjoy an OAuth implementation to login with external providers e.g. facebook, twitter, etc.
I like the tutorial very much. Thanks!
I have come across an issue when trying the project in windows 10 x64 machine, it gives a warning like:
DNX ‘dnx-clr-win-x86.1.0.0-rc1-final’ is required but not installed on this computer, my current run time is set to ‘1.0.0-rc1-update1 x64’.
wondering how to get this to work?
(FYI, the project did run on another machine which is running windows 10 x32 machine)
Try the following: Right click the web application and select Properties. Then select the 1.0.0-rc1-update1 as the Solution SDK DNX SDK Version.

This will also change the global.json file as follow:
{ "projects": [ "src", "test" ], "sdk": { "version": "1.0.0-rc1-update1" } }Worked it out … in the package console type the following
PM> dnvm upgrade
PM> dnvm upgrade -r CoreClr
PM> dnu restore
Well done Zane.
A very helpful article and example. I do have one query: refreshing browser takes me back to home page, is that intended behavior?
Is there a way to stay on the current page?
e.g. refreshing while on http://localhost:9823/#/photos takes back to http://localhost:9823/
a tip:
install Typewriter add on for Visual Studio 2015 .. it will create you your TS entities base on the models…
Thanks for the tip Cristovao. I ‘ll give it a try.
A link to “Typewriter” would be useful as a google search on “Typewriter” will just bring up the mechanical device…
Keep up the great work!!
I have forked your repo and opened it in VS 2015 and tried to run the app but get a strange error:
Error: Object doesn’t support property or method ‘keys’
Error loading http://localhost:9823/lib/spa/app.js
The spinning wheel is displayed but the app hangs and nothing happens.
I am not sure what this means? The only thing I have change is the connection string for the app to run on my machine. This works fine as I have run the scripts for EF to create the db locally, can you please advise?
Many thanks
Oh and running on Windows
I cannot reproduce your error but it seems that it’s a known shim related issue. Try creating a JavaScript file under wwwroot/js folder and paste the following code.
// From https://developer.mozilla.org/en-US/docs/Web/JavaScript/Reference/Global_Objects/Object/keys
if (!Object.keys) {
  Object.keys = (function() {
    'use strict';
    var hasOwnProperty = Object.prototype.hasOwnProperty,
        hasDontEnumBug = !({ toString: null }).propertyIsEnumerable('toString'),
        dontEnums = [
          'toString',
          'toLocaleString',
          'valueOf',
          'hasOwnProperty',
          'isPrototypeOf',
          'propertyIsEnumerable',
          'constructor'
        ],
        dontEnumsLength = dontEnums.length;

    return function(obj) {
      if (typeof obj !== 'object' && (typeof obj !== 'function' || obj === null)) {
        throw new TypeError('Object.keys called on non-object');
      }

      var result = [], prop, i;

      for (prop in obj) {
        if (hasOwnProperty.call(obj, prop)) {
          result.push(prop);
        }
      }

      if (hasDontEnumBug) {
        for (i = 0; i < dontEnumsLength; i++) {
          if (hasOwnProperty.call(obj, dontEnums[i])) {
            result.push(dontEnums[i]);
          }
        }
      }
      return result;
    };
  }());
}
Include the file as the top script in the _Layout.cshtml page and test it. For reference check this.
Amazing thanks will try it later cross fingers!!
It appears my Antivirus may be playing a part in this issue of mine, runs fine without the above script just not IE11. Thanks for taking the time to look into this problem.
Thank you very much for the great tutorial.
I got everything to work. But if I upgrade to Angular 2 Beta 7 then I get typescript compile Errors. Mostly things like “error TS2304: Cannot find name ‘Promise’.”.
Are you going to update the github project to a newer Angular Version one day? This would be really helpful!
Thank you very much!
Hi Jones,
I have upgraded the project to Angular 2 Beta 7. Two files needed to be changed, package.json and app.ts typescript file. In the package.json make sure you upgrade not only angular 2 but also some other related packages. As far as for the typescript error you mentioned, you need to add the following line to the app.ts file.
You can view the changes I made here.
Thank you very much!!
Hey Chris,
I’ve been working on getting Angular working with TypeScript in VS2015, and it has been pretty frustrating. This article has been a great help, but I have a question about your script loading. I’m not familiar with Systemjs, so maybe this is something common that I just haven’t seen before. Anyway, I notice you have this block:
<script src="~/lib/js/angular2.dev.js"></script>

    <script src="~/lib/js/jquery.js"></script>
    <script src="~/lib/js/bootstrap.js"></script>

    <script>
        System.config({
            map: {
                'rxjs': 'lib/js/rxjs',
                'angular2/angular2': '~/lib/js/angular2.dev.js',
                'angular2/http': '~/lib/js/http.dev.js',
                'angular2/router': '~/lib/js/router.dev.js'
            },
            packages: {
                'app': { defaultExtension: 'js' },
                'rxjs': { defaultExtension: 'js' }
            },
            defaultJSExtensions: true

        });
    </script>
    <script src="~/lib/js/angular2.dev.js"></script>
From my naive perspective, this looks like it’s loading angular at least twice, from both of the script blocks, and possibly an additional time for the mapping (still not exactly sure how this works). Playing around with this, it seemed to only work if I left the script in *after* the System.config (or left both in).
I also may be misunderstanding and/or misusing the System mapping process, but for a long time (before I put the script *after* System), I was seeing issues with a call in my code to /angular/platform/browser, or something along those lines, not working (and trying to trigger an additional request). I couldn’t find any way to make the mapping “relevant,” as it never seemed to work when I had the script tag *before* the System.config, and doesn’t seem necessary at all (read: all mappings removed) when I put it after.
This may not all make sense, as I’m still not sure what I’m doing myself. The multiple script tags here are perhaps the main question — why are there dupes?
You can remove the unnecessary references. Thanks for noticing it.
Excellent tutorial. Especially it explains very well how to get all the tooling in place in Visual Studio – npm, bower, gulp, dnx ef, …
Great and very detailed tutorial. Thanks for putting this together.
Thank you! This tutorial was very helpful!
I have the same issue as Jim S where I’m unable to debug Typescript files in VS 2015 in a ASP.NET 5 Web Application. In my gulpfile, I’ve set the sourcemap to point to the sourceRoot ‘wwwroot/app’ but no breakpoints get hit. Do you have any instructions for getting debugging working in VS?
Hi,
Really enjoyed the article and working great. One thing I couldn’t figure out, is there a way to have the typescript file automatically compile when you build the project?
Thanks
Visual Studio 2015 allows you to do this through the Task Runner Explorer by right clicking a specific task and add a binding for After Build event. In your case you need to add this binding to the compile-typescript task.

On the other hand you don’t actually need to do this. We have already a watch.ts Gulp task that watches for Typescript file changes and runs the compile-typescript task automatically.
gulp.task('watch.ts', ['compile-typescript'], function () {
    return gulp.watch('wwwroot/app/**/*.ts', ['compile-typescript']);
});

gulp.task('watch', ['watch.ts']);
In case you want to take it a step further and optimize the development experience consider integrating browser-sync in the app. This will watch for any file changes and automatically inject and reflect them in your browser. This means that while running the watch task, if you change a typescript file it will be compiled and browser-sync will reflect the change instantly in your browser. I have used browser-sync on this project.
I spent 2 years reading over and over
about spa and could not find helpfull
information of how to combine all
new techs together to create something
with quality in mind.
ur post returned my faith in programming
again
thanks thanks thanks
if you would include comments for
photos (master-details) approach I’ll be grateful
and thanks again
excellent tutorial thanks.its very usefull for me
Thanks for the very good article on anular 2..this is best complete article on the web ..
How we can do in EF 7, since when the class I Inherit EntityTypeConfiguration that unable to find the class..do you have any idea please let me know..
Thank you for the excellent post. I would suggest to move the typescript files outside the wwroot and use outdir option in tsconfig file. this will keep wwroot folder containing only files required to run in the client side.
Thank you again,
Amazing article for complete SPA application. I was also looking into separate two applications , Client Only SPA (Angular + TypeScript ) + Server ( Asp.net Core + Entity ), any suggestions??
This shouldn’t be a difficult task to accomplish. The spa currently leaves inside the wwwroot folder so you need to move it inside your new most likely folder based application. You also need to move the bower, npm and Gulp related files and change them to reflect your new environment.
Excellent example with source code. Working fine with Chrome but not with IE 11, how I can use with IE 11, need help.
This might help you.
Thanks problem resolved.
Good work. Thanks for posting.
Some comments:
packages: {
                'app': { defaultExtension: 'js' },
                'rxjs': { defaultExtension: 'js' }
            }
is not really needed.
Thanks Victor,
Regards,
Chris
Great post. My reference to how to organize your code with asp.net and angular2.
Would be awesome to see a second part using angular 2 rc1, webpack.and perharps asp.net 5 rc2
waiting for update to angular 2 rc and core rc2 …
I have already updated both the post and source code to Angular 2 RC. Check this link.
Thanks Christos
Best tutorial! Thanks a lot 🙂 What makes it the best is that at first you show what we’re going to achieve :)) and only after that we dive into details.
Thank you for your tutorial. Waiting for update to ASP.NET Core RC2 ???
we are Waiting for update to ASP.NET Core RC2. thanks
I have updated the project to ASP.NET Core RC2. The master branch on Github contains the ASP.NET Core version while the RC_1 the ASP.NET 5. Check the source code here and a related post . The commit where migration happened is this one.
Thank you!
Thank you, the Best tutorial
Hi, after updating to core 2, i cannot install @angular with npm. what could have gone wrong? please assist
.NET Core has nothing to do with @angular.
Make sure you have the latest node.js installed on your machine. You can update to the latest version from here. As mentioned from official Angular site, you need to run at least node v5.x.x and npm 3.x.x. Verify your versions by running the following commands in a console:
node -v
npm -v
Hi ,
I am trying to build your solution and I have updated version of Node.js and Npm.
I am getting following error
npm WARN install Couldn’t install optional dependency: Unsupported
This should not be a problem though. It’s a known NPM issue but official Angular claims you can ignore those messages.

Thank you very much for the article. It’s a really good resource to see how ASP.NET Core 1.0 and Angular 2 work together. I would like to expand on this and add ng2-bootstrap (https://valor-software.com/ng2-bootstrap/#/) Do I add it with bower or npm and then add it to the gulpfile? Should I reference it in the System.config in the _Layout.cshtml?
Hi Rik,
we used ng2-bootstrap using NPM on this SPA. Read the related article here.
Great pos 🙂
but I have a question… How to get the currently logged in users?
Hi, it’s a great tutorial.
I can’ seem to get it to work since i’m using angular 2 RC5, and the tuturial is still using RC 2.
Is there an updated version to Angular 2 RC 5?
I would really like to do this tutorial and get it to work
Thanks
Hi Frederic,
I have already updated the repository to Angular 2 RC.5. I will update the post as soon as I find some free time.
Hi Christos,
.NET Core 1.0 has just been released. Can you please upgrade this excellent tutorial to the latest version?
Thanks you so much for your hard work.
Done. Make sure to alter the Startup class as follow in order to disable CamelCasing which ASP.NET Core applies by default.
services.AddMvc() .AddJsonOptions(opt => { var resolver = opt.SerializerSettings.ContractResolver; if (resolver != null) { var res = resolver as DefaultContractResolver; res.NamingStrategy = null; } });You are the Best, Thanks.
Hi, Christos! Thank you for your tutorial!!!
I propose to change AccountController(authenticate method). “role” variable is not used.
Your code:
foreach (Role role in _roles)
{
    Claim _claim = new Claim(ClaimTypes.Role, "Admin", ClaimValueTypes.String, user.Username);
   _claims.Add(_claim);
 }
Fix code:
foreach (Role role in _roles)
{
    Claim _claim = new Claim(ClaimTypes.Role, role.Name, ClaimValueTypes.String, user.Username);
    _claims.Add(_claim);
}