When using a WCF services over the internet, you should always consider security issues such as Authentication or Authorization. Authentication generally speaking, answers the question “Who are you” and Authorization answers the question “What are your privileges”. Take an example: There is a client named “Paul”, who want’s to access a service and particularly an operation called “GetProducts”. If Authentication is enabled, normally Paul must somehow provide his credentials to the service, then the service must check if those credentials are valid and if so, proceed with calling the operation. Moreover, if Authorization was enabled, after validating that Paul is a valid user, the service would have to check if he also has the right to call the operation he requested. WCF services can authenticate clients with several ways such as Windows Integrated Security or ASP.NET Providers. Windows Integrated Security fits mostly in a Windows Environment where an Active Directory can provide a database to store user’s credentials. Probably an organization would prefer this kind of service. When client applications connect to the service across the internet it is most likely to use alternative approaches for authenticating and authorizing users. One of them is to use the ASP.NET Membership and Role Providers. We are going to show how to authenticate clients with the ASP.NET Membership Provider leaving authorizing users with ASP.NET Role Provider for another post.Start by creating a new solution and add a new WCF website. Name it TestAuthonticationService.

In the IService.cs file remove the DataContract and leave just the Service and the Operation Contracts as follow:
namespace AuthenticationService
{

    [ServiceContract]
    public interface IService
    {

        [OperationContract]
        string GetData(int value);

    }

}
Modify respectively the Service implementation file, Service.cs:
namespace AuthenticationService
{

    public class Service : IService
    {
        public string GetData(int value)
        {
            return string.Format("You entered: {0}", value);
        }
    }
}
Modify the Service.svc file simply adding the full qualified name of the service implementation class:
<% @ServiceHost Language="C#" Debug="true" Service="AuthenticationService.Service" CodeBehind="~/App_Code/Service.cs" %>
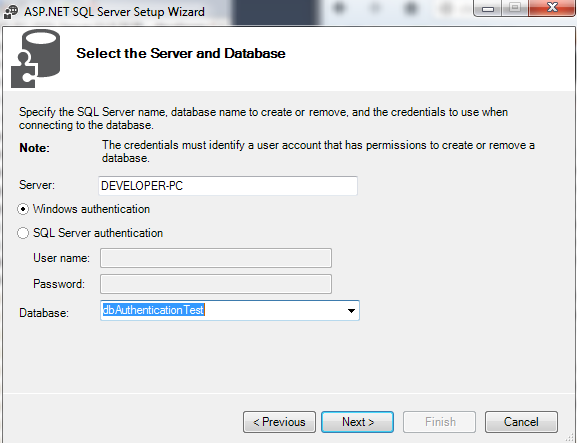
Right click the Service.svc file, select View in Browser and make sure the service is running. That was the first step. The next step, is to create a database which the service will use to authenticate clients through the ASP.NET Provider. In order for the ASP.NET Provider to use such a database, that database must have some basic tables such as “Users” or “Roles”. To do that, as soon as we create the new database, we are going to install the services that the ASP.NET Provider requires. Then, in the Web.config file, will make the right configurations to tell the Provider to use that database to validate users. I am going to create a new db in my SQL Server 2012. I will call it dbAuthenticationTest. As you can see, it is just an empty database:
To install ASP.NET Membership and Role Providers services, go and run as administrator the aspnet_regsql.exe utility, which is under the “C:\Windows\Microsoft.NET\Framework64\v4.0.30319” folder. In your environment maybe it relies in different folder. Click Next, select “Configure SQL Server for application services”, click Next, select your server instance and the new database and click Next again.
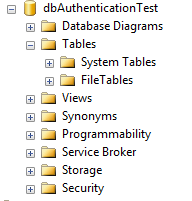
Click Next and Finish. Close the wizard and check your new database again. You will see that new tables added to it:

What we need to do next is quite tricky. At this point, our website have no idea about this database and so is the ASP.NET Membership Provider. We must add in the Web.config a new connection string pointing to our database and then configure the Provider. In your server explorer in your solution, right click the Data Connections and select “Add Connection”. Select “Microsoft SQL Server”, click Continue and Point the new Database as we did in the step when we installed the services. Select your new Connection and from below, copy and paste the connection string. Add this plus two entries for the Membership and the Role Provider as follow. Make sure you modify the connection string to yours configuration:
<?xml version="1.0"?>
<configuration>
<connectionStrings>
  <add name="dbAuthentication" connectionString="Data Source=developer-PC;Initial Catalog=dbAuthenticationTest;Integrated Security=True" providerName="System.Data.SqlClient" />
</connectionStrings>
  <appSettings>
    <add key="aspnet:UseTaskFriendlySynchronizationContext" value="true" />
  </appSettings>
  <system.web>
    <compilation debug="false" targetFramework="4.5" />
    <httpRuntime targetFramework="4.5"/>
  <membership defaultProvider="DefaultMembershipProvider">
      <providers>
        <add name="DefaultMembershipProvider" type="System.Web.Providers.DefaultMembershipProvider, System.Web.Providers, Version=1.0.0.0, Culture=neutral, PublicKeyToken=31bf3856ad364e35" connectionStringName="dbAuthentication" enablePasswordRetrieval="false" enablePasswordReset="true" requiresQuestionAndAnswer="false" requiresUniqueEmail="false" maxInvalidPasswordAttempts="5" minRequiredPasswordLength="6" minRequiredNonalphanumericCharacters="0" passwordAttemptWindow="10" applicationName="/" />
      </providers>
    </membership>
    <roleManager defaultProvider="DefaultRoleProvider">
      <providers>
        <add name="DefaultRoleProvider" type="System.Web.Providers.DefaultRoleProvider, System.Web.Providers, Version=1.0.0.0, Culture=neutral, PublicKeyToken=31bf3856ad364e35" connectionStringName="dbAuthentication" applicationName="/" />
      </providers>
    </roleManager>
  </system.web>
  <system.serviceModel>
    <behaviors>
      <serviceBehaviors>
        <behavior>
          <!-- To avoid disclosing metadata information, set the values below to false before deployment -->
          <serviceMetadata httpGetEnabled="true" httpsGetEnabled="true"/>
          <!-- To receive exception details in faults for debugging purposes, set the value below to true.  Set to false before deployment to avoid disclosing exception information -->
          <serviceDebug includeExceptionDetailInFaults="false"/>
        </behavior>
      </serviceBehaviors>
    </behaviors>
    <protocolMapping>
        <add binding="basicHttpsBinding" scheme="https" />
    </protocolMapping>
    <serviceHostingEnvironment aspNetCompatibilityEnabled="true" multipleSiteBindingsEnabled="true" />
  </system.serviceModel>
  <system.webServer>
    <modules runAllManagedModulesForAllRequests="true"/>
    <!--
        To browse web app root directory during debugging, set the value below to true.
        Set to false before deployment to avoid disclosing web app folder information.
      -->
    <directoryBrowse enabled="true"/>
  </system.webServer>

</configuration>
This is a WCF Website and by default System.Web.Providers aren’t installed or referenced in your project. In other words, we may have done good job in the Web.config file but still nothing matters since the Providers classes don’t exist. To add them in the website, right click the website and select “Manage NuGet Packages..” From the online packages search and install the “ASP.NET Universal Providers – Core dll”.

From Visual Studio’s toolbar above, click WEBSITE and select ASP.NET Configuration. We are going to add 2 new users. New users added from this website, are stored in the new database because we actually told the ASP.NET Providers so! Click Select Authentication type, select from the Internet and click Done. Now you can create users. Create two, let say Mary and Joy with passwords Mary123 and Joy123 respectively. Make sure, users are active. Now we need to edit the Web.config file and tell the service to use Authentication via ASP.NET Providers. Make the following configuration, the build the website and publish it to the IIS.
<?xml version="1.0"?>
<configuration>
<connectionStrings>
  <add name="dbAuthentication" connectionString="Data Source=developer-PC;Initial Catalog=dbAuthenticationTest;Integrated Security=True" providerName="System.Data.SqlClient" />
</connectionStrings>
  <appSettings>
    <add key="aspnet:UseTaskFriendlySynchronizationContext" value="true" />
  </appSettings>
  <system.web>
    <authentication mode="Forms" />
    <compilation debug="false" targetFramework="4.5" />
    <httpRuntime targetFramework="4.5"/>
  <membership defaultProvider="DefaultMembershipProvider">
      <providers>
        <add name="DefaultMembershipProvider" type="System.Web.Providers.DefaultMembershipProvider, System.Web.Providers, Version=1.0.0.0, Culture=neutral, PublicKeyToken=31bf3856ad364e35" connectionStringName="dbAuthentication" enablePasswordRetrieval="false" enablePasswordReset="true" requiresQuestionAndAnswer="false" requiresUniqueEmail="false" maxInvalidPasswordAttempts="5" minRequiredPasswordLength="6" minRequiredNonalphanumericCharacters="0" passwordAttemptWindow="10" applicationName="/" />
      </providers>
    </membership>
    <roleManager enabled="true" defaultProvider="DefaultRoleProvider">
      <providers>
        <add connectionStringName="dbAuthentication" applicationName="/"
          name="DefaultRoleProvider" type="System.Web.Providers.DefaultRoleProvider, System.Web.Providers, Version=1.0.0.0, Culture=neutral, PublicKeyToken=31bf3856ad364e35" />
      </providers>
    </roleManager>
  </system.web>
  <system.serviceModel>
    <bindings>
      <ws2007HttpBinding>
        <binding name="ServiceWS2007HttpBindingConfig">
          <security mode="TransportWithMessageCredential">
            <transport clientCredentialType="None" />
            <message clientCredentialType="UserName" />
          </security>
        </binding>
      </ws2007HttpBinding>
    </bindings>
    <services>
      <service name="AuthenticationService.Service">
        <endpoint address="https://localhost/TestAuthenticationService/"
         binding="ws2007HttpBinding" bindingConfiguration="ServiceWS2007HttpBindingConfig"
         contract="AuthenticationService.IService" />
      </service>
    </services>
    <behaviors>
      <serviceBehaviors>
        <behavior name="">
          <serviceMetadata httpGetEnabled="true" httpsGetEnabled="true" />
          <serviceDebug includeExceptionDetailInFaults="false" />
          <serviceAuthorization principalPermissionMode="UseAspNetRoles"
           roleProviderName="DefaultRoleProvider" />
          <serviceCredentials>
            <userNameAuthentication userNamePasswordValidationMode="MembershipProvider"
             membershipProviderName="DefaultMembershipProvider" />
          </serviceCredentials>
        </behavior>
      </serviceBehaviors>
    </behaviors>
    <serviceHostingEnvironment multipleSiteBindingsEnabled="false" aspNetCompatibilityEnabled="true">
      <serviceActivations>
        <add relativeAddress="Service.svc" service="AuthenticationService.Service" />
      </serviceActivations>
    </serviceHostingEnvironment>
    <protocolMapping>
        <add binding="basicHttpBinding" scheme="http" />
    </protocolMapping>
  </system.serviceModel>
  <system.webServer>
    <modules runAllManagedModulesForAllRequests="true"/>
    <!--
        To browse web app root directory during debugging, set the value below to true.
        Set to false before deployment to avoid disclosing web app folder information.
      -->
    <directoryBrowse enabled="true"/>
  </system.webServer>

</configuration>
After publishing the at the https://localhost/TestAuthenticationService/ IIS address the website, click it from the IIS Manager, select Advance Settings and enable the https protocol:

Navigate to https://localhost/TestAuthenticationService/Service.svc and make sure the service is hosted correctly in IIS.
Next we are going to create a new website which will be our client application. Go ahead and right click the solution. Create a new ASP.NET empty website. Right click and select Add Service Reference.. Fill the address with the service address (https://localhost/TestAuthenticationService/Service.svc). If prompt about security that ok. Call the namespace “AuthenticationServiceRef”. This will create our proxy class to call the service. Create a new web form to the website, add a textbox, a button and a label. The user will enter a integer value into the textbox, and when he press the button the GetData(int value) operation will be called over the https protocol. The idea is to display the result of the GetData operation in the lblResult. The code for Default.aspx and it’s code behind file are:
<%@ Page Language="C#" AutoEventWireup="true" CodeFile="Default.aspx.cs" Inherits="_Default" %>
<!DOCTYPE html>
<html xmlns="http://www.w3.org/1999/xhtml">
<head runat="server">
<title></title>
</head>
<body>
<form id="form1" runat="server">
<div>
Enter a value: <asp:TextBox ID="txtValue" runat="server"></asp:TextBox>
<asp:Button ID="btnSubmit" runat="server" OnClick="btnSubmit_Click" Text="Submit" />
<br />
<asp:Label ID="lblResult" runat="server" Text=""></asp:Label>
</div>
</form>
</body>
</html>
using AuthenticationServiceRef;

public partial class _Default : System.Web.UI.Page
{
    protected void Page_Load(object sender, EventArgs e)
    {

    }
    protected void btnSubmit_Click(object sender, EventArgs e)
    {
        ServiceClient proxy = new ServiceClient();
        lblResult.Text = proxy.GetData(Int32.Parse(txtValue.Text));
    }
}
Go ahead, build and run the website. Put an integer value into the text and press the button. Ops! An error occurred asking the client for credentials. This is good actually, it’s a sign that the WCF service was hosted correctly and it expects for the client to be authenticated.
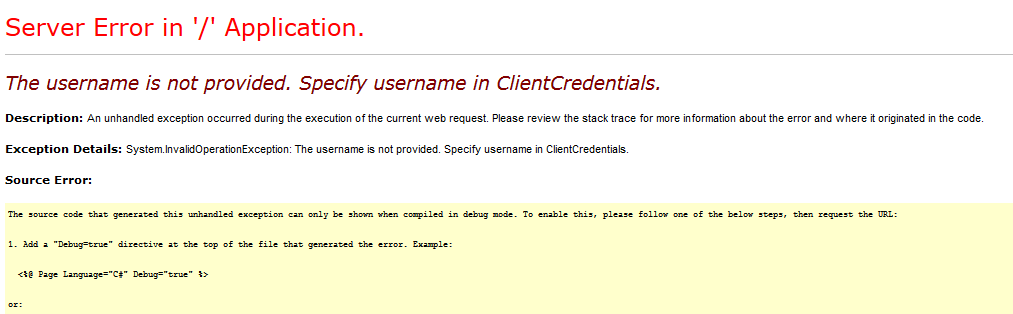
Go ahead and modify the Default.aspx.cs file as follows, providing this time User credentials.
using AuthenticationServiceRef;

public partial class _Default : System.Web.UI.Page
{
    protected void Page_Load(object sender, EventArgs e)
    {

    }
    protected void btnSubmit_Click(object sender, EventArgs e)
    {
        ServiceClient proxy = new ServiceClient();
        proxy.ClientCredentials.UserName.UserName = "Mary";
        proxy.ClientCredentials.UserName.Password = "Mary123";
        lblResult.Text = proxy.GetData(Int32.Parse(txtValue.Text));
    }
}
Build and open again the Default.aspx page in your browser. Put an integer value and press the Submit button. You should see the label with the return value of the GetData operation. What happened is that the client provided user credentials this time, the WCF service used those to authenticate the user through the ASP.NET Provider, by checking the database we had created at the beginning of this post. That’s it. We are going to see how to add Authorization services to a WCF service with the ASP.NET Role Provider in the next post.

Hi this is a great example. Can you also explain, how to handle a scenario of WCF Authentication with Service and Interface separated as different Projects(dlls) with different Namespace
example dll 1 Test.Service.Product and dll2 is Test.Contract.IProduct.
When I try to create a client for this I get a compilation error that says that ‘GetData’ is not a member of ‘AuthenticationServiceRef.AuthenticationServiceClient’ – and when I look at the wsdl it’s true, it doesn’t have GetData as a member. Instead I have all these other functions: ‘Login’, ‘Logout’, ‘ValidateUser’, etc. It’s like my service has been “replaced” by some kind of authentication service that doesn’t show ‘GetData’. Any ideas?
Do I need to generate a certificate ?
Yes you do. I believe I missed that part from the article cause I had the certificate already installed.