It’s common sense for Web Applications to make use of same code over and over again to display/render information and details for their domain objects. For example, an e-shop Web Application would probably render each product in the same way in all web pages. Considering this product class..
public class Product
    {
        public long Id { get; set; }

        public string Name { get; set; }

        public string Description { get; set; }

        public decimal Price { get; set; }
    }
the respective View for rendering a List of products in ASP.NET MVC View would be
@foreach (var product in Model)
{
    <div>
        ID: <span>@product.Id</span>
        Name: <span>@product.Id</span>
        Description: <span>@product.Id</span>
        Price: <span>@product.Id</span>
    </div>
}
But this is a just a simple Product class for demonstration purposes. What if you wanted to display objects with twenty or even more properties? And what if you needed to display over and over again this kind of information in many pages in your application? Writing the same code would be quite frustrating and this is where Partial Views enter the stage. Let’s create an MVC Application and show Partial Views capabilities.
Create a new ASP.NET MVC Web Application named “PartialViewsAndChildActions” choosing the Basic Template, in your Visual Studio 2012. Add a new Product class in the Models folder.
namespace PartialViewsAndChildActions.Models
{
    public class Product
    {
        public long Id { get; set; }

        public string Name { get; set; }

        public string Description { get; set; }

        public decimal Price { get; set; }
    }
}
Add a new Controller named “ProductController” in the Controllers folder, choosing the Empty MVC Controller template. Paste the following code.
public ActionResult Index()
        {
            List<Product> products = new List<Product>()
            {
                new Product { Id =1, Name ="Product 1", Description ="Description 1", Price = 10m},
                new Product { Id =2, Name ="Product 2", Description ="Description 2", Price = 20m},
                new Product { Id =3, Name ="Product 3", Description ="Description 3", Price = 30m},
                new Product { Id =4, Name ="Product 4", Description ="Description 4", Price = 40m}
            };
            return View(products);
        }
Right click inside the Index action and select “Add view..”. Check the “Create a strongly type View..” and fill the textbox with
IEnumerable<Product>

Click Add and paste make sure you change it’s contents as follow.
@model IEnumerable<PartialViewsAndChildActions.Models.Product>

@{
    ViewBag.Title = "Index";
}

<h2>Products</h2>
<style type="text/css">
    span {
        color: white;
    }
</style>
@foreach (var product in Model)
{
    <div style="background-color:crimson">
        ID: <span>@product.Id</span>
        Name: <span>@product.Name</span>
        Description: <span>@product.Description</span>
        Price: <span>@product.Price</span>
        <hr style="color:white" />
    </div>
}
Change the default controller when Application starts in the RouteConfig.cs file, from “Home” to “Product”.
public static void RegisterRoutes(RouteCollection routes)
        {
            routes.IgnoreRoute("{resource}.axd/{*pathInfo}");

            routes.MapRoute(
                name: "Default",
                url: "{controller}/{action}/{id}",
                defaults: new { controller = "Product", action = "Index", id = UrlParameter.Optional }
            );
        }
Build and run your application. The result should look like this.

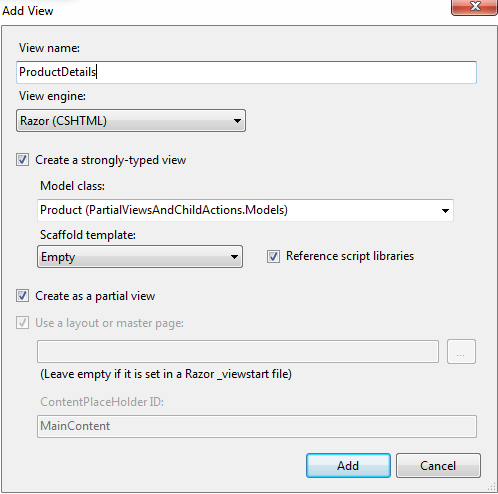
When we need to use both the same fragments of Razor tags and HTML markup in several different places, we create and use Partial Views. Let’s see how this works. Right click the /Views/Shared folder and select
Add.. View
Name the View “ProductDetails”, check the “Create strongly type view” and fill the textbox with the Product class. Finally, make sure you check the “Create as a partial view” checkbox.
Paste the following code in the “ProductDetails” Partial View. You will notice that is very similar to what we used in the Index View. This code renders the details for a Product object.
@model PartialViewsAndChildActions.Models.Product

<div style="background-color: crimson">
    ID: <span>@Model.Id</span>
    Name: <span>@Model.Name</span>
    Description: <span>@Model.Description</span>
    Price: <span>@Model.Price</span>
    <hr style="color: white" />
</div>
To use this Partial view, remove the respective code in the Index View and replace it with Html.Partial helper method like this.
@model IEnumerable<PartialViewsAndChildActions.Models.Product>

@{
    ViewBag.Title = "Index";
}

<h2>Products</h2>
<style type="text/css">
    span {
        color: white;
    }
</style>
@foreach (var product in Model)
{
    @Html.Partial("ProductDetails", product)
}
Build and run your application to see that it still works in the same way. But this time you can re-use this partial view wherever you want and more over, if you decide to change how product objects are rendered , the only View you need to change is the ProductDetails partial view. Just great. The above @Html.Partial helper method, passed a Product object in the “ProductDetails” partial view. The partial view was dynamically rendered.
Another MVC feature I want to show you, is the Child Action, because Child Actions are for Actions what Partial Views are to Views. More over, Child Actions are mostly used to render partial pieces in pages, such as data-driven widgets, rather than render common Views. A child action can be called inside a View using the Html.Action helper method. Go and create a child action inside the ProductController to see how it works.
[ChildActionOnly]
public ActionResult DisplayProduct(Product product)
{
    return PartialView("ProductDetails",product);
}
The DisplayProduct child action, takes a Product object parameter and renders it using the “ProductDetails” Partial View. Change the Index View to use the Html.Action helper method as follow.
@foreach (var product in Model)
{
    @Html.Action("DisplayProduct", product)
}
You application will still work in the same way. Using child actions to render partial views, will give you greater manipulation of your data. For example you could change your product values in the child action before rendering it. Let’s test it. Change the DisplayProduct child action as follow.
[ChildActionOnly]
        public ActionResult DisplayProduct(Product product)
        {
            switch (product.Id)
            {
                case 1:
                    product.Name = "Child Action Product 1";
                    product.Description = "Child Action Description 1";
                    break;
                case 2:
                    product.Name = "Child Action Product 2";
                    product.Description = "Child Action Description 2";
                    break;
                case 3:
                    product.Name = "Child Action Product 3";
                    product.Description = "Child Action Description 3";
                    break;
                case 4:
                    product.Name = "Child Action Product 4";
                    product.Description = "Child Action Description 4";
                    break;
                default:
                    break;
            }

            return PartialView("ProductDetails",product);
        }
Build and run your application and see the result.

We managed to manipulate our products inside the child action. I hope you enjoyed the post. You can download the “PartialViewsAndPartialActions” MVC project from here.
Categories: ASP.NET

I didn´t know about action functionality, very usefull! congratulations!
Keep up the Good work.
good example.I found another good example in this link
http://articlesforprogramming.blogspot.in/2013/07/partial-view-in-aspnet-mvc4.html
Very clear and educational… The problem is that it also shows me that my problem is a bit different than I thought. Thanks for the post… I’m going to go look at some others on your site.
very helpfull article. Thanks
Great explanations as usual. Thanks
ajax and jquery article and this one are great. so simple explonation, so easy to understant. thanx man. I hope you continiue to publish such a great articles.
Awesome article!
This is a very good article for the beginners.