Web API makes building HTTP Services quite easy and pleasant since most of the hard work is taking place under it’s Framework’s umbrella. For example, when a client application makes a call to a Web API client, Web API can figure out by itself, what type of data passed to it and what type of data is expected to be returned. This transparency though, doesn’t mean that you don’t need to be aware of the basic HTTP Restful principles. We have seen in previous post the basics for starting with Web API but we weren’t so absolute as far as for the HTTP principles. This post will show you the right way to build HTTP Services with Web API. We will create a solution to support all CRUD operations Create – Read – Update – Delete on in-memory data. Let’s begin.
Create an ASP.NET 4 Web Application project, named HttpPrinciplesWithWebAPI selecting the Web API template. Delete the “ValuesController” inside the controllers folder and in it’s position create a new one named GroupController selecting the Empty API controller template. This controller will allow us to get Person objects from a group, add/delete a person to/from a group and lastly, update a group’s Person object. We need to create a Person class so paste the following code inside the class you created.
namespace HttpPrinciplesWithWebAPI.Controllers
{
    public class GroupController : ApiController
    {
    }

    public class Person
    {
        public int Id;
        public string FirstName;
        public string LastName;
        public int YearsInGroup;
    }
}
Let’s create our first Web API action method, the Get() one. We need some mock data so we will create a static variable of Person objects.
    public class GroupController : ApiController
    {
        public IEnumerable<Person> Get()
        {
            return group;
        }

        static List<Person> Group = InitGroup();

        private static List<Person> InitGroup()
        {
            var gr = new List<Person>();
            gr.Add(new Person { Id = 1, FirstName = "Christos", LastName = "Sakellarios", YearsInGroup = 7 });
            gr.Add(new Person { Id = 2, FirstName = "Anna", LastName = "Ioannou", YearsInGroup = 2 });
            gr.Add(new Person { Id = 3, FirstName = "Jason", LastName = "Smith", YearsInGroup = 3 });
            gr.Add(new Person { Id = 4, FirstName = "Helen", LastName = "Crouse", YearsInGroup = 10 });

            return gr;
        }
    }

    public class Person
    {
        public int Id;
        public string FirstName;
        public string LastName;
        public int YearsInGroup;
    }
}
We used the HTTP convention, that is we named our action method with a HTTP GET prefix. You could give it any name you wanted but you would have to annotate your method with a HttpGet attribute. Build your application and run it. Add a /api/group/ to the default url and make sure your Web API is on air.

If you can, test your Web API service through Fiddler too. This tool can provide you with important information about your HTTP Services.

Before start getting interesting in HTTP principles let’s change a little bit our Default View (the page is loaded when you start your application). Change Index.cshtml file under /Views/Home folder as follow.
<div id="body">
    <ul id="group">

    </ul>
</div>

@section scripts {
    <script>
        $.ajax({
            url: 'api/group',
            success: function (data) {
                var group = $('#group');
                for (var i = 0; i < data.length; i++)
                    group.append($('<li>' + data[i].Id + ' ' + data[i].FirstName +
                         ' ' + data[i].LastName + ' --> Years in Group: ' +
                         data[i].YearsInGroup + '</li>'));
            }
        });
    </script>
}
We deleted the most of the default content existed and add a simple ul element that each time you run your application, it is filled through an Ajax GET request to your Get Web API action method. Build and start your application.

Ok, it’s time to get some serious. Add the following Get(int Id) action method to your GroupController.
public Person Get(int Id)
        {
            var person = (from p in Group
                          where p.Id == Id
                          select p).FirstOrDefault();

            // If null should return a 404
            return person;
        }
This method will return a specific Person object according to Id value passed. You can see that I highlighted line 7. I made this for a reason. You should know that when you send an HTTP request to get a resource (e.g a specific Person), if that resource doesn’t exist, you should get back a 404 code telling you that the item you requested doesn’t exist. This is an HTTP principle. By default though this isn’t supported. Let’s test it. Request from Fiddler a valid Person and then an invalid. Check the code and value returned in the second case.

Request an invalid Person object, for example a person with Id=5

Instead of returing a null value and Status OK, let’s return a 404 code and a message telling that the Person object requested doesn’t exist. Change the Get(int Id) action method as follow.
public HttpResponseMessage Get(int Id)
        {
            HttpResponseMessage msg = null;
            var per = (from p in Group
                       where p.Id == Id
                       select p).FirstOrDefault();
            // If null should return 404
            if (per == null)
            {
                msg = Request.CreateErrorResponse(HttpStatusCode.NotFound, "Person not Found");
            }
            else
            {
                msg = Request.CreateResponse<Person>(HttpStatusCode.OK, per);
            }
            return msg;
        }
The message you must return must be of type HttpResponseMessage. If resource not found you create an message of that type using the Request.CreateErrorResponse function, passing as parameters a 404 code HttpStatusCode.NotFound and a custom message. If resource is found, you create a HttpResponseMessage message using the Request.CreateResponse function with HttpStatusCode.OK. Build your application and test the previous scenario again. Check the difference.

Let’s keep going. Same story with the POST action methods. Add a POST action to your GroupController in order to add a Person object to the in memory mock Person list, Group.
public void Post([FromBody]Person p)
        {
            Group.Add(p);
            // Should return a 201 with a location header
        }
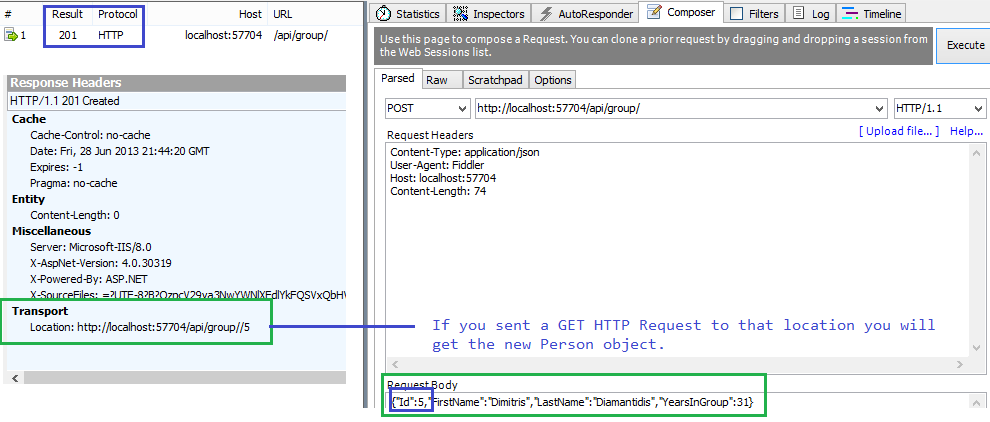
The [FromBody] attribute means that new object’s value will come from the body. It could come for example from the query string. To post a Person object through Fiddler (we are going to see how you can post from your pages in other post), in the composer tab, select POST, in the Requested Headers add a Content-Type: application/json element and lastly, put the json value into the Requested Body. Finally press execute.

To return a 201 code telling that your resource was created, change your POST method as follow.
public HttpResponseMessage Post([FromBody]Person p)
        {
            Group.Add(p);
            // I should return a 201 and a location header
            var msg = Request.CreateResponse(HttpStatusCode.Created);
            msg.Headers.Location = new Uri(Request.RequestUri + "/" + p.Id.ToString());

            return msg;
        }
The only line I want to explain is the 6th. The msg.Headers.Location = new Uri(Request.RequestUri + “/” + p.Id.ToString()); will tell that new resource’s location will match the requested URL (when you sent the POST request, plus a /Id. In other words, we set the header location to listen the Get(int Id) Web API action method. Build and run your application. Check from Fiddler that a 201 Request Created Code is returned when you sent a valid POST request.
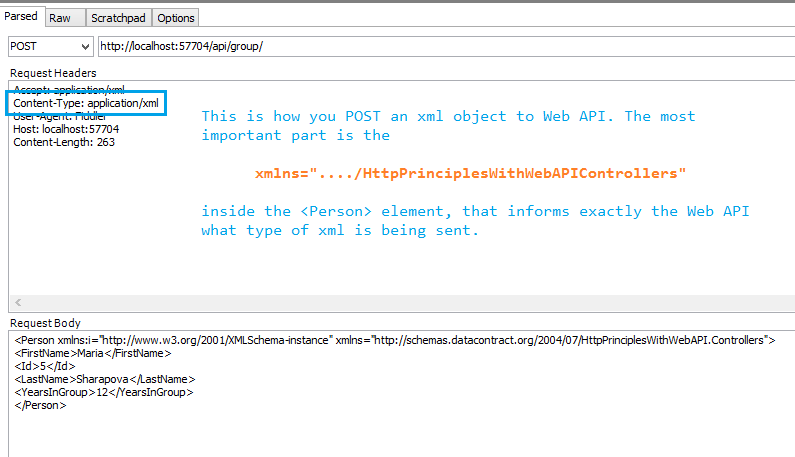
Well, this is pretty much the most important you need to know for HTTP GET and POST requests. One last thing I wanna show you, is how to sent xml POST requests. You may think that you setting the Content-Type: application/xml will be enough but that’s wrong. You need to give some more information about the XML object you want to POST. Check the follow image and you will understand.
That’s all for now. More interesting things on Web API coming on next posts so keep in touch. I hope you enjoyed the post. Download the project we created from here.
Categories: ASP.NET

Leave a comment