There are a few different ways to execute a Stored Procedure through a C# application, each of them following different principles. One of the most used approach is to use an SqlCommand object of type CommandType.StoredProcedure and invoke it’s ExecuteReader() function. Entity Framework though, allows you to implicitly or explicitly execute a Stored Procedure through it’s entities. The reason why I said implicitly or explicitly has to do with the way you will eventually execute the stored procedure. Let me explain a little farther about this. Suppose you have a DbContext Model class generated from your database and you have a table named “Products”. You also have created 4 stored procedures, the GetAllProducts, InsertNewProduct, UpdateProduct and DeleteProduct. Those stored procedures can be executed in two different ways with Entity Framework. You can “bind” the GetAllProducts stored procedure which is a select statement, directly to you DbContext class so you can execute it writting something like this:
myDbContextObject.GetAllProducts();
Though, the other three CUD stored procedures have to be bind directly to the Product entity. This way, you won’t have to implicitly execute each of those procedures but when you call the DbContext.SaveChanges() function, the respective stored procedure will be executed. That is if you have added a new entity the InsertProduct stored procedured will be called and so on. That’s what we are going to show on this post. Let’s start.
Create a new ASP.NET Web Application project named MapCrudStoredProcedures. We will a create a simple database first, inside the project for simplicity. Right click your project and add a new SQL Server database file named “Store.mdf”. If prompted to allow VS create an App_Data folder for you, click yes. In Server Explorer double click the database and create a new table named Product as follow.

Click Update and then again Update Database to create the table. Right click the table and select Show Table Data. Insert some records in the table.

Let’s created the GetAllProducts stored procedure now. Right click the Store Procedures folder in Server explorer and a new one.
CREATE PROCEDURE dbo.GetAllProducts

AS
 SET NOCOUNT ON
 SELECT
  ProductId,
  Name,
  Description,
  Price

 FROM dbo.Product
Add the InsertProduct stored procedure..
CREATE PROCEDURE [dbo].[InsertProduct]
@ProductId int,
@Name nvarchar(50),
@Description nvarchar(50),
@Price decimal(18,0)

AS
INSERT INTO dbo.Product(ProductId,Name,Description,Price)
VALUES (@ProductId, @Name, @Description, @Price);
Add the UpdateProduct stored procedure..
CREATE PROCEDURE [dbo].[UpdateProduct]
@ProductId int,
@Name nvarchar(50),
@Description nvarchar(50),
@Price decimal(18,0)
AS
UPDATE Product SET ProductId=@ProductId,
Name=@Name,
Description=@Description,
Price=@Price
WHERE ProductId=@ProductId;
And finally add the DeleteProduct stored procedure.
CREATE PROCEDURE [dbo].[DeleteProduct]
@ProductId int
AS
DELETE From Product
WHERE ProductId=@ProductId;
We are ready to generate our Entity Model. Add a new item of type ADO.NET Entity Data Model named “StoreModel.edmx”. Select Generate from Database choosing the Store.mdf database. Leave the default namespace filled for you, StoreEntities. In the next Wizard, select the Product table and all the stored procedures you have created previously. 
Click finish and let VS generate the Model for you. In the Edmx diagram you should only see the Product entity despite the fact that you added the stored procedures too. That’s all right. Build your solution and make sure everything compiles. Now let’s do the mapping. To bind the GetAllProducts stored procedure, which is just a Select statement, switch to the Model Browser, right click the GetAllProducts function and select Function Import Mapping. You will notice that Entity Framework was too smart and has already made the mapping for you. It has also created a new Complex Type class in order to map the Result retrieved from your Select statement.

So far so good. Mind that EF was able to map correctly the stored procedure because in the select statement we used the same name-columns for the result set. In case you wanted to return something different you would have to make the mapping manually, creating a new Complex Type for the result set. Let’s continue with the CUD stored procedures now. Even if you want to use only one of them, you have to map each of the three CUD stored procedures to the respective Entity, otherwise you won’t be able to execute neither of them. In the Edmx diagram, right click the Product entity and choose Stored Procedure Mapping. Make the respective mappings as follow.

Save and build your application. Let’s create a User Interface Web Form named “Default.aspx” to make use of our Stored Procedures. You don’t have to type by yourself all the code, you can just download the project at the bottom of this post.
<%@ Page Language="C#" AutoEventWireup="true" CodeBehind="Default.aspx.cs" Inherits="MapCrudStoredProcedures.Default" %>
<!DOCTYPE html>
<html xmlns="http://www.w3.org/1999/xhtml">
<head id="Head1" runat="server">
<title></title>
<style type="text/css">
.tblInsertStyle {
width: 200px;
background-color: #006699;
color: white;
}
.auto-style2 {
width: 125px;
}
input {
color: rgb(206, 78, 46);
}
.fieldsetCss {
background-color:rgb(245, 243, 243);
width:500px;
}
</style>
</head>
<body>
<form id="form1" runat="server">
<div>
<fieldset class="fieldsetCss">
<legend>All Products:</legend>
<asp:GridView ID="grdAllProducts" runat="server" BackColor="White" BorderColor="#CCCCCC" BorderStyle="None" BorderWidth="1px" CellPadding="3">
<FooterStyle BackColor="White" ForeColor="#000066" />
<HeaderStyle BackColor="#006699" Font-Bold="True" ForeColor="White" />
<PagerStyle BackColor="White" ForeColor="#000066" HorizontalAlign="Left" />
<RowStyle ForeColor="#000066" />
<SelectedRowStyle BackColor="#669999" Font-Bold="True" ForeColor="White" />
<SortedAscendingCellStyle BackColor="#F1F1F1" />
<SortedAscendingHeaderStyle BackColor="#007DBB" />
<SortedDescendingCellStyle BackColor="#CAC9C9" />
<SortedDescendingHeaderStyle BackColor="#00547E" />
</asp:GridView>
<br />
Insert New Product:<br />
<table class="tblInsertStyle">
<tr>
<td class="auto-style2">ID:</td>
<td>
<asp:TextBox ID="txtNewProductId" runat="server" Style="margin-left: 0px"></asp:TextBox>
</td>
</tr>
<tr>
<td class="auto-style2">Name</td>
<td>
<asp:TextBox ID="txtNewProductName" runat="server"></asp:TextBox>
</td>
</tr>
<tr>
<td class="auto-style2">Description</td>
<td>
<asp:TextBox ID="txtNewProductDescription" runat="server"></asp:TextBox>
</td>
</tr>
<tr>
<td class="auto-style2">Price</td>
<td>
<asp:TextBox ID="txtNewProductPrice" runat="server"></asp:TextBox>
</td>
</tr>
<tr>
<td class="auto-style2">
<asp:Button ID="btnInsertNewProduct" runat="server" Text="Insert" Width="114px" OnClick="btnInsertNewProduct_Click" />
</td>
<td> </td>
</tr>
</table>
<br />
<fieldset>
<legend>Delete Product:</legend>
<asp:DropDownList ID="ddlProducts" runat="server">
</asp:DropDownList>
<asp:Button ID="btnDelete" runat="server" OnClick="btnDelete_Click" Text="Remove" Width="95px" />
<br />
</fieldset>
<fieldset>
<legend>Edit Product:</legend>
<asp:DropDownList ID="ddlEditProduct" runat="server" AppendDataBoundItems="True" AutoPostBack="True" OnSelectedIndexChanged="ddlEditProduct_SelectedIndexChanged">
</asp:DropDownList>
<br />
<asp:Panel ID="pnlEditProduct" runat="server" Visible="false">
<table class="tblInsertStyle">
<tr>
<td class="auto-style2">ID:</td>
<td>
<asp:TextBox ID="txtUpdateProductId" runat="server" Style="margin-left: 0px"></asp:TextBox>
</td>
</tr>
<tr>
<td class="auto-style2">Name</td>
<td>
<asp:TextBox ID="txtUpdateProductName" runat="server"></asp:TextBox>
</td>
</tr>
<tr>
<td class="auto-style2">Description</td>
<td>
<asp:TextBox ID="txtUpdateProductDescription" runat="server"></asp:TextBox>
</td>
</tr>
<tr>
<td class="auto-style2">Price</td>
<td>
<asp:TextBox ID="txtUpdateProductPrice" runat="server"></asp:TextBox>
</td>
</tr>
<tr>
<td class="auto-style2">
<asp:Button ID="btnUpdate" runat="server" Text="Update" Width="114px" OnClick="btnUpdate_Click" />
</td>
<td> </td>
</tr>
</table>
</asp:Panel>
</fieldset>
</fieldset>
</div>
</form>
</body>
</html>
Here is the Code Behind file for the Default.aspx Web Form.
using System;
using System.Collections.Generic;
using System.Linq;
using System.Web;
using System.Web.UI;
using System.Web.UI.WebControls;

namespace MapCrudStoredProcedures
{
    public partial class Default : System.Web.UI.Page
    {
        protected void Page_Load(object sender, EventArgs e)
        {
            if (!Page.IsPostBack)
            {
                BindGridAllProducts();
            }
        }

        protected void BindGridAllProducts()
        {
            using (StoreEntities entities = new StoreEntities())
            {
                grdAllProducts.DataSource = entities.GetAllProducts();
                grdAllProducts.DataBind();

                ddlProducts.DataSource = entities.Products.ToList();
                ddlProducts.DataTextField = "Name";
                ddlProducts.DataValueField = "ProductId";
                ddlProducts.DataBind();

                ddlEditProduct.Items.Clear();
                ddlEditProduct.DataSource = entities.Products.ToList();
                ddlEditProduct.DataTextField = "Name";
                ddlEditProduct.DataValueField = "ProductId";
                ddlEditProduct.Items.Insert(0, "Select Product..");
                ddlEditProduct.DataBind();

                txtNewProductId.Text = entities.Products.Max(p => p.ProductId + 1).ToString();
                txtNewProductId.Enabled = false;
            }
        }


        protected void btnDelete_Click(object sender, EventArgs e)
        {
            using (var context = new StoreEntities())
            {
                var productToDelete = context.Products.Find(Int32.Parse(ddlProducts.SelectedValue));
                if (productToDelete != null)
                {
                    context.Products.Remove(productToDelete);
                    context.SaveChanges();
                    BindGridAllProducts();
                }
            }
        }

        protected void btnUpdate_Click(object sender, EventArgs e)
        {

            using (var entities = new StoreEntities())
            {
                var product = entities.Products.Find(Int32.Parse(txtUpdateProductId.Text));
                product.Name = txtUpdateProductName.Text;
                product.Description = txtUpdateProductDescription.Text;
                product.Price = decimal.Parse(txtUpdateProductPrice.Text);

                entities.Entry(product).State = System.Data.EntityState.Modified;
                entities.SaveChanges();
                BindGridAllProducts();
            }

            pnlEditProduct.Visible = false;
        }

        protected void ddlEditProduct_SelectedIndexChanged(object sender, EventArgs e)
        {
            if (ddlEditProduct.SelectedValue != "Select Product..")
            {
                txtUpdateProductId.Text = ddlEditProduct.SelectedValue;
                txtUpdateProductId.Enabled = false;
                using (var entities = new StoreEntities())
                {
                    var product = entities.Products.Find(Int32.Parse(ddlEditProduct.SelectedValue));
                    txtUpdateProductName.Text = product.Name;
                    txtUpdateProductDescription.Text = product.Description;
                    txtUpdateProductPrice.Text = product.Price.ToString();
                }

                pnlEditProduct.Visible = true;
            }
            else
            {
                pnlEditProduct.Visible = false;
            }
        }

        protected void btnInsertNewProduct_Click(object sender, EventArgs e)
        {
            using (var context = new StoreEntities())
            {
                context.Products.Add(new Product
                {
                    ProductId = Int32.Parse(txtNewProductId.Text),
                    Name = txtNewProductName.Text,
                    Description = txtNewProductDescription.Text,
                    Price = decimal.Parse(txtNewProductPrice.Text)
                });

                context.SaveChanges();
                BindGridAllProducts();

                txtNewProductName.Text = "";
                txtNewProductDescription.Text = "";
                txtNewProductPrice.Text = "";

            }
        }
    }
}
I have highlighted the most important code lines. These are where the stored procedures are executed. You will notice that only the GetProducts() procedure is called implicitly while the others are called when you invoke the SaveChanges() function.
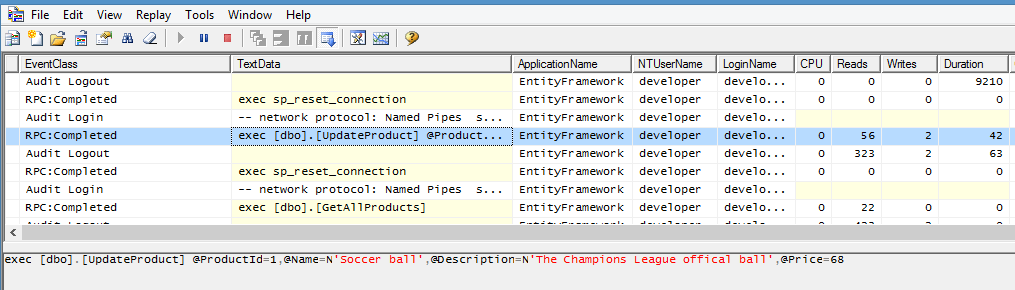
Build and run your application. Here are some screenshots from the SQL Server Profiler Tool proving that indeed our Stored Procedures are those that are executed in the database.

This is how our web application looks like.
Some Notes:
Mapping stored procedures with Entity Framework isn’t as simple as it looked like in this post. Here we showed the easiest scenario where table columns map exactly to the entity’s properties. There are so many different scenarios that can make stored procedure mapping quite difficult. For example if you had the primary key generated in database, you would have to alter the insert stored procedure so that it would return the new generated primary key. This value later would have to be manually mapped to the new entity relative property. There are a lot to see here so make sure you follow this post and stay tuned for later posts. You can download the project we created from here. I hope you enjoyed it!
Categories: ADO.NET

Leave a comment