Mobile application development has been dramatically changed in the last years with more and more frameworks trying to stand on the front-line and convience developers that they are their best option for building hybrid mobile applications with the smallest effort. One of the top frameworks on the market right now is Ionic and more specifically Ionic 2 which is a complete re-write and re-design from scratch of the first version. In case you are an Angular developer you will find Ionic framework exciting since you can leverage all your knowledge and easily build mobile apps by using Ionic’s components, which are nothing more but Angular components.
What is this post all about
We have seen several Angular or .NET related posts and apps on this blog and it’s time for us to see a mobile app as well. The purpose of this post is to build an hybrid mobile app using Ionic 2, Angular 2 and Firebase. Yes, you ‘ve just read Firebase. You don’t have to know anything about Firebase to follow with me because I ‘ll guide you through step by step. The reason why I chose Firebase is because I wanted you, at the end of this post to build and run the app on your mobile phone immediatly. Right now, there are some tutorials regarding Ionic 2 but most of them describe the basics of building mobile apps such as how to setup the app or use a specific component. The app we are going to build here will use features that you see in famous apps such as LinkedIn or Facebook. Which are those features? Let’s enumerate some of them.
- Network availability detection
- Offline application operation
- SQLite database support
- Event notifications
- Camera features
- File uploading
- Open browsers
.. and much more.. Before start setting up the required environmnet for the app let us see a preview.
I hope you enjoy this journey as much as I did. Go grub some coffee and let’s start!
Firebase setup
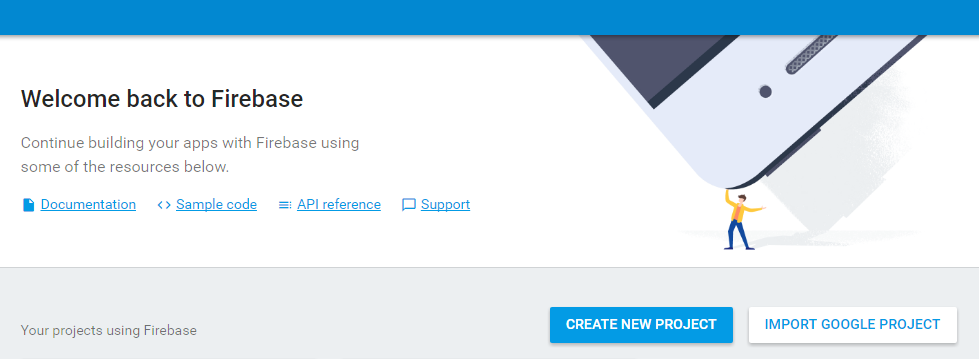
So what exactly is Firebase? In a nutchel Firebase is the platform that will give us out of the box a database to store our data, a storage location to store our blobs or files such as user profile pictures and last but not least, the authentication infrustructure for the users to sign in the app. In other words.. Firebase has everything our app needs and it’s free! All you need is a Google account in order to login. One of the most important reasons that Firebase is that popular is it’s event based mechanisms which apparently is crusial for mobile apps. Think the example of the Facebook app. You create a post and some of your friends start posting comments on that. All of your friends receive the updates instantly on their app. Yes, Firebase can do that too. Using it’s API each of your Angular components can subsribe to a specific database location (we ‘ll explain little bit later) and every time an update happens on that location, such as a comment added, all subscribers get the update instantly. The first thing we need to do in order to start using Firebase is to create a project. Go ahead and Sing In in Firebase using your Google account.

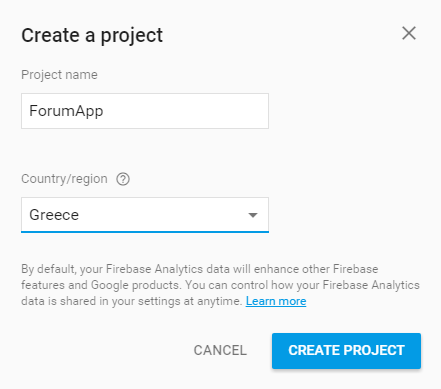
After signing in, click the Go to console button and press CREATE NEW PROJECT.
Name the project ForumApp and choose your country.
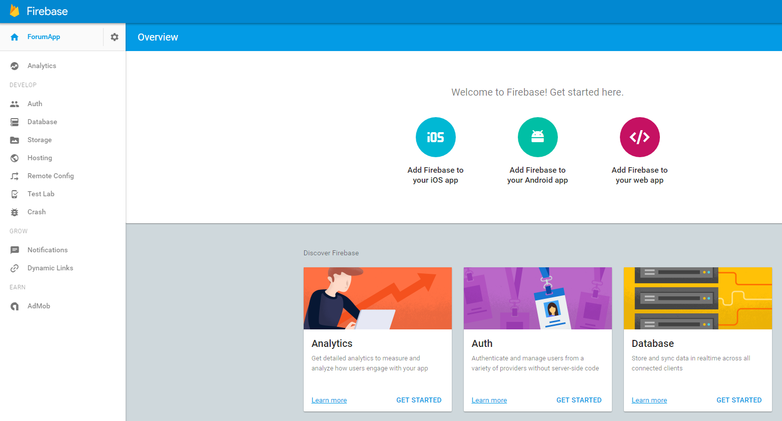
Firebase will create the project and redirect you into the console where you can see all the available options in Firebase. We will be using mostly the Auth, Database and Storage services.
The USERS tab on the Auth page display all users that have been registered in the project. You can either create a Firebase user through the ADD USER button or using the API as we are going to see later on. For the moment don’t do anything, just take a look.
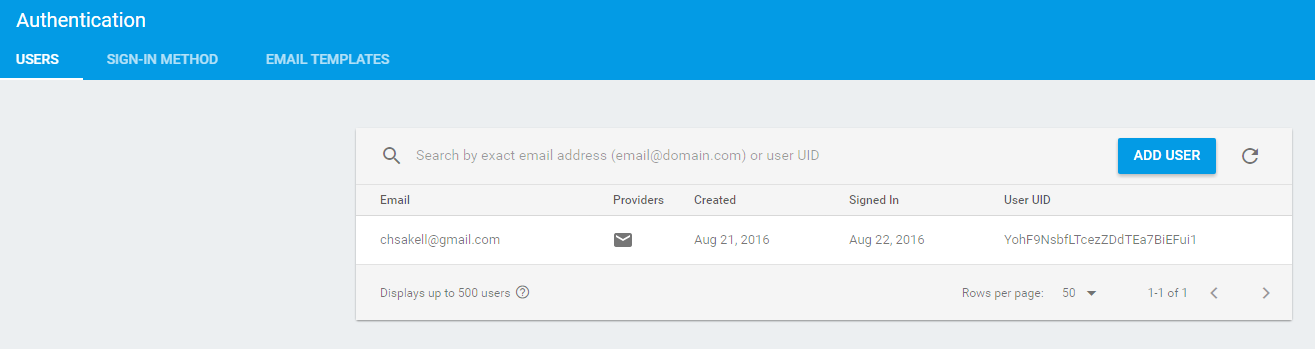
In my case there’s only one user registered. I have registered this user through the mobile app and not from the website. Firebase allow you to authenticate application users using several providers such as Github, Facebook or Twitter. To view all available providers click the SIGN-IN METHOD tab. Our application will use the Email/Password provider so we need to enable it. Click on that provider, enable it and save.

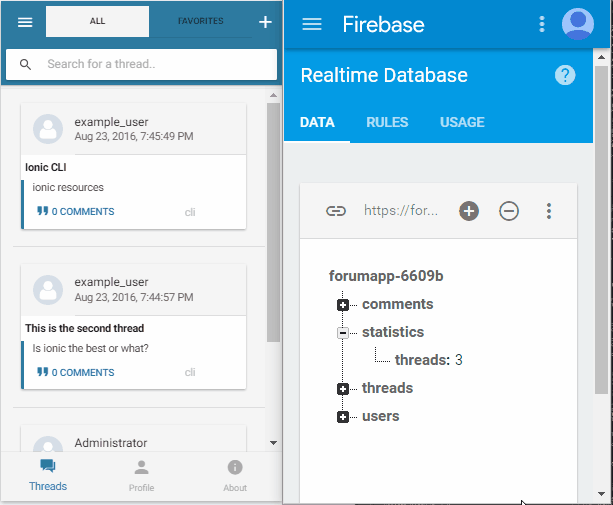
Click Database from the left menu. Here is where our data will be stored in a JSON format. YES I ‘ve just said JSON. Your data in firebase is going to be a large JSON object which means that in case you have only relational database background this is going to be a real strange experience. Forget anything about foreign keys or complicated queries. It’s only a javascript object and Firebase’s API will help you run queries on that. Here’s how my database look’s like.
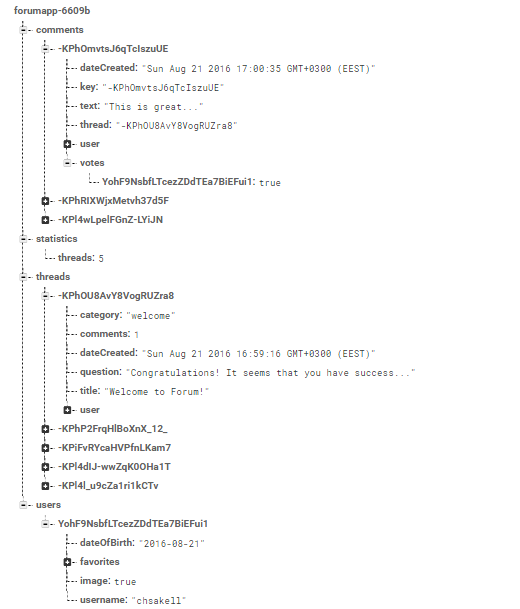
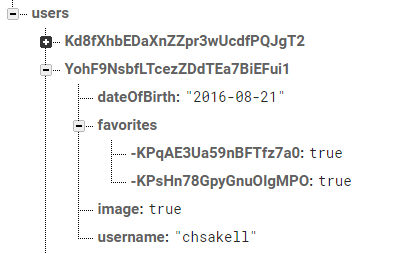
Each node represents kind of corresponding table in a relational database but this time since it’s a Javascript object, it can also contain other nested javascript objects. Notice for example the way we are going to store the voting information on a comment entity. A Comment has a Unique identifier such as -KPhOmvtsJ6qTcIszuUE and a key named votes which in turn is a JavaScript object containing which user voted Up (true)) or Down (false)). Here the user with uid YohF9NsbfLTcezZDdTEa7BiEFui1 has voted Up for the specific comment. With this design you know how many and which users have voted for a specific comment and more over prevent a user to vote more tha one times. Each node or key in the database is a Firebase location that can be referenced. It’s very important to understand this concept because queries or event listeners require Firebase locations, the so called references. You can read more about references here. Before switching to the Storage page we need to set the access level in our database. Press the RULES tab in the Database page. By default only authenticated users may read or write in our database. Change the Rules object as follow:
{
"rules": {
".read": "auth != null",
".write": "auth != null",
    "statistics" : {
    "threads": {
    // /statistics/threads is readable by the world
    ".read": true,
    // /statistics/threads is writable by the world
    ".write": true
    }
    },
    "threads" : {
        // /threads is readable by the world
    ".read": true,
    // /threads is writable by the world
    ".write": true
    }
}
}
What the above rule means is that statistics/threads and threads locations are readable/writable by un-authenticated users but comments aren’t. Application’s users will be able to upload pictures but we need to setup this on Firebase first. Click the Storage menu button and set the Rules as follow:
service firebase.storage {
  match /b/forumapp-your_id.appspot.com/o {
    match /{allPaths=**} {
      allow read;
      allow write: if request.auth != null;
    }
  }
}
Make sure to replace the your_id with your’s. Each user will upload his/her profile picture under an images folder, with a sub-folder named equal to user’s uid.
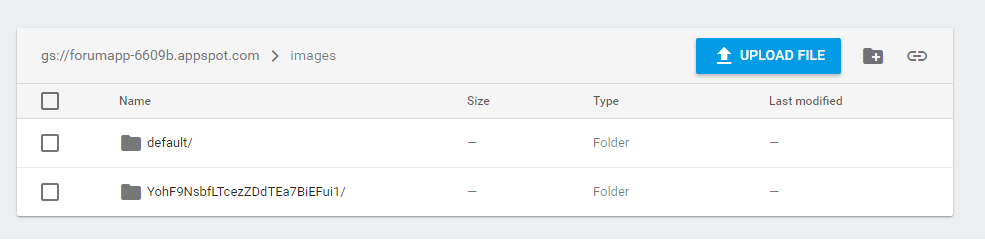
We these rules all users may view other user’s images but only authenticated can upload. We are done setting up Firebase, time for the good stuff.
Ionic 2 – The Forum App
In order to start developing Ionic mobile apps, you need to install it first. After installing NodeJS (in case you haven’t already) run the following command.
npm install -g ionic@beta
Later on the post we will be adding Cordova plugins in our app for accessing native mobile features so go ahead and run the following command as well.
npm install -g cordova
We ‘ll start a brand new Ionic 2 project using Ionic’s CLI command start with a blank template parameter. Go to your working directory and run the command.
ionic start forum-app blank --v2
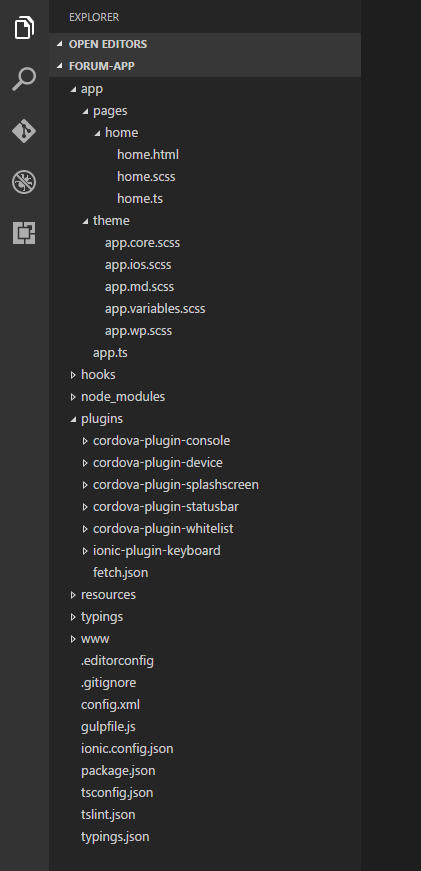
Ionic will create a blank project in a folder named forum-app which you may open with your IDE envrironment of your preference. I personally use Visual Studio Code which I find great for both client-side and mobile development. Your starting project should look like this.
App folder is the one we will be focusing mostly. The plugins folders is where Cordova plugins are being installed. One thing I want you to immediatly do is to update ionic-native package inside the package.json file because ionic-cli may not use the latest version by default. This would result not finding some modules. Update it as follow.
"dependencies": {
    "@angular/common": "2.0.0-rc.4",
    "@angular/compiler": "2.0.0-rc.4",
    "@angular/core": "2.0.0-rc.4",
    "@angular/platform-browser": "2.0.0-rc.4",
    "@angular/platform-browser-dynamic": "2.0.0-rc.4",
    "@angular/http": "2.0.0-rc.4",
    "@angular/forms": "0.2.0",
    "es6-shim": "0.35.1",
    "ionic-angular": "2.0.0-beta.11",
    "ionic-native": "1.3.17",
    "ionicons": "3.0.0",
    "reflect-metadata": "0.1.8",
    "rxjs": "5.0.0-beta.6",
    "zone.js": "0.6.12"
  }
I changed mine from 1.3.10 to 1.3.17. Make sure your re-run npm install to update the package. In case you wonder, Ionic Native is a set of ES5/ES6/TypeScript wrappers for Cordova/PhoneGap plugins which will help us a lot for accessing native features in our device.
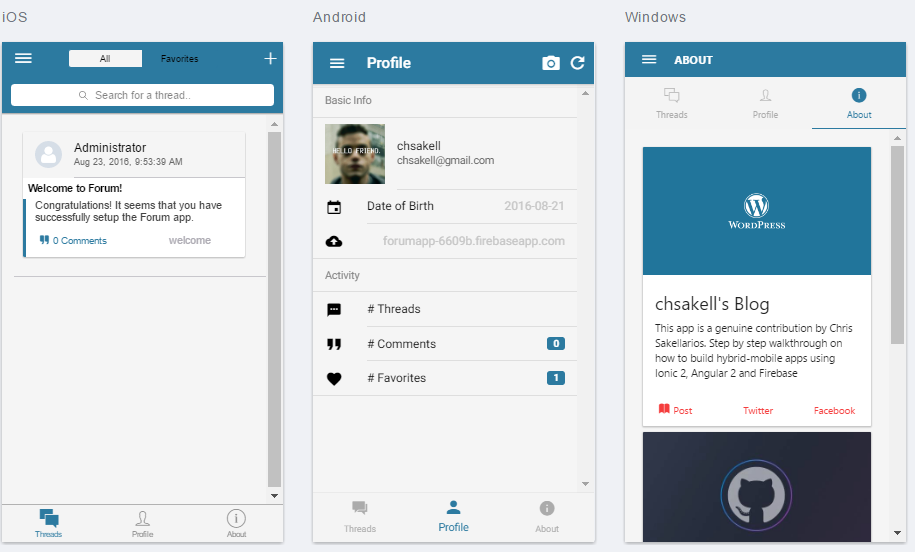
Now let’s start talking about our app. The Forum mobile app is an app where users can create Threads and then add Comments. A thread belongs to a specific category which you may change as you wish. Comments may also have Up and Down votes. A user may add a thread to his/her favorites collection. We want users to be able to upload profile pictures either using their mobile Camera or their Photo albums. We also want to add a specific View that displays info regarding the Forum app. Only authenticated users can view/create Threads or Comments or in other words, only authenticated users may use the Forum app. With that said we should already start thinking about the views we need to create in our app. I can tell that we need at least three Tabs, one to display all Threads, another one for user’s profile info a last one for the app’s info. Each tab in Ionic can have nested views and hence the first one that initialy renders the threads, will allow the user to navigate and view a thread’s comments or create a new Thread or Comment.
We mentioned that only authenticated users may use the app so we need to provide a way for them to register and login as well. There will be two pages for this purpose, a Login and a Register one. Those pages will not be sub-views of a specific Tab but injected by a root component under certain circumstances. More over, we ‘ll use a Menu for signing out from the app.
Add an app.html page under the app folder and paste the following code.
<ion-menu [content]="content">
    <ion-toolbar>
        <ion-title>Menu</ion-title>
    </ion-toolbar>
    <ion-content>
        <ion-list no-border>
            <ion-list-header>
                Account
            </ion-list-header>

            <ion-item (click)="openPage('signup')" *ngIf="!isUserLoggedIn()">
                <ion-icon name='person-add' item-left></ion-icon>
                Register
                <ion-icon name='arrow-dropright' item-right secondary></ion-icon>
            </ion-item>
            <ion-item (click)="signout()" *ngIf="isUserLoggedIn()">
                <ion-icon name='log-out' item-left></ion-icon>
                Sign out
                <ion-icon name='arrow-dropright' item-right secondary></ion-icon>
            </ion-item>
        </ion-list>

    </ion-content>
</ion-menu>
<ion-nav #content [root]="rootPage"></ion-nav>
The idea here is to make the menu component accessible by all tabs. The ion-nav‘s rootPage will be either the TabsPage component or the LoginPage. I won’t show you the entire app.ts code yet cause it contains native related code and you will be confused. The app.ts file is the one that bootstraps the Ionic app. Here’s part of it..
export class ForumApp implements OnInit {
  @ViewChild('content') nav: Nav;

  private rootPage: any;
  private loginPage: LoginPage;

  connectSubscription: Subscription;

  constructor(platform: Platform,
    private dataService: DataService,
    private authService: AuthService,
    private sqliteService: SqliteService,
    private menu: MenuController,
    private events: Events) {
    var self = this;
    this.rootPage = TabsPage;
    // Code ommited

    ngOnInit() {
    var self = this;
    // This watches for Authentication events
    this.authService.onAuthStateChanged(function (user) {
      if (user === null) {
        self.menu.close();
        self.nav.setRoot(LoginPage);
      }
    });
  }
  // Code ommited
We can see that the app fires having the TabsPage as root but in case it detects that user is unauthenticated, sets the LoginPage as the root.
Tabs
Let’s create the TabsPage component as well. Create a folder named tabs under pages and add the tabs.html template first.
<ion-tabs #forumTabs [selectedIndex]="0" (click)="clicked()">
    <ion-tab tabIcon="chatboxes" #content tabTitle="Threads" [root]="threadsPage" tabBadge="{{newThreads}}" tabBadgeStyle="danger"></ion-tab>
    <ion-tab tabIcon="person" #content tabTitle="Profile" [root]="profilePage"></ion-tab>
    <ion-tab tabIcon="information-circle" #content tabTitle="About" [root]="aboutPage"></ion-tab>
</ion-tabs>
We have three tabs on our app, one to display threads, one to display user’s info and another one for application’s info. Threads tab has a tabBadge in order to inform the user that new threads have been added in Firebase at real time. When this tab displays the badge, which means that there are new threads added, when clicked should publish a threads:add event so that any subscribers (ThreadsPage) do what they have to do.
Add the tabs.ts file under the tabs folder as well.
import {Component, OnInit, ViewChild } from '@angular/core';
import { NavController, Events, Tabs } from 'ionic-angular';

import {ThreadsPage} from '../threads/threads';
import {ProfilePage} from '../profile/profile';
import {AboutPage} from '../about/about';
import { AuthService } from '../../shared/services/auth.service';

@Component({
    templateUrl: 'build/pages/tabs/tabs.html'
})
export class TabsPage implements OnInit {
    @ViewChild('forumTabs') tabRef: Tabs;

    private threadsPage: any;
    private profilePage: any;
    private aboutPage: any;

    private newThreads: string = '';
    private selectedTab: number = -1;

    constructor(private navCtrl: NavController,
        private authService: AuthService,
        public events: Events) {
        // this tells the tabs component which Pages
        // should be each tab's root Page
        this.threadsPage = ThreadsPage;
        this.profilePage = ProfilePage;
        this.aboutPage = AboutPage;
    }

    ngOnInit() {
        this.startListening();
    }

    startListening() {
        var self = this;

        self.events.subscribe('thread:created', (threadData) => {
            if (self.newThreads === '') {
                self.newThreads = '1';
            } else {
                self.newThreads = (+self.newThreads + 1).toString();
            }
        });

        self.events.subscribe('threads:viewed', (threadData) => {
            self.newThreads = '';
        });
    }

    clicked() {
        var self = this;

        if (self.newThreads !== '') {
            self.events.publish('threads:add');
            self.newThreads = '';
        }
    }
}
And some custom stylesheets in tabs.scss..
ion-tabbar {
  background: #f4f4f4;
}
Services
Our app is not only an Ionic app but an Angular as well. It will make use of some shared @Injectable() services and Component Directives as well. We will create them firstly so we can start getting familiar with the Firebase API. Add a folder named shared under app and create the interfaces.ts file.
export interface IThread {
    key: string;
    title: string;
    question: string;
    category: string;
    dateCreated: string;
    user: IUser;
    comments: number;
}

export interface IComment {
    key?: string;
    thread: string;
    text: string;
    user: IUser;
    dateCreated: string;
    votesUp: number;
    votesDown: number;
}

export interface UserCredentials {
    email: string;
    password: string;
}

export interface IUser {
    uid: string;
    username: string;
}

export interface Predicate<T> {
    (item: T): boolean;
}
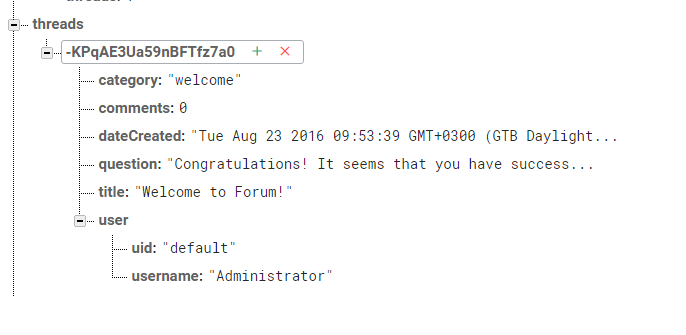
Take a look at the models that we are going to use in the Forum app, they are pretty self-explanatory. Here’s how a Thread object is being represented in Firebase.
For communicating with Firebase we will be using References to specific locations or keys in our database object. The API cals almost always return a Promise with an object called DataSnapshot which in turn we need to map in one of our model entities we created before. For this reason, add a folder named services under shared and add the mappings.service.ts file.
import { Injectable } from '@angular/core';

import { IThread, IComment } from '../interfaces';
import { ItemsService } from '../services/items.service';

@Injectable()
export class MappingsService {

    constructor(private itemsService: ItemsService) { }

    getThreads(snapshot: any): Array<IThread> {
        let threads: Array<IThread> = [];
        if (snapshot.val() == null)
            return threads;

        let list = snapshot.val();

        Object.keys(snapshot.val()).map((key: any) => {
            let thread: any = list[key];
            threads.push({
                key: key,
                title: thread.title,
                question: thread.question,
                category: thread.category,
                dateCreated: thread.dateCreated,
                user: { uid: thread.user.uid, username: thread.user.username },
                comments: thread.comments == null ? 0 : thread.comments
            });
        });

        return threads;
    }

    getThread(snapshot: any, key: string): IThread {

        let thread: IThread = {
            key: key,
            title: snapshot.title,
            question: snapshot.question,
            category: snapshot.category,
            dateCreated: snapshot.dateCreated,
            user: snapshot.user,
            comments: snapshot.comments == null ? 0 : snapshot.comments
        };

        return thread;
    }

    getComments(snapshot: any): Array<IComment> {
        let comments: Array<IComment>= [];
        if (snapshot.val() == null)
            return comments;

        let list = snapshot.val();

        Object.keys(snapshot.val()).map((key: any) => {
            let comment: any = list[key];

            this.itemsService.groupByBoolean(comment.votes, true);

            comments.push({
                key: key,
                text: comment.text,
                thread: comment.thread,
                dateCreated: comment.dateCreated,
                user: comment.user,
                votesUp: this.itemsService.groupByBoolean(comment.votes, true),
                votesDown: this.itemsService.groupByBoolean(comment.votes, false)
            });
        });

        return comments;
    }

    getComment(snapshot: any, commentKey: string): IComment {
        let comment: IComment;

        if (snapshot.val() == null)
            return null;

        let snapshotComment = snapshot.val();
        console.log(snapshotComment);
        comment = {
            key: commentKey,
            text: snapshotComment.text,
            thread: snapshotComment.thread,
            dateCreated: snapshotComment.dateCreated,
            user: snapshotComment.user,
            votesUp: this.itemsService.groupByBoolean(snapshotComment.votes, true),
            votesDown: this.itemsService.groupByBoolean(snapshotComment.votes, false)
        };

        return comment;
    }

}
The ItemsService is a service that contains lodash utility functions in Typescript. Add the items.service.ts under services folder as well.
import { Injectable } from '@angular/core';
import { Predicate } from '../interfaces';

import * as _ from 'lodash';

@Injectable()
export class ItemsService {

    constructor() { }

    getKeys(object): string[] {
        return _.keysIn(object);
    }

    reversedItems<T>(array: T[]): T[] {
        return <T[]>_.reverse(array);
    }

    groupByBoolean(object, value: boolean): number {
        let result: number = 0;
        if (object == null)
            return result;

        _.map(_.shuffle(object), function (val) {
            if (val === value)
                result++;
        });

        return result;
    }


    includesItem<T>(array: Array<T>, predicate: Predicate<T>) {
        let result = _.filter(array, predicate);
        return result.length > 0;
    }

    /*
    Finds a specific item in an array using a predicate and replaces it
    */
    setItem<T>(array: Array<T>, predicate: Predicate<T>, item: T) {
        var _oldItem = _.find(array, predicate);
        if (_oldItem) {
            var index = _.indexOf(array, _oldItem);
            array.splice(index, 1, item);
        } else {
            array.push(item);
        }
    }
}
You need to add lodash and jquery packages as dependencies in the package.json file.
"dependencies": {
    "@angular/common": "2.0.0-rc.4",
    "@angular/compiler": "2.0.0-rc.4",
    "@angular/core": "2.0.0-rc.4",
    "@angular/platform-browser": "2.0.0-rc.4",
    "@angular/platform-browser-dynamic": "2.0.0-rc.4",
    "@angular/http": "2.0.0-rc.4",
    "@angular/forms": "0.2.0",
    "angular2-moment": "^0.8.2",
    "es6-shim": "^0.35.0",
    "ionic-angular": "2.0.0-beta.11",
    "ionic-native": "1.3.16",
    "ionicons": "3.0.0",
    "jquery": "^3.1.0",
    "lodash": "^4.14.1",
    "reflect-metadata": "^0.1.3",
    "rxjs": "5.0.0-beta.6",
    "zone.js": "^0.6.12"
  }
.. and also install lodash typings in typings.json as follow.
{
  "dependencies": {
    "lodash": "registry:npm/lodash#4.0.0+20160416211519"
  },
  "devDependencies": {},
  "globalDependencies": {
    "jquery": "registry:dt/jquery#1.10.0+20160417213236",
    "es6-shim": "registry:dt/es6-shim#0.31.2+20160602141504"
  }
}
Run npm install and typings install to install new packages. Time for the most important service in our Forum app, the one that is responsible for retreiving data from Firebase. Add the data.service.ts inside the services folder. Instead of pasting all the code here, I will explain the important functions one by one. You can copy the entire data.service.ts contents from the repository. At this point I will strongly recommend you to study the firebase.database.Reference API. First, we declare any Firebase references we will use in the app.
declare var firebase: any;

@Injectable()
export class DataService {
    databaseRef: any = firebase.database();
    usersRef: any = firebase.database().ref('users');
    threadsRef: any = firebase.database().ref('threads');
    commentsRef: any = firebase.database().ref('comments');
    statisticsRef: any = firebase.database().ref('statistics');
    storageRef: any = firebase.storage().ref();
    connectionRef: any = firebase.database().ref('.info/connected');
Self-explanatory I believe. The connectionRef is how Firebase let us detect client’s connection state. We will use this in the ThreadsPage initialization logic, in order to check if the user can communicate with Firebase or not. If not, we ‘ll try to fetch SQLite data from app’s database and keep working in Offline mode till network connected event fires. But something missing here.. The firebase object needs to know where your project is, in other words your project’s settings in order to understand the previous references. Login in Firebase and go to your project’s console. Over there you will find an Add Firebase to your web app button.

Click the button and copy its contents.
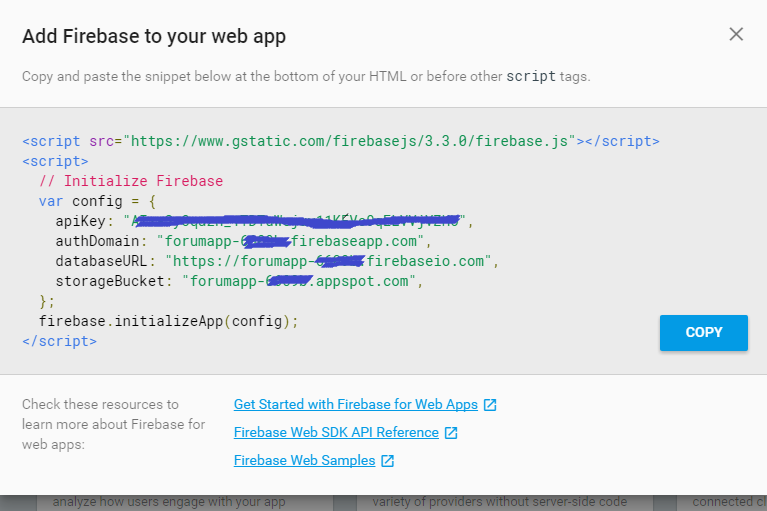
Now open www/index.html and change the body contents as follow. Make sure you replace your copied settings from the previous step.
<body>
  <ion-app></ion-app>


  <script src="https://www.gstatic.com/firebasejs/3.2.1/firebase.js"></script>
  <script>
  // Initialize Firebase
  var config = {
    apiKey: "your_api_key",
    authDomain: "your_auth_domain",
    databaseURL: "your_database_url",
    storageBucket: "your_storage_bucket",
  };
  firebase.initializeApp(config);
</script>


  <!-- cordova.js required for cordova apps -->
  <script src="cordova.js"></script>
  <!-- Polyfill needed for platforms without Promise and Collection support -->
  <script src="build/js/es6-shim.min.js"></script>
  <!-- Zone.js and Reflect-metadata  -->
  <script src="build/js/Reflect.js"></script>
  <script src="build/js/zone.js"></script>
  <!-- the bundle which is built from the app's source code -->
  <script src="build/js/app.bundle.js"></script>
</body>
Now back to data.service.ts. The InitData function initializes the first Thread for you, just for demonstration purposes. The transaction method will check if there is any value set in the statistics/threads location. If not, it will set the statistics/threads value equal to 1 (return 1) and when successfully committed, it will push the new thread. The push method generates a unique key which will be used later as the key property of an IThread. We commit the new thread using the setWithPriority method so that each thread has a priority depending on the order added.
private InitData() {
let self = this;
// Set statistics/threads = 1 for the first time only
self.getStatisticsRef().child('threads').transaction(function (currentRank) {
console.log(currentRank);
if (currentRank === null) {
console.log(currentRank);
return 1;
}
}, function (error, committed, snapshot) {
if (error) {
console.log('Transaction failed abnormally!', error);
} else if (!committed) {
console.log('We aborted the transaction because there is already one thread.');
} else {
console.log('Threads number initialized!');
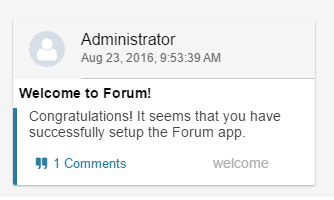
let thread: IThread = {
key: null,
title: 'Welcome to Forum!',
question: 'Congratulations! It seems that you have successfully setup the Forum app.',
category: 'welcome',
dateCreated: new Date().toString(),
user: { uid: 'default', username: 'Administrator' },
comments: 0
};
let firstThreadRef = self.threadsRef.push();
firstThreadRef.setWithPriority(thread, 1).then(function(dataShapshot) {
console.log('Congratulations! You have created the first thread!');
});
}
console.log('committed', snapshot.val());
}, false);
}
The reason why we used transaction here is because in case you try to deploy the Forum app in your browser using the ionic serve –lab command, three different instances will be initialized, one for each platform. If we remove the transaction, there is a possibility that all of them will try to push the new thread which mean you will end up having three threads and an invalid statistics/threads value equal to 1, because when all of three checked the location, the value was null.
Disclaimer: I have used priorities in order to sort and support pagination when retrieving Threads later in a simple way. This is not the best way because in case you break the statistics/threads value or remove a thread from Firebase you are going to get strange results. But let’s keep some things simple on this app and focus mostly on the features rather than the implementation.
CheckFirebaseConnection is the one that listens in a specific Firebase location and check the client’s connecton status.
checkFirebaseConnection() {
        try {
            var self = this;
            var connectedRef = self.getConnectionRef();
            connectedRef.on('value', function (snap) {
                console.log(snap.val());
                if (snap.val() === true) {
                    console.log('Firebase: Connected:');
                    self.connected = true;
                } else {
                    console.log('Firebase: No connection:');
                    self.connected = false;
                }
            });
        } catch (error) {
            self.connected = false;
        }
    }

    isFirebaseConnected() {
        return this.connected;
    }
The submitThread function is simple to understand. It creates a new reference on Firebase and commits the new thread in the same way we saw before. It also updates the current number of threads in statistics/threads location which means that before invoking this method we need to check the current number of threads and increase it by one. You may wonder why do we have to keep a location such as the statistics/threads anyway? The thing is that this is how you work in an NoSQL environment. You may have to keep copies of your values in multiple places so you don’t have to retrieve all the data each time. If we disn’t have statistics/threads we would have to get all the threads dataSnapnot and enumerate them to get their length. Another example we are going to see later on, is the way we know who created a comment. A comment has a user object with the unique user’s identifier plus his/her username. If that user changes the username, you will have to update all those references.
submitThread(thread: IThread, priority: number) {
    var newThreadRef = this.threadsRef.push();
    this.statisticsRef.child('threads').set(priority);
    console.log(priority);
    return newThreadRef.setWithPriority(thread, priority);
}
We call the set method to store user’s favorite threads in the addThreadToFavorites method. The method will create a key-value pair under the user’s unique key. This is how we know the favorite threads for a specific user. If a thread belongs to his/her favorites, then a threadKey – true value pair exists under that user’s object.
addThreadToFavorites(userKey: string, threadKey: string) {
        return this.usersRef.child(userKey + '/favorites/' + threadKey).set(true);
 }
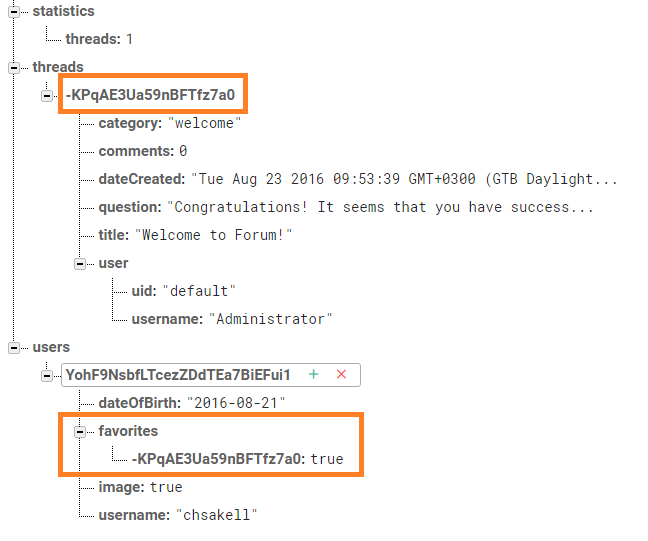
We read user’s favorite threads using the getFavoriteThreads method which accepts user’s unique identifier.
getFavoriteThreads(user: string) {
        return this.usersRef.child(user + '/favorites/').once('value');
    }
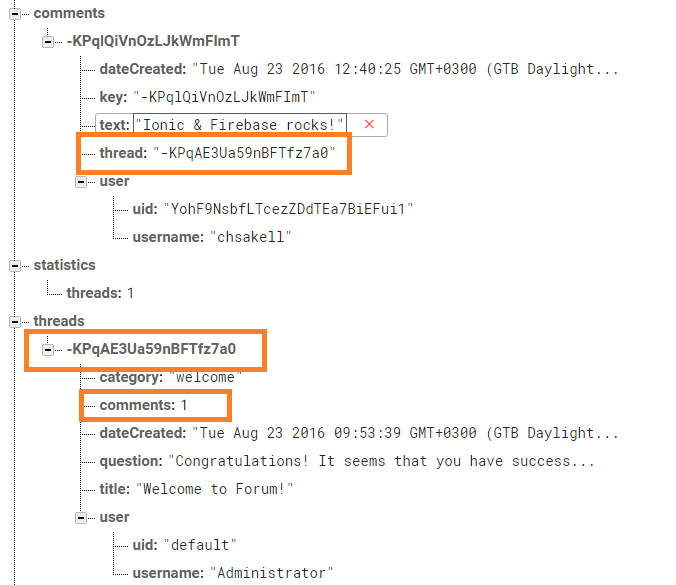
Commiting a new comment works in a similar way. The submitComment method accepts the thread’s key under which the comment was created and the comment itself. Mind that before calling this method we have already called the push method on the commentsRef so that we have the new generated key available. We make sure to update the number of comments existing under the specific thread.
submitComment(threadKey: string, comment: IComment) {
        this.commentsRef.child(comment.key).set(comment);

        return this.threadsRef.child(threadKey + '/comments').once('value')
            .then((snapshot) => {
                let numberOfComments = snapshot == null ? 0 : snapshot.val();
                this.threadsRef.child(threadKey + '/comments').set(numberOfComments + 1);
            });
    }
Let’s see how a user can submit a vote for a comment. There are two options, Up or Down and the value is stored under the respective comment. We have the voteComment function that accepts the unique comment’s key, user’s uid and true or false for Up and Down votes respectively.
voteComment(commentKey: string, like: boolean, user: string): any {
    let commentRef = this.commentsRef.child(commentKey + '/votes/' + user);
    return commentRef.set(like);
    }
In this way, if a user press again the same value (Up or Down) nothing changes.
There are two more important functions in the DataService that I would like to explain. The first one is the getUserThreads which fetches threads created by a specific user. It uses the orderByChild method to locate the threads/user/uid key in compination with the equalTo method to match only a specific key.
getUserThreads(userUid: string) {
        return this.threadsRef.orderByChild('user/uid').equalTo(userUid).once('value');
    }
Same applies for the getUserComments function that fetches all comments created by a user.
getUserComments(userUid: string) {
        return this.commentsRef.orderByChild('user/uid').equalTo(userUid).once('value');
    }
Add the auth.service.ts file under the services folder. The AuthService uses the firebase.auth.Auth Firebase interface for authenticating users in Firebase. Mind that there are several providers you can sign in with, such as Github or Google but we will use the signInWithEmailAndPassword method.
import { Injectable } from '@angular/core';
import { Observable } from 'rxjs/Observable';

import { UserCredentials } from '../interfaces';

declare var firebase: any;

@Injectable()
export class AuthService {

    usersRef: any = firebase.database().ref('users');

    constructor() { }

    registerUser(user: UserCredentials) {
        return firebase.auth().createUserWithEmailAndPassword(user.email, user.password);
    }

    signInUser(email: string, password: string) {
        return firebase.auth().signInWithEmailAndPassword(email, password);
    }

    signOut() {
        return firebase.auth().signOut();
    }

    addUser(username: string, dateOfBirth: string, uid: string) {
        this.usersRef.child(uid).update({
            username: username,
            dateOfBirth: dateOfBirth
        });
    }

    getLoggedInUser() {
        return firebase.auth().currentUser;
    }

    onAuthStateChanged(callback) {
        return firebase.auth().onAuthStateChanged(callback);
    }

}
There’s another one service we need to create, the SqliteService which is responsible for manipulating local data in the mobile device when working in offline mode. But let’s ignore native components at the moment and keep setting core components. Add the app.providers.ts file under the app folder. This file exports all services to be available in our Angular app.
import { HTTP_PROVIDERS } from '@angular/http';

import { AuthService } from './shared/services/auth.service';
import { DataService } from './shared/services/data.service';
import { SqliteService } from './shared/services/sqlite.service';
import { MappingsService } from './shared/services/mappings.service';
import { ItemsService } from './shared/services/items.service';

export const APP_PROVIDERS = [
    AuthService,
    DataService,
    ItemsService,
    SqliteService,
    MappingsService,
    HTTP_PROVIDERS
];
Component Directives
We will create an ThreadComponent to display threads in the ThreadsPage list. Each thread will be responsible to listen for events that only happens upon that, which in our case will be the number of comments added. Add a new folder named directives under shared and create the thread.component.ts.
import { Component, EventEmitter, OnInit, OnDestroy, Input, Output } from '@angular/core';

import { IThread } from '../interfaces';
import { UserAvatarComponent } from '../../shared/directives/user-avatar.component';
import { DataService } from '../services/data.service';

@Component({
    selector: 'forum-thread',
    templateUrl: 'build/shared/directives/thread.component.html',
    directives: [UserAvatarComponent]
})
export class ThreadComponent implements OnInit, OnDestroy {
    @Input() thread: IThread;
    @Output() onViewComments = new EventEmitter<string>();

    constructor(private dataService: DataService) { }

    ngOnInit() {
        var self = this;
        self.dataService.getThreadsRef().child(self.thread.key).on('child_changed', self.onCommentAdded);
    }

    ngOnDestroy() {
         console.log('destroying..');
        var self = this;
        self.dataService.getThreadsRef().child(self.thread.key).off('child_changed', self.onCommentAdded);
    }

    // Notice function declarion to keep the right this reference
    public onCommentAdded = (childSnapshot, prevChildKey) => {
       console.log(childSnapshot.val());
        var self = this;
        // Attention: only number of comments is supposed to changed.
        // Otherwise you should run some checks..
        self.thread.comments = childSnapshot.val();
    }

    viewComments(key: string) {
        this.onViewComments.emit(key);
    }

}
The on and off functions starts and stops listening for data changes at a particular location. This is how each thread will automatically update the number of comments posted on that thread at real time. Firebase will send the update to all connected users immediatly.
Another importan function is the viewComments which informs the parent component (ThreadsPage) to open the CommentsPage for the specific thread. Add the thread.component.html template for this component in the same folder
<ion-item text-wrap>
    <ion-card>

        <ion-item>
            <ion-avatar item-left>
                <forum-user-avatar [user]="thread.user"></forum-user-avatar>
            </ion-avatar>
            <h2>{{thread.user.username}}</h2>
            <p>{{thread.dateCreated | date:'medium'}}</p>
        </ion-item>

        <div class="thread-card-title wordwrap">
            {{thread.title}}
        </div>
        <div class="thread-card-question wordwrap left-border-primary">
            {{thread.question}}
        </div>

        <ion-row class="left-border-primary">
            <ion-col>
                <button primary clear small (click)="viewComments(thread.key)">
        <ion-icon name="quote"></ion-icon>
        <div>{{thread.comments}} Comments</div>
      </button>
            </ion-col>
            <ion-col center text-center>
                <ion-note>
                    {{thread.category}}
                </ion-note>
            </ion-col>
        </ion-row>
    </ion-card>
</ion-item>
You may have noticed that this component uses an element forum-user-avatar. It’s another component we are going to create and will be responsible for rendering user’s profile picture uploaded in Firebase’s storage. Add the user-avatar.component.ts under the directives folder.
import { Component, Input, OnInit } from '@angular/core';
import { PhotoViewer } from 'ionic-native';

import { IUser } from '../interfaces';
import { DataService } from '../services/data.service';

@Component({
    selector: 'forum-user-avatar',
    template: ` <img *ngIf="imageLoaded" src="{{imageUrl}}" (click)="zoom()">`
})
export class UserAvatarComponent implements OnInit {
    @Input() user: IUser;
    imageLoaded: boolean = false;
    imageUrl: string;

    constructor(private dataService: DataService) { }

    ngOnInit() {
        var self = this;
        let firebaseConnected: boolean = self.dataService.isFirebaseConnected();
        if (self.user.uid === 'default' || !firebaseConnected) {
            self.imageUrl = 'images/profile.png';
            self.imageLoaded = true;
        } else {
            self.dataService.getStorageRef().child('images/' + self.user.uid + '/profile.png').getDownloadURL().then(function (url) {
                self.imageUrl = url.split('?')[0] + '?alt=media' + '&t=' + (new Date().getTime());
                self.imageLoaded = true;
            });
        }
    }

    zoom() {
        PhotoViewer.show(this.imageUrl, this.user.username, { share: false });
    }

    getUserImage() {
        var self = this;

        return self.dataService.getStorageRef().child('images/' + self.user.uid + '/profile.png').getDownloadURL();
    }
}
This component accepts an @Input() parameter and set’s the imageUrl property. We would like though this image to be zoomed when clicked. It is high time for us to see the first native feature in the Forum app. We are going to use the Photo Viewer Ionic Native plugin to accomplish our goal. First thing we need to do is run the following command and install the cordova plugin.
ionic plugin add com-sarriaroman-photoviewer
Inside the component we import the PhotoViewer Typescript wrapper from ionic-native and we bind the click event to call the static show method. That’s all needed!
Login & Register on Firebase
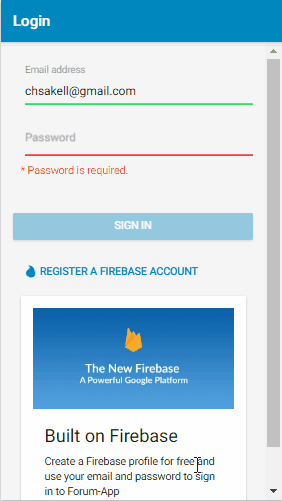
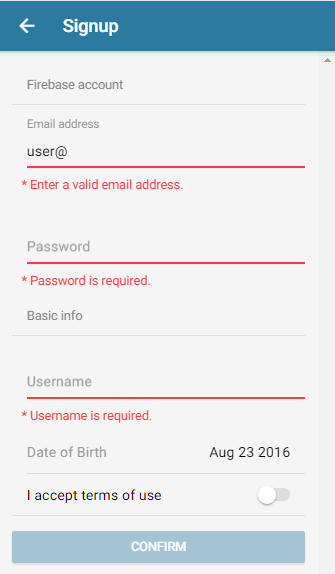
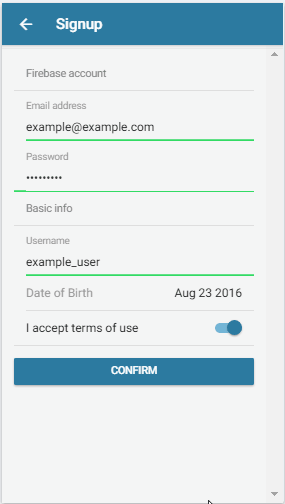
Users should be authenticated in order to view/add threads and comments so let’s procceed with those views first. Add a folder named signup under pages. In Ionic, it’s common to create three files foreach page. One .ts Angular Component which holds the logic, one .html to hold the template and a .scss file for setting stylesheets. Go ahead and create the signup.ts, signup.html and signup.scss files under the signup folder. The SignupPage requires basic information from user. More specifically a unique email address and a password that are required from Firebase itself to create the account and some other data we would like to keep, such as a username and date of birth. We would also like to add validation logic in the signup page and for this we ‘ll use Angular Forms. Let’s have a preview of this page first.
Set the signup.ts contents as follow:
import { Component, OnInit } from '@angular/core';
import { Modal, NavController, ViewController, LoadingController, ToastController } from 'ionic-angular';
import {FORM_DIRECTIVES, FormBuilder, FormGroup, Validators, AbstractControl} from '@angular/forms';

import { IThread, UserCredentials } from '../../shared/interfaces';
import { DataService } from '../../shared/services/data.service';
import { AuthService } from '../../shared/services/auth.service';
import { CheckedValidator } from '../../shared/validators/checked.validator';
import { EmailValidator } from '../../shared/validators/email.validator';

@Component({
    templateUrl: 'build/pages/signup/signup.html',
    directives: [FORM_DIRECTIVES]
})
export class SignupPage implements OnInit {

    createFirebaseAccountForm: FormGroup;
    username: AbstractControl;
    email: AbstractControl;
    password: AbstractControl;
    dateOfBirth: AbstractControl;
    terms: AbstractControl;

    constructor(private nav: NavController,
        private loadingCtrl: LoadingController,
        private toastCtrl: ToastController,
        private viewCtrl: ViewController,
        private fb: FormBuilder,
        private dataService: DataService,
        private authService: AuthService) { }

    ngOnInit() {
        this.createFirebaseAccountForm = this.fb.group({
            'username': ['', Validators.compose([Validators.required, Validators.minLength(8)])],
            'email': ['', Validators.compose([Validators.required, EmailValidator.isValid])],
            'password': ['', Validators.compose([Validators.required, Validators.minLength(5)])],
            'dateOfBirth': [new Date().toISOString().slice(0, 10), Validators.compose([Validators.required])],
            'terms': [false, CheckedValidator.isChecked]
        });

        this.username = this.createFirebaseAccountForm.controls['username'];
        this.email = this.createFirebaseAccountForm.controls['email'];
        this.password = this.createFirebaseAccountForm.controls['password'];
        this.dateOfBirth = this.createFirebaseAccountForm.controls['dateOfBirth'];
        this.terms = this.createFirebaseAccountForm.controls['terms'];
    }

    getFormattedDate(): string {
        let now = new Date();
        let mm = now.getMonth() + 1;
        let dd = now.getDate();

        let formattedDate = [now.getFullYear(), !mm[1] && '0', mm, !dd[1] && '0', dd].join('-');
        return formattedDate;
    }

    onSubmit(signupForm: any): void {
        var self = this;

        if (this.createFirebaseAccountForm.valid) {

            let loader = this.loadingCtrl.create({
                content: 'Creating account...',
                dismissOnPageChange: true
            });

            let newUser: UserCredentials = {
                email: signupForm.email,
                password: signupForm.password
            };

            loader.present();

            this.authService.registerUser(newUser)
                .then(function (result) {
                    self.authService.addUser(signupForm.username, signupForm.dateOfBirth, self.authService.getLoggedInUser().uid);
                    loader.dismiss()
                        .then(() => {
                            self.viewCtrl.dismiss({
                                user: newUser
                            }).then(() => {
                                let toast = self.toastCtrl.create({
                                    message: 'Account created successfully',
                                    duration: 4000,
                                    position: 'top'
                                });
                                toast.present();
                                self.CreateAndUploadDefaultImage();
                            });
                        });
                }).catch(function (error) {
                    // Handle Errors here.
                    var errorCode = error.code;
                    var errorMessage = error.message;
                    console.error(error);
                    loader.dismiss().then(() => {
                        let toast = self.toastCtrl.create({
                            message: errorMessage,
                            duration: 4000,
                            position: 'top'
                        });
                        toast.present();
                    });
                });
        }
    }

    CreateAndUploadDefaultImage() {
        let self = this;
        let imageData = 'images/profile.png';

        var xhr = new XMLHttpRequest();
        xhr.open('GET', imageData, true);
        xhr.responseType = 'blob';
        xhr.onload = function (e) {
            if (this.status === 200) {
                var myBlob = this.response;
                // myBlob is now the blob that the object URL pointed to.
                self.startUploading(myBlob);
            }
        };
        xhr.send();
    }

    startUploading(file) {

        let self = this;
        let uid = self.authService.getLoggedInUser().uid;
        let progress: number = 0;
        // display loader
        let loader = this.loadingCtrl.create({
            content: 'Uploading default image..',
        });
        loader.present();

        // Upload file and metadata to the object 'images/mountains.jpg'
        var metadata = {
            contentType: 'image/png',
            name: 'profile.png',
            cacheControl: 'no-cache',
        };

        var uploadTask = self.dataService.getStorageRef().child('images/' + uid + '/profile.png').put(file, metadata);

        // Listen for state changes, errors, and completion of the upload.
        uploadTask.on('state_changed',
            function (snapshot) {
                // Get task progress, including the number of bytes uploaded and the total number of bytes to be uploaded
                progress = (snapshot.bytesTransferred / snapshot.totalBytes) * 100;
            }, function (error) {
                loader.dismiss().then(() => {
                    switch (error.code) {
                        case 'storage/unauthorized':
                            // User doesn't have permission to access the object
                            break;

                        case 'storage/canceled':
                            // User canceled the upload
                            break;

                        case 'storage/unknown':
                            // Unknown error occurred, inspect error.serverResponse
                            break;
                    }
                });
            }, function () {
                loader.dismiss().then(() => {
                    // Upload completed successfully, now we can get the download URL
                    var downloadURL = uploadTask.snapshot.downloadURL;
                    self.dataService.setUserImage(uid);
                });
            });
    }

}
I know. Lot’s of stuff to explain here. I will start with the Angular Custom validators. We set a custom validator to ensure that a checkbox is checked and another one to validate an email address.
this.createFirebaseAccountForm = this.fb.group({
    'username': ['', Validators.compose([Validators.required, Validators.minLength(8)])],
    'email': ['', Validators.compose([Validators.required, EmailValidator.isValid])],
    'password': ['', Validators.compose([Validators.required, Validators.minLength(5)])],
    'dateOfBirth': [new Date().toISOString().slice(0, 10), Validators.compose([Validators.required])],
    'terms': [false, CheckedValidator.isChecked]
});
We need to create the EmailValidator and the CheckedValidator validators. Add a folder named validators under the shared folder and create the following two files, email.validator.ts, checked.validator.ts.
import { FormControl } from '@angular/forms';

interface ValidationResult {
    [key: string]: boolean;
}

export class EmailValidator {

    public static isValid(control: FormControl): ValidationResult {
        var emailReg = /^(([^<>()\[\]\\.,;:\s@"]+(\.[^<>()\[\]\\.,;:\s@"]+)*)|(".+"))@((\[[0-9]{1,3}\.[0-9]{1,3}\.[0-9]{1,3}\.[0-9]{1,3}])|(([a-zA-Z\-0-9]+\.)+[a-zA-Z]{2,}))$/;

        let valid = emailReg.test(control.value);

        if (!valid) {
            return { isValid: true };
        }
        return null;
    }
}
import { FormControl } from '@angular/forms';

interface ValidationResult {
    [key: string]: boolean;
}

export class CheckedValidator {

    public static isChecked(control: FormControl): ValidationResult {
        var valid = control.value === false || control.value === 'false';
        if (valid) {
            return { isChecked: true };
        }
        return null;
    }
}
Here’s the contents of signup.html template. Notice how we check if the custom validators return true.
<ion-header>
    <ion-navbar>
        <ion-title>Signup</ion-title>
    </ion-navbar>
</ion-header>
<ion-content padding>
    <form [formGroup]="createFirebaseAccountForm" (ngSubmit)="onSubmit(createFirebaseAccountForm.value)">
        <ion-list>
            <ion-list-header>
                Firebase account
            </ion-list-header>
            <ion-item [class.error]="!email.valid && email.touched">
                <ion-label floating>Email address</ion-label>
                <ion-input type="text" value="" [formControl]="email"></ion-input>
            </ion-item>
            <div *ngIf="email.hasError('required') && email.touched" class="error-box">* Email is required.</div>
            <div *ngIf="email.hasError('isValid') && email.touched" class="error-box">* Enter a valid email address.</div>
            <ion-item [class.error]="!password.valid && password.touched">
                <ion-label floating>Password</ion-label>
                <ion-input type="password" value="" [formControl]="password"></ion-input>
            </ion-item>
            <div *ngIf="password.hasError('required') && password.touched" class="error-box">* Password is required.</div>
            <div *ngIf="password.hasError('minlength') && password.touched" class="error-box">* Minimum password length is 5.</div>
        </ion-list>
        <ion-list>
            <ion-list-header>
                Basic info
            </ion-list-header>
            <ion-item [class.error]="!username.valid && username.touched">
                <ion-label floating>Username</ion-label>
                <ion-input type="text" value="" [formControl]="username"></ion-input>
            </ion-item>
            <div *ngIf="username.hasError('required') && username.touched" class="error-box">* Username is required.</div>
            <div *ngIf="username.hasError('minlength') && username.touched" class="error-box">* Minimum password length is 8.</div>
            <ion-item>
                <ion-label>Date of Birth</ion-label>
                <ion-datetime displayFormat="MMM DD YYYY" [formControl]="dateOfBirth"></ion-datetime>
            </ion-item>
            <ion-item>
                <ion-label>I accept terms of use</ion-label>
                <ion-toggle [formControl]="terms"></ion-toggle>
            </ion-item>
            <div *ngIf="terms.hasError('isChecked') && terms.touched" class="error-box">* You need to accept the terms of use.</div>
        </ion-list>
        <button type="submit" class="custom-button" [disabled]="!createFirebaseAccountForm.valid" block>Confirm</button>
    </form>
</ion-content>
The SignupPage component make use of two ionic components to notify user that something is happening or happened. The first one is the Toast which displays a message when registration process is completed.
let toast = self.toastCtrl.create({
    message: 'Account created successfully',
    duration: 4000,
    position: 'top'
});
toast.present();
You need to inject ToastController in the component’s constructor. The same applies for the Loading component which displays an overlay while registration is being processed.
let loader = this.loadingCtrl.create({
    content: 'Creating account...',
    dismissOnPageChange: true
});

loader.present();
There are two more important functions in the signup.ts, the CreateAndUploadDefaultImage() and the startUploading. The first one reads a local file named avatar.png which exists under www/images folder. Copy the image file from here and paste it inside the www/images folder (or another one of your choice, just make sure to name it profile.png). The startUploading method uses the method described here and uploads a default image on the Firebase storage that we set at the start of this post. We will use the same method to upload files captured by the mobile’s Camera or picked from the mobile’s photo album later on the Profile page.
The Login page is much simpler than the signup. Add the login.ts and the login.html files under a new folder named login in pages.
import { Component, OnInit } from '@angular/core';
import { Modal, NavController, ViewController, LoadingController, ToastController } from 'ionic-angular';
import {FORM_DIRECTIVES, FormBuilder, FormGroup, Validators, AbstractControl} from '@angular/forms';

import { TabsPage } from '../tabs/tabs';
import { SignupPage } from '../signup/signup';
import { IThread, UserCredentials } from '../../shared/interfaces';
import { DataService } from '../../shared/services/data.service';
import { AuthService } from '../../shared/services/auth.service';

@Component({
    templateUrl: 'build/pages/login/login.html',
    directives: [FORM_DIRECTIVES]
})
export class LoginPage implements OnInit {

    loginFirebaseAccountForm: FormGroup;
    email: AbstractControl;
    password: AbstractControl;

    constructor(private nav: NavController,
        private loadingCtrl: LoadingController,
        private toastCtrl: ToastController,
        private fb: FormBuilder,
        private dataService: DataService,
        private authService: AuthService) { }

    ngOnInit() {
        this.loginFirebaseAccountForm = this.fb.group({
            'email': ['', Validators.compose([Validators.required])],
            'password': ['', Validators.compose([Validators.required, Validators.minLength(5)])]
        });

        this.email = this.loginFirebaseAccountForm.controls['email'];
        this.password = this.loginFirebaseAccountForm.controls['password'];
    }

    onSubmit(signInForm: any): void {
        var self = this;
        if (this.loginFirebaseAccountForm.valid) {

            let loader = this.loadingCtrl.create({
                content: 'Signing in firebase..',
                dismissOnPageChange: true
            });

            loader.present();

            let user: UserCredentials = {
                email: signInForm.email,
                password: signInForm.password
            };

            console.log(user);
            this.authService.signInUser(user.email, user.password)
                .then(function (result) {
                    self.nav.setRoot(TabsPage);
                }).catch(function (error) {
                    // Handle Errors here.
                    var errorCode = error.code;
                    var errorMessage = error.message;
                    loader.dismiss().then(() => {
                        let toast = self.toastCtrl.create({
                            message: errorMessage,
                            duration: 4000,
                            position: 'top'
                        });
                        toast.present();
                    });
                });
        }
    }

    register() {
        this.nav.push(SignupPage);
    }
}
<ion-header>
    <ion-navbar hideBackButton>
        <ion-title>Login</ion-title>
    </ion-navbar>
</ion-header>
<ion-content padding>
    <form [formGroup]="loginFirebaseAccountForm" (ngSubmit)="onSubmit(loginFirebaseAccountForm.value)">
        <ion-item [class.error]="!email.valid && email.touched">
            <ion-label floating>Email address</ion-label>
            <ion-input type="text" value="" [formControl]="email"></ion-input>
        </ion-item>
        <div *ngIf="email.hasError('required') && email.touched" class="error-box">* Email is required.</div>
        <div *ngIf="email.hasError('pattern') && email.touched" class="error-box">* Enter a valid email address.</div>
        <ion-item [class.error]="!password.valid && password.touched">
            <ion-label floating>Password</ion-label>
            <ion-input type="password" value="" [formControl]="password"></ion-input>
        </ion-item>
        <div *ngIf="password.hasError('required') && password.touched" class="error-box">* Password is required.</div>
        <div *ngIf="password.hasError('minlength') && password.touched" class="error-box">* Minimum password length is 5.</div>
        <br/><br/>
        <button type="submit" class="custom-button" [disabled]="!loginFirebaseAccountForm.valid" block>Sign in</button>
        <br/>
        <button clear (click)="register()">
            <ion-icon name='flame'></ion-icon>
            Register a firebase account</button>
        <ion-card padding>
            <img src="images/firebase.png" />
            <ion-card-content>
                <ion-card-title>
                    Built on Firebase
                </ion-card-title>
                <p>
                    Create a Firebase profile for free and use your email and password to sign in to Forum-App
                </p>
            </ion-card-content>
        </ion-card>
    </form>
</ion-content>
Nothing that we haven’t seen already here. Just simple validation logic and a call to the AuthService signInUser method. Notice however that in a successfull login we make sure to set the root of the NavController to the TabsPage. I recommend you to spend some time reading the basics of the Nav API as well.
Threads Page
This page is responsible to display all threads existing in Firebase ordered by priority. The thread with the largest priority is being displayed first. Add a threads folder under pages and create the threads.html template first.
<ion-header>
  <ion-navbar no-border-bottom>
    <button menuToggle>
      <ion-icon name='menu'></ion-icon>
    </button>
    <ion-segment [(ngModel)]="segment" (ionChange)="filterThreads(segment)">
      <ion-segment-button value="all">
        All
      </ion-segment-button>
      <ion-segment-button value="favorites">
        Favorites
      </ion-segment-button>
    </ion-segment>

    <ion-buttons end>
      <button *ngIf="!internetConnected" (click)="notify('Working offline..')">
        <ion-icon name="warning"></ion-icon>
      </button>
      <button (click)="createThread()" *ngIf="internetConnected">
        <ion-icon name="add"></ion-icon>
      </button>
    </ion-buttons>
  </ion-navbar>

  <ion-toolbar no-border-top>
    <ion-searchbar primary [(ngModel)]="queryText" (ionInput)="searchThreads()" placeholder="Search for a thread..">
    </ion-searchbar>
  </ion-toolbar>
</ion-header>

<ion-content>

  <ion-refresher (ionRefresh)="reloadThreads($event)" *ngIf="segment=='all'">
    <ion-refresher-content></ion-refresher-content>
  </ion-refresher>

  <div *ngIf="loading">
    <img src="images/ring.gif" style="display:block; margin:auto" />
  </div>

  <ion-list *ngIf="!loading">
    <forum-thread *ngFor="let thread of threads" [thread]="thread" (onViewComments)="viewComments($event)"></forum-thread>
  </ion-list>

  <ion-infinite-scroll (ionInfinite)="fetchNextThreads($event)" threshold="10px" *ngIf="(start > 0) && (queryText.trim().length == 0) && segment=='all' && internetConnected">
    <ion-infinite-scroll-content></ion-infinite-scroll-content>
  </ion-infinite-scroll>
</ion-content>
There are 4 basic parts in the template. The first one is the ion-segment which is just a container for buttons. The segment allows the user to change between all and his/her favorite threads. They are just buttons, nothing more. The second important component in the template is the ion-toolbar which allows the user to search in public (only, not favorites) threads.

We also use an ion-refresher element for refreshing the entire list. The truth is that we don’t need this functionality that much because we will bind events on Firebase which will notify the app each time a new thread is being added. Then we have an ion-list that renders the currently loaded threads and last but not least an ion-infinite-scroll element. This component will allow us to support pagination and every time the user scrolls and reaches the bottom of the page, the next batch of threads will be loaded from firebase. For this to work we need to keep track the priority of the last thread loaded in our application (and that’s why we used priorities..). For simplicity the refresher and the infinite scroll components will be enabled only when the ‘All’ segment button is pressed and the user is connected to the network. That’s why you see some *ngIf conditions on the template. Once again get the entire source-code of the threads.ts file here. I will explain the most important methods of the ThreadsPage component. We need the ViewChild from @angular/core and the ionic Content so we can scroll up and down the ion-content. We import the NavController, the ThreadCreatePage and ThreadCommentsPage so we can push those pages on the stack while being always at the Threads tab. We also import all our custom services for both online (Firebase) and offline (SQLite) CRUD operations. We also import Events from ionic for sending and responding to application-level events across the Forum app. One case where we are going to use Events is get notified in case of network disconnection or re-connection.
import { Component, OnInit, ViewChild } from '@angular/core';
import { NavController, ModalController, ToastController, Content, Events } from 'ionic-angular';

import { ThreadComponent } from '../../shared/directives/thread.component';
import { UserAvatarComponent } from '../../shared/directives/user-avatar.component';
import { IThread } from '../../shared/interfaces';
import { ThreadCreatePage } from '../thread-create/thread-create';
import { ThreadCommentsPage } from '../thread-comments/thread-comments';
import { LoginPage } from '../login/login';
import { AuthService } from '../../shared/services/auth.service';
import { DataService } from '../../shared/services/data.service';
import { MappingsService } from '../../shared/services/mappings.service';
import { ItemsService } from '../../shared/services/items.service';
import { SqliteService } from '../../shared/services/sqlite.service';
First thing we need to do, is decide whether we are connected in Firebase or not and fetch the data from internet of the SQLite database respectively. This is what ngOnInit() and checkFirebase() are for.
ngOnInit() {
    var self = this;
    self.segment = 'all';
    self.events.subscribe('network:connected', self.networkConnected);
    self.events.subscribe('threads:add', self.addNewThreads);

    self.checkFirebase();
  }
checkFirebase() {
    let self = this;
    if (!self.dataService.isFirebaseConnected()) {
      setTimeout(function () {
        console.log('Retry : ' + self.firebaseConnectionAttempts);
        self.firebaseConnectionAttempts++;
        if (self.firebaseConnectionAttempts < 5) {
          self.checkFirebase();
        } else {
          self.internetConnected = false;
          self.dataService.goOffline();
          self.loadSqliteThreads();
        }
      }, 1000);
    } else {
      console.log('Firebase connection found (threads.ts) - attempt: ' + self.firebaseConnectionAttempts);
      self.dataService.getStatisticsRef().on('child_changed', self.onThreadAdded);
      if (self.authService.getLoggedInUser() === null) {
        //
      } else {
        self.loadThreads(true);
      }
    }
  }
checkFirebase waits for at least five seconds before decides to load data from the database. DataService listens to a specific location in Firebase that check the client’s connection status which is returned by the isFirebaseConnected() function.
There are three key variables on this component:
public threads: Array<IThread> = [];
public newThreads: Array<IThread> = [];
public favoriteThreadKeys: string[];
Variable threads holds items that are being displayed in the ion-list. Either is the ‘All’ segment button selected or the ‘Favorites’, this variable should hold the right data. Variable newThreads holds new items added from other users and is being populated instantly because of the following listening event:
self.dataService.getStatisticsRef().on('child_changed', self.onThreadAdded);
What this line of code does, is start listening changes in the statistics/threads Firebase location which we populate only when we add a new thread. And because we set it equal to new thread’s priority here is the onThreadAdded function as well.
// Notice function declarion to keep the right this reference
  public onThreadAdded = (childSnapshot, prevChildKey) => {
    let priority = childSnapshot.val(); // priority..
    var self = this;
    self.events.publish('thread:created');
    // fetch new thread..
    self.dataService.getThreadsRef().orderByPriority().equalTo(priority).once('value').then(function (dataSnapshot) {
      let key = Object.keys(dataSnapshot.val())[0];
      let newThread: IThread = self.mappingsService.getThread(dataSnapshot.val()[key], key);
      self.newThreads.push(newThread);
    });
  }
This function retrieves the new created thread, adds it in the newThreads and publish a thread:created event. The TabsPage component which holds the tabs, is subscribed to this event in order to display a badge on the Threads tab. Here’s how how it looks like: On the right you can see that I change the statistics/threads value on purpose, so that the app thinks someone has created a new thread..
We also subscribe to a threads:add event in order to add all new threads that have been created mostly by other users.
self.events.subscribe('threads:add', self.addNewThreads);
This event will fire from the TabsPage component when Threads tab has a badge containing the number of new threads have been added in Firebase.
public addNewThreads = () => {
    var self = this;
    self.newThreads.forEach(function (thread: IThread) {
      self.threads.unshift(thread);
    });

    self.newThreads = [];
    self.scrollToTop();
    self.events.publish('threads:viewed');
  }
TabsPage component will receive the threads:viewed event and will remove the badge form the tab. The ngOnInit() function also subscribes to the network:connected event in order to get notified when client reconnects.
self.events.subscribe('network:connected', self.networkConnected);
When this event fires, in case connection exists we reload threads from Firebase, otherwise we make sure to reset the mobile’s local SQLite database and save the currently local threads. This is just a choice we made to keep things simple and always make SQLite contain the latest loaded threads on the app.
public networkConnected = (connection) => {
    var self = this;
    self.internetConnected = connection[0];
    console.log('NetworkConnected event: ' + self.internetConnected);

    if (self.internetConnected) {
      self.threads = [];
      self.loadThreads(true);
    } else {
      self.notify('Connection lost. Working offline..');
      // save current threads..
      setTimeout(function () {
        self.sqliteService.saveThreads(self.threads);
        self.loadSqliteThreads();
      }, 1000);
    }
  }
The getThreads() function is quite important since is the one that loads threads from Firebase. In case the ‘All’ segment button is pressed then we retrieve the threads ordered by priority while keeping track of priorities loaded using the self.start variable. If the ‘Favorites’ button is pressed then we enumerate user’s favorite threads and foreach key retrieved, we download the respective thread and add it to the array.
getThreads() {
    var self = this;
    let startFrom: number = self.start - self.pageSize;
    if (startFrom < 0)
      startFrom = 0;
    if (self.segment === 'all') {
      this.dataService.getThreadsRef().orderByPriority().startAt(startFrom).endAt(self.start).once('value', function (snapshot) {
        self.itemsService.reversedItems<IThread>(self.mappingsService.getThreads(snapshot)).forEach(function (thread) {
          self.threads.push(thread);
        });
        self.start -= (self.pageSize + 1);
        self.events.publish('threads:viewed');
        self.loading = false;
      });
    } else {
      self.favoriteThreadKeys.forEach(key => {
        this.dataService.getThreadsRef().child(key).once('value')
          .then(function (dataSnapshot) {
            self.threads.unshift(self.mappingsService.getThread(dataSnapshot.val(), key));
          });
      });
      self.events.publish('threads:viewed');
      self.loading = false;
    }
  }
The searchThreads() function searches Firebase only when ‘All’ segment button is pressed. It’s a very simple implementation that checks if the title of a thread contains the query text entered by the user.
searchThreads() {
    var self = this;
    if (self.queryText.trim().length !== 0) {
      self.segment = 'all';
      // empty current threads
      self.threads = [];
      self.dataService.loadThreads().then(function (snapshot) {
        self.itemsService.reversedItems<IThread>(self.mappingsService.getThreads(snapshot)).forEach(function (thread) {
          if (thread.title.toLowerCase().includes(self.queryText.toLowerCase()))
            self.threads.push(thread);
        });
      });
    } else { // text cleared..
      this.loadThreads(true);
    }
  }
The last two functions, createThread and viewComments are responsible to push new Pages in the stack. The first one renders the ThreadCreatePage page (we ‘ll create it shortly) using a Modal while the latter simply pushes the ThreadCommentsPage with the thread’s key passed as parameter. The pushed page will read the parameter in order to load the comments posted on that thread.
createThread() {
    var self = this;
    let modalPage = this.modalCtrl.create(ThreadCreatePage);

    modalPage.onDidDismiss((data: any) => {
      if (data) {
        let toast = this.toastCtrl.create({
          message: 'Thread created',
          duration: 3000,
          position: 'bottom'
        });
        toast.present();

        if (data.priority === 1)
          self.newThreads.push(data.thread);

        self.addNewThreads();
      }
    });

    modalPage.present();
  }

  viewComments(key: string) {
    if (this.connected) {
      this.navCtrl.push(ThreadCommentsPage, {
        threadKey: key
      });
    } else {
      this.notify('Network not found..');
    }
  }
Let me remind you that viewComments is an @Output() event fired by a ThreadComponent thread.
 <ion-list *ngIf="!loading">
    <forum-thread *ngFor="let thread of threads" [thread]="thread" (onViewComments)="viewComments($event)"></forum-thread>
  </ion-list>
I have also created some custom css rules for the Threads page inside the threads.scss file.
.thread-card-title {
    font-size: 14x;
    width: 100%;
    font-weight: bold;
    color: black;
    padding: 0px 6px;
    margin-top: 6px;
  }

  .thread-card-question {
    font-size: 1.0em;
    width: 100%;
    padding: 0 10px 0 12px;
    margin-top: 7px;
    color: #424242;
  }

  .wordwrap {
   white-space: normal;      /* CSS3 */
   white-space: -moz-pre-wrap; /* Firefox */
   white-space: -pre-wrap;     /* Opera <7 */
   white-space: -o-pre-wrap;   /* Opera 7 */
   word-wrap: break-word;      /* IE */
}

.segment-button.segment-activated {
    color: black;
    background-color: #f4f4f4;// #ffdd00;
}

.toolbar ion-searchbar .searchbar-input {
  background-color: white;
}

.segment-button {
  color: black;
}
Let’s procceed with the ThreadCreatePage component. Add a folder named thread-create under pages and create the following thread-create.ts, thread-create.html and thread-create.scss files.
import { Component, OnInit } from '@angular/core';
import { Modal, NavController, ViewController, LoadingController } from 'ionic-angular';
import {FORM_DIRECTIVES, FormBuilder, FormGroup, Validators, AbstractControl} from '@angular/forms';

import { IThread } from '../../shared/interfaces';
import { AuthService } from  '../../shared/services/auth.service';
import { DataService } from '../../shared/services/data.service';

@Component({
  templateUrl: 'build/pages/thread-create/thread-create.html',
  directives: [FORM_DIRECTIVES]
})
export class ThreadCreatePage implements OnInit {

  createThreadForm: FormGroup;
  title: AbstractControl;
  question: AbstractControl;
  category: AbstractControl;

  constructor(private nav: NavController,
    private loadingCtrl: LoadingController,
    private viewCtrl: ViewController,
    private fb: FormBuilder,
    private authService: AuthService,
    private dataService: DataService) { }

  ngOnInit() {
    console.log('in thread create..');
    this.createThreadForm = this.fb.group({
      'title': ['', Validators.compose([Validators.required, Validators.minLength(8)])],
      'question': ['', Validators.compose([Validators.required, Validators.minLength(10)])],
      'category': ['', Validators.compose([Validators.required, Validators.minLength(1)])]
    });

    this.title = this.createThreadForm.controls['title'];
    this.question = this.createThreadForm.controls['question'];
    this.category = this.createThreadForm.controls['category'];
  }

  cancelNewThread() {
    this.viewCtrl.dismiss();
  }

  onSubmit(thread: any): void {
    var self = this;
    if (this.createThreadForm.valid) {

      let loader = this.loadingCtrl.create({
        content: 'Posting thread...',
        dismissOnPageChange: true
      });

      loader.present();

      let uid = self.authService.getLoggedInUser().uid;
      self.dataService.getUsername(uid).then(function (snapshot) {
        let username = snapshot.val();

        self.dataService.getTotalThreads().then(function (snapshot) {
          let currentNumber = snapshot.val();
          let newPriority: number = currentNumber === null ? 1 : (currentNumber + 1);

          let newThread: IThread = {
            key: null,
            title: thread.title,
            question: thread.question,
            category: thread.category,
            user: { uid: uid, username: username },
            dateCreated: new Date().toString(),
            comments: null
          };

          self.dataService.submitThread(newThread, newPriority)
            .then(function (snapshot) {
              loader.dismiss()
                .then(() => {
                  self.viewCtrl.dismiss({
                    thread: newThread,
                    priority: newPriority
                  });
                });
            }, function (error) {
              // The Promise was rejected.
              console.error(error);
              loader.dismiss();
            });
        });
      });
    }
  }

}
There is nothing new to explain here except the way a pushed page may return some data to its caller when dismissed. You need an instance of a ViewController to accomplish this.
self.viewCtrl.dismiss({
    thread: newThread,
    priority: newPriority
});
<ion-header>
    <ion-navbar>
        <ion-title>New Thread</ion-title>
        <ion-buttons start>
            <button (click)="cancelNewThread()">
        <ion-icon name="arrow-back"></ion-icon> Cancel
      </button>
        </ion-buttons>
    </ion-navbar>
</ion-header>

<ion-content padding>
    <form [formGroup]="createThreadForm" (ngSubmit)="onSubmit(createThreadForm.value)">
        <ion-item [class.error]="!title.valid && title.touched">
            <ion-label floating>Title</ion-label>
            <ion-input type="text" value="" [formControl]="title"></ion-input>
        </ion-item>
        <div *ngIf="title.hasError('required') && title.touched" class="error-box">* Title is required.</div>
        <div *ngIf="title.hasError('minlength') && title.touched" class="error-box">* Minimum password length is 8.</div>
        <ion-item [class.error]="!question.valid && question.touched">
            <ion-label floating>Question</ion-label>
            <ion-textarea [formControl]="question" rows="6"></ion-textarea>
        </ion-item>
        <div *ngIf="question.hasError('required') && question.touched" class="error-box">* Question is required.</div>
        <div *ngIf="question.hasError('minlength') && question.touched" class="error-box">* Type at least 100 characters.</div>
        <ion-item>
            <ion-label>Category</ion-label>
            <ion-select multiple="false" [formControl]="category">
                <ion-option value="components" checked="true">Components</ion-option>
                <ion-option value="native">Native</ion-option>
                <ion-option value="theming">Theming</ion-option>
                <ion-option value="ionicons">Ionicons</ion-option>
                <ion-option value="cli">CLI</ion-option>
            </ion-select>
        </ion-item>
        <div *ngIf="category.hasError('minlength')" class="error-box">* Select at least one category.</div>
        <br/><br/>
        <button type="submit" class="custom-button" [disabled]="!createThreadForm.valid" block>Submit</button>
    </form>
</ion-content>
.error-box {
    color: color($colors, danger);
    padding: 10px;
}
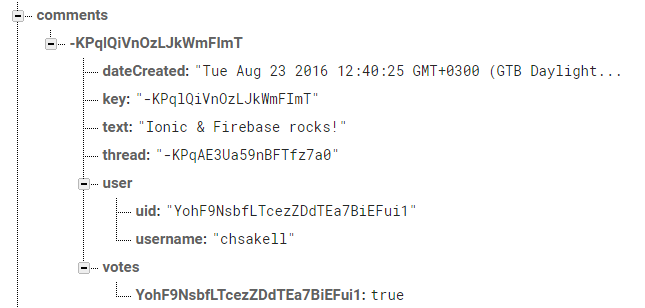
Add a new folder named thread-comments and create a thread-comments.ts file. Copy the contents from the repository. Let me explain the core parts of this component. On init, we get thread’s key passed from the previous page using NavParams. Then we load those comments on the page. The structure in Firebase looks like this..
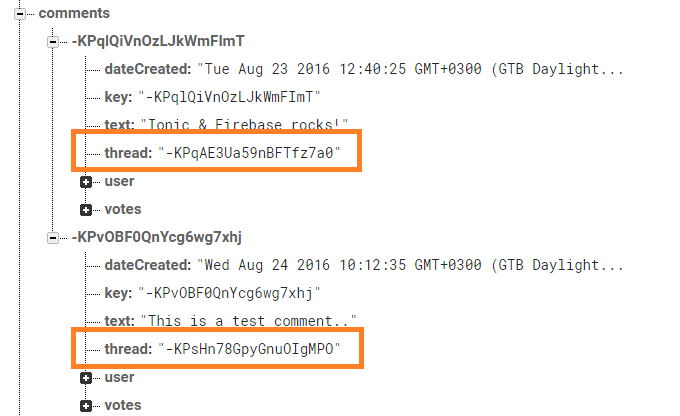
Above you can see two comments for two different threads.
ngOnInit() {
    var self = this;
    self.threadKey = self.navParams.get('threadKey');
    self.commentsLoaded = false;

    self.dataService.getThreadCommentsRef(self.threadKey).once('value', function (snapshot) {
        self.comments = self.mappingsService.getComments(snapshot);
        self.commentsLoaded = true;
    }, function (error) {});
}
We can bind to that specific location in Firebase using the order by child method.
getThreadCommentsRef(threadKey: string) {
    return this.commentsRef.orderByChild('thread').equalTo(threadKey);
}
This page allows the user to mark the thread as Favorite. It does that using an Ionic ActionSheet component. If user adds the thread to his/her favorite collection, a key-value pair is added under the currently logged in user object in Firebase.
Here are the thread-comments.html template and the thread-comments.scss custom stylesheets as well.
<ion-header>
    <ion-navbar>
        <ion-title>Comments</ion-title>
        <ion-buttons end>
            <button (click)="showCommentActions()">
        <ion-icon name="options"></ion-icon>
      </button>
        </ion-buttons>
    </ion-navbar>
</ion-header>

<ion-content>
    <div *ngIf="!commentsLoaded">
        <img src="images/ring.gif" style="display:block; margin:auto" />
    </div>
    <ion-list *ngIf="commentsLoaded">
        <ion-item *ngFor="let comment of comments" text-wrap>
            <ion-card>

                <ion-item>
                    <ion-avatar item-left>
                        <forum-user-avatar [user]="comment.user"></forum-user-avatar>
                    </ion-avatar>
                    <h2>{{comment.user.username}}</h2>
                    <p>{{comment.dateCreated | date:'medium'}}</p>
                </ion-item>

                <ion-card-content class="left-border-primary">
                    <p>{{comment.text}}</p>
                </ion-card-content>

                <ion-row class="left-border-primary">
                    <ion-col>
                        <button primary clear small (click)="vote(true,comment)">
        <ion-icon name="arrow-dropup"></ion-icon>
        <div>{{comment.votesUp}}</div>
      </button>
                    </ion-col>
                    <ion-col>
                        <button primary clear small (click)="vote(false,comment)">
        <ion-icon name="arrow-dropdown"></ion-icon>
        <div>{{comment.votesDown}}</div>
      </button>
                    </ion-col>
                    <ion-col center text-center>
                        <ion-note>
                            {{comment.dateCreated | amTimeAgo:true}}
                        </ion-note>
                    </ion-col>
                </ion-row>

            </ion-card>
        </ion-item>
    </ion-list>
    <ion-fixed class="fixed-div">
        <button fab primary fab-bottom fab-right class="fab-footer" (click)="createComment()">
    <ion-icon name="create" is-active="false"></ion-icon>
  </button>
    </ion-fixed>
</ion-content>
.platform-ios .fixed-div {
  right: 0;
    bottom: 0;
    margin-bottom: 42px;
}

.platform-android .fixed-div {
  right: 0;
    bottom: 0;
    margin-bottom: 56px;
}

.platform-windows .fixed-div {
  right: 0;
    bottom: 0;
}

ion-card .item + ion-card-content {
    padding-top: 7px;
}
There’s a Fab button on the template that opens the CommentCreatePage. The logic is all the same so just create a folder named comment-create under pages and add the following comment-create.ts, comment-create.html files.
import { Component, OnInit } from '@angular/core';
import { Modal, NavController, ViewController, LoadingController, NavParams } from 'ionic-angular';
import {FORM_DIRECTIVES, FormBuilder, FormGroup, Validators, AbstractControl} from '@angular/forms';

import { IComment, IUser } from '../../shared/interfaces';
import { AuthService } from '../../shared/services/auth.service';
import { DataService } from '../../shared/services/data.service';

@Component({
  templateUrl: 'build/pages/comment-create/comment-create.html',
  directives: [FORM_DIRECTIVES]
})
export class CommentCreatePage implements OnInit {

  createCommentForm: FormGroup;
  comment: AbstractControl;
  threadKey: string;
  loaded: boolean = false;

  constructor(private nav: NavController,
    private navParams: NavParams,
    private loadingCtrl: LoadingController,
    private viewCtrl: ViewController,
    private fb: FormBuilder,
    private authService: AuthService,
    private dataService: DataService) {

  }

  ngOnInit() {
    this.threadKey = this.navParams.get('threadKey');

    this.createCommentForm = this.fb.group({
      'comment': ['', Validators.compose([Validators.required, Validators.minLength(10)])]
    });

    this.comment = this.createCommentForm.controls['comment'];
    this.loaded = true;
  }

  cancelNewComment() {
    this.viewCtrl.dismiss();
  }

  onSubmit(commentForm: any): void {
    var self = this;
    if (this.createCommentForm.valid) {

      let loader = this.loadingCtrl.create({
        content: 'Posting comment...',
        dismissOnPageChange: true
      });

      loader.present();

      let uid = self.authService.getLoggedInUser().uid;
      self.dataService.getUsername(uid).then(function (snapshot) {
        let username = snapshot.val();

        let commentRef = self.dataService.getCommentsRef().push();
        let commentkey: string = commentRef.key;
        let user: IUser = { uid: uid, username: username };

        let newComment: IComment = {
          key: commentkey,
          text: commentForm.comment,
          thread: self.threadKey,
          user: user,
          dateCreated: new Date().toString(),
          votesUp: null,
          votesDown: null
        };

        self.dataService.submitComment(self.threadKey, newComment)
          .then(function (snapshot) {
            loader.dismiss()
              .then(() => {
                self.viewCtrl.dismiss({
                  comment: newComment,
                  user: user
                });
              });
          }, function (error) {
            // The Promise was rejected.
            console.error(error);
            loader.dismiss();
          });
      });
    }
  }
}
<ion-header>
    <ion-navbar>
        <ion-title>New Comment</ion-title>
        <ion-buttons start>
            <button (click)="cancelNewComment()">
        <ion-icon name="arrow-back"></ion-icon> Cancel
      </button>
        </ion-buttons>
    </ion-navbar>
</ion-header>

<ion-content padding>
    <form [formGroup]="createCommentForm" (ngSubmit)="onSubmit(createCommentForm.value)" *ngIf="loaded">
        <ion-item [class.error]="!comment.valid && comment.touched">
            <ion-label floating>Comment</ion-label>
            <ion-textarea [formControl]="comment" rows="10"></ion-textarea>
        </ion-item>
        <div *ngIf="comment.hasError('required') && comment.touched" class="error-box">* Comment is required.</div>
        <div *ngIf="comment.hasError('minlength') && comment.touched" class="error-box">* Type at least 100 characters.</div>
        <br/><br/>
        <button type="submit" class="custom-button" [disabled]="!createCommentForm.valid" block>Submit</button>
    </form>
</ion-content>
Profile Page
This page displays some basic info about the user such as username or date of birth, fields that created during registration plus some statistics, such as how many threads and comments has the user created. More over will allow the user to upload a new image from his/her mobile Camera or Album folder. For this we will need to import a cordova plugin. Add a folder named profile under pages and create a profile.ts file. Copy the contents from here. Let’s explain the most important parts of this component. The imports statements should be familiar to you by now except for a new one, the Camera ionic-native plugin. Run the following command to install this plugin.
ionic plugin add cordova-plugin-camera
import {Component, OnInit} from '@angular/core';
import {NavController, LoadingController, ActionSheetController } from 'ionic-angular';
import { Camera, CameraOptions } from 'ionic-native';

import { IUser } from '../../shared/interfaces';
import { UserAvatarComponent } from '../../shared/directives/user-avatar.component';
import { AuthService } from '../../shared/services/auth.service';
import { DataService } from '../../shared/services/data.service';
The loadUserProfile is the core function that gets all user’s data. It calls the getUserData() that fills the Firebase’s account data, then loads user’s image from the storage using the getDownloadURL function. It also calls the getUserThreads() and getUserComments() functions to count the number of threads and comments submitted by this user.
loadUserProfile() {
    var self = this;
    self.userDataLoaded = false;

    self.getUserData().then(function (snapshot) {
      let userData: any = snapshot.val();

      self.getUserImage().then(function (url) {
        self.userProfile = {
          username: userData.username,
          dateOfBirth: userData.dateOfBirth,
          image: url,
          totalFavorites: userData.hasOwnProperty('favorites') === true ?
            Object.keys(userData.favorites).length : 0
        };

        self.user = {
          uid : self.firebaseAccount.uid,
          username : userData.username
        };

        self.userDataLoaded = true;
      }).catch(function (error) {
        console.log(error.code);
        self.userProfile = {
          username: userData.username,
          dateOfBirth: userData.dateOfBirth,
          image: 'images/profile.png',
          totalFavorites: userData.hasOwnProperty('favorites') === true ?
            Object.keys(userData.favorites).length : 0
        };
        self.userDataLoaded = true;
      });
    });

    self.getUserThreads();
    self.getUserComments();
  }

  getUserData() {
    var self = this;

    self.firebaseAccount = self.authService.getLoggedInUser();
    return self.dataService.getUser(self.authService.getLoggedInUser().uid);
  }

  getUserImage() {
    var self = this;

    return self.dataService.getStorageRef().child('images/' + self.firebaseAccount.uid + '/profile.png').getDownloadURL();
  }

  getUserThreads() {
    var self = this;

    self.dataService.getUserThreads(self.authService.getLoggedInUser().uid)
      .then(function (snapshot) {
        let userThreads: any = snapshot.val();
        if (userThreads !== null) {
          self.userStatistics.totalThreads = Object.keys(userThreads).length;
        } else {
          self.userStatistics.totalThread = 0;
        }
      });
  }

  getUserComments() {
    var self = this;

    self.dataService.getUserComments(self.authService.getLoggedInUser().uid)
      .then(function (snapshot) {
        let userComments: any = snapshot.val();
        if (userComments !== null) {
          self.userStatistics.totalComments = Object.keys(userComments).length;
        } else {
          self.userStatistics.totalComments = 0;
        }
      });
  }
We use again an ActionSheet to present the user with the available options for uploading a new profile image.
openImageOptions() {
    var self = this;

    let actionSheet = self.actionSheeCtrl.create({
      title: 'Upload new image from',
      buttons: [
        {
          text: 'Camera',
          icon: 'camera',
          handler: () => {
            self.openCamera(Camera.PictureSourceType.CAMERA);
          }
        },
        {
          text: 'Album',
          icon: 'folder-open',
          handler: () => {
            self.openCamera(Camera.PictureSourceType.PHOTOLIBRARY);
          }
        }
      ]
    });

    actionSheet.present();
  }
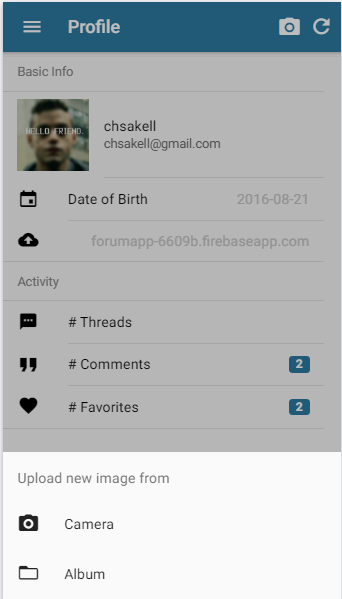
Depending of what the user selects, the openCamera() function will be called with the respective source parameter. Of course all cordova plugins are only available while running the app on your mobile, not in the browser. The openCamera() function will open either the mobile’s Camera or the Photo album gallery and when done, will capture and convert the data into a Blob which is required by Firebase for uploading files. The startUploadingImage function is quite similar with the one described in the signup page.
openCamera(pictureSourceType: any) {
    var self = this;

    let options: CameraOptions = {
      quality: 95,
      destinationType: Camera.DestinationType.DATA_URL,
      sourceType: pictureSourceType,
      encodingType: Camera.EncodingType.PNG,
      targetWidth: 400,
      targetHeight: 400,
      saveToPhotoAlbum: true,
      correctOrientation: true
    };

    Camera.getPicture(options).then(imageData => {
      const b64toBlob = (b64Data, contentType = '', sliceSize = 512) => {
        const byteCharacters = atob(b64Data);
        const byteArrays = [];

        for (let offset = 0; offset < byteCharacters.length; offset += sliceSize) {
          const slice = byteCharacters.slice(offset, offset + sliceSize);

          const byteNumbers = new Array(slice.length);
          for (let i = 0; i < slice.length; i++) {
            byteNumbers[i] = slice.charCodeAt(i);
          }

          const byteArray = new Uint8Array(byteNumbers);

          byteArrays.push(byteArray);
        }

        const blob = new Blob(byteArrays, { type: contentType });
        return blob;
      };

      let capturedImage: Blob = b64toBlob(imageData, 'image/png');
      self.startUploading(capturedImage);
    }, error => {
      console.log('ERROR -> ' + JSON.stringify(error));
    });
  }
Interested to see how it ‘ll look like when running from the device? Me too.
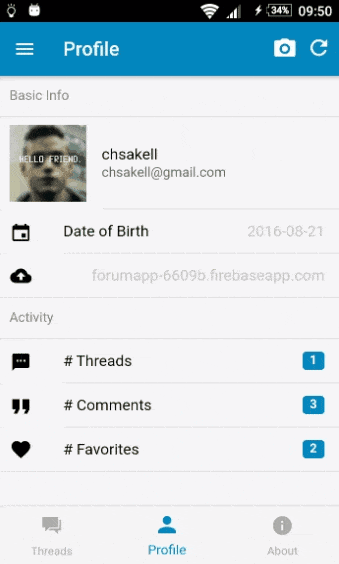
Here is the profile.html template as well.
<ion-header>
    <ion-navbar>
        <button menuToggle>
        <ion-icon name='menu'></ion-icon>
    </button>
        <ion-title>Profile</ion-title>
        <ion-buttons end>
            <button (click)="openImageOptions()">
            <ion-icon name="camera"></ion-icon>
      </button>
            <button (click)="reload()">
        <ion-icon name="refresh"></ion-icon>
      </button>
        </ion-buttons>
    </ion-navbar>
</ion-header>
<ion-content>
    <div *ngIf="!userDataLoaded">
        <img src="images/ring.gif" style="display:block; margin:auto" />
    </div>

    <ion-list no-border *ngIf="userDataLoaded">

        <ion-list-header>
            Basic Info
        </ion-list-header>
        <ion-item>
            <ion-thumbnail item-left>
                <!--<img src="{{userProfile.image}}">-->
                <forum-user-avatar [user]="user" *ngIf="userDataLoaded"></forum-user-avatar>
            </ion-thumbnail>
            <h2>{{userProfile.username}}</h2>
            <p>{{firebaseAccount.email}}</p>
        </ion-item>

        <ion-item>
            <ion-icon name='calendar' item-left></ion-icon>
            Date of Birth
            <ion-note item-right>
                {{userProfile.dateOfBirth}}
            </ion-note>
        </ion-item>

        <ion-item>
            <ion-icon name='cloud-upload' item-left></ion-icon>
            <ion-note item-right>
                {{firebaseAccount.U}}
            </ion-note>
        </ion-item>

    </ion-list>


    <ion-list *ngIf="userDataLoaded">

        <ion-list-header>
            Activity
        </ion-list-header>

        <ion-item>
            # Threads
            <ion-icon name='text' item-left></ion-icon>
            <ion-badge item-right>{{userStatistics.totalThreads}}</ion-badge>
        </ion-item>

        <ion-item>
            # Comments
            <ion-icon name='quote' item-left></ion-icon>
            <ion-badge item-right>{{userStatistics.totalComments}}</ion-badge>
        </ion-item>
        <ion-item>
            # Favorites
            <ion-icon name='heart' item-left></ion-icon>
            <ion-badge item-right>{{userProfile.totalFavorites}}</ion-badge>
        </ion-item>

    </ion-list>
</ion-content>
The About tab page displays some info about the app. It is the simplest page and the only noticable thing to explain is the InAppBrowser plugin used. We want to be able to open links in browser through this page so go ahead and install the plugin.
ionic plugin add cordova-plugin-inappbrowser
Opening URLs in app Browser couldn’t be easier. Add a new folder named about in pages and create the about.ts file.
import {Component} from '@angular/core';
import {NavController} from 'ionic-angular';
import { InAppBrowser } from 'ionic-native';

@Component({
  templateUrl: 'build/pages/about/about.html'
})
export class AboutPage {

  constructor(private navCtrl: NavController) {
  }

  openUrl(url) {
    let browser = new InAppBrowser(url, '_blank', 'location=yes');
  }
}
And the about.html template..
<ion-header>
    <ion-navbar>
        <button menuToggle>
        <ion-icon name='menu'></ion-icon>
    </button>
        <ion-title>About</ion-title>
    </ion-navbar>
</ion-header>
<ion-content padding>
    <ion-card>
        <img src="images/wordpress.png" />
        <ion-card-content>
            <ion-card-title>
                chsakell's Blog
            </ion-card-title>
            <p>
                This app is a genuine contribution by Chris Sakellarios. Step by step walkthrough on how to build hybrid-mobile apps using
                Ionic 2, Angular 2 and Firebase
            </p>
        </ion-card-content>
        <ion-row no-padding>
            <ion-col>
                <button clear small danger>
                <ion-icon name='book'></ion-icon>
                Post
                </button>
        </ion-col>
            <ion-col text-center>
                <button clear small danger (click)="openUrl('https://twitter.com/chsakellsblog')">
                <ion-icon name='twitter'></ion-icon>
                Twitter
                </button>
            </ion-col>
            <ion-col text-center>
                <button clear small danger (click)="openUrl('https://facebook.com/chsakells.blog')">
                <ion-icon name='facebook'></ion-icon>
                Facebook
                </button>
            </ion-col>
        </ion-row>
    </ion-card>
    <ion-card>
        <img src="images/github.jpg" />
        <ion-card-content>
            <ion-card-title>
                Github repository
            </ion-card-title>
            <p>
                Application's source code is fully available on Github and distributed under MIT licence.
            </p>
        </ion-card-content>
        <ion-row no-padding>
            <ion-col>
                <button clear small danger (click)="openUrl('https://github.com/chsakell/ionic2-angular2-firebase')">
                <ion-icon name='git-network'></ion-icon>
                Code
                </button>
        </ion-col>
            <ion-col text-center>
                <button clear small danger>
                <ion-icon name='share'></ion-icon>
                Share
                </button>
            </ion-col>
        </ion-row>
    </ion-card>
    <ion-card>
        <img src="images/firebase.png" />
        <ion-card-content>
            <ion-card-title>
                Built on Firebase
            </ion-card-title>
            <p>
                Application makes use of the powerfull Firebase data store.
            </p>
        </ion-card-content>
    </ion-card>
</ion-content>
SQLite Service
We ‘ve said that we want our app to be able to display content (at least some threads) while being in offline mode. For this we need to have our data stored locally on the device. We will use the SQLite cordova plugin to accomplish our goal, and we ‘ll make sure that every time the user disconnects, the currently loaded threads are being saved in a database on the mobile device. You can store any data you wish but for simplicity we will only store threads and users. In case you are unfamiliar with SQLite, here is a good tutorial to start with. First of all, install SQLite plugin by running the following command.
ionic plugin add cordova-sqlite-storage
Add an sqlite.service.ts file under shared/services folder and paste the contents from here. First we import all modules needed.
import { Injectable } from '@angular/core';
import { SQLite } from 'ionic-native';

import { IThread, IComment, IUser } from '../interfaces';
import { ItemsService } from '../services/items.service';
The InitDatabase() function will be called once when the app starts. It will create a forumdb.db database if not exists and open a connection to it.
InitDatabase() {
    var self = this;
    this.db = new SQLite();
    self.db.openDatabase({
        name: 'forumdb.db',
        location: 'default' // the location field is required
    }).then(() => {
        self.createThreads();
        self.createComments();
        self.createUsers();
    }, (err) => {
        console.error('Unable to open database: ', err);
    });
}
In case you come from a relational database background, you will find createThreads, createComments and createUsers functions more than familiar.
createThreads() {
    var self = this;
    self.db.executeSql('CREATE TABLE IF NOT EXISTS Threads ( key VARCHAR(255) PRIMARY KEY NOT NULL, title text NOT NULL, question text NOT NULL, category text NOT NULL, datecreated text, USER VARCHAR(255), comments INT NULL);', {}).then(() => {
    }, (err) => {
        console.error('Unable to create Threads table: ', err);
    });
}

createComments() {
    var self = this;
    self.db.executeSql('CREATE TABLE IF NOT EXISTS Comments ( key VARCHAR(255) PRIMARY KEY NOT NULL, thread VARCHAR(255) NOT NULL, text text NOT NULL, USER VARCHAR(255) NOT NULL, datecreated text, votesUp INT NULL, votesDown INT NULL);', {}).then(() => {
    }, (err) => {
        console.error('Unable to create Comments table: ', err);
    });
}

createUsers() {
    var self = this;
    self.db.executeSql('CREATE TABLE IF NOT EXISTS Users ( uid text PRIMARY KEY NOT NULL, username text NOT NULL); ', {}).then(() => {
    }, (err) => {
        console.error('Unable to create Users table: ', err);
    });
}
The functions create corresponding tables in case they don’t exist yet. We save users of type IUser using the following two functions.
saveUsers(users: IUser[]) {
    var self = this;

    users.forEach(user => {
        self.addUser(user);
    });
}

addUser(user: IUser) {
    var self = this;
    let query: string = 'INSERT INTO Users (uid, username) Values (?,?)';
    self.db.executeSql(query, [user.uid, user.username]).then((data) => {
        console.log('user ' + user.username + ' added');
    }, (err) => {
        console.error('Unable to add user: ', err);
    });
}
Notice how we pass input parameters on the executeSql function. Same applies for saving threads of type IThread.
saveThreads(threads: IThread[]) {
    let self = this;
    let users: IUser[] = [];

    threads.forEach(thread => {
        if (!self.itemsService.includesItem<IUser>(users, u => u.uid === thread.user.uid)) {
            console.log('in add user..' + thread.user.username);
            users.push(thread.user);
        } else {
            console.log('user found: ' + thread.user.username);
        }
        self.addThread(thread);
    });

    self.saveUsers(users);
}

addThread(thread: IThread) {
    var self = this;

    let query: string = 'INSERT INTO Threads (key, title, question, category, datecreated, user, comments) VALUES (?,?,?,?,?,?,?)';
    self.db.executeSql(query, [
        thread.key,
        thread.title,
        thread.question,
        thread.category,
        thread.dateCreated,
        thread.user.uid,
        thread.comments
    ]).then((data) => {
        console.log('thread ' + thread.key + ' added');
    }, (err) => {
        console.error('Unable to add thread: ', err);
    });
    }
Ok, we save data but how do we read them? There is a getThreads() function called from the ThreadsPage component which not only selects threads from the Threads table but also joins records with the Users. I have also created a printThreads method in order to understand how easy is reading data using SQLite.
getThreads(): any {
    var self = this;
    return self.db.executeSql('SELECT Threads.*, username FROM Threads INNER JOIN Users ON Threads.user = Users.uid', {});
}

printThreads() {
    var self = this;
    self.db.executeSql('SELECT * FROM Threads', {}).then((data) => {
        if (data.rows.length > 0) {
            for (var i = 0; i < data.rows.length; i++) {
                console.log(data.rows.item(i));
                console.log(data.rows.item(i).key);
                console.log(data.rows.item(i).title);
                console.log(data.rows.item(i).question);
            }
        } else {
            console.log('no threads found..');
        }
    }, (err) => {
        console.error('Unable to print threads: ', err);
    });
}
Bootstrap the Ionic Forum app
The last component remained to add is the first been called when the app fires. Copy the contents of the ForumApp component in the app.ts from here. Let’s take it step by step. The ngOnInit() function ensures that when user is unauthenticated, the LoginPage becomes the root page. Don’t use nav.push here, cause pressing the hardware back button will render the previous page on the stack.
ngOnInit() {
    var self = this;
    // This watches for Authentication events
    this.authService.onAuthStateChanged(function (user) {
        if (user === null) {
        self.menu.close();
        self.nav.setRoot(LoginPage);
        }
    });
    }
The signout() and isUserLoggedIn() methods are self-explanatory.
signout() {
    var self = this;
    self.menu.close();
    self.authService.signOut();
  }

  isUserLoggedIn(): boolean {
    let user = this.authService.getLoggedInUser();
    return user !== null;
  }
The openPage(page) function is called from the menu. You can add any other items you wish on that menu.
openPage(page) {
    let viewCtrl: ViewController = this.nav.getActive();
    // close the menu when clicking a link from the menu
    this.menu.close();

    if (page === 'signup') {
      if (!(viewCtrl.instance instanceof SignupPage))
        this.nav.push(SignupPage);
    }
  }
We import the Network ionic native plugin for detecting network changes (connect-reconnect). Install the plugin by running the following command.
ionic plugin add cordova-plugin-network-information
Any plugin initialization code should be placed inside the platform.ready() event which ensures that all cordova plugins are available. We also make sure we are not deploying the app on our local browser using the window.cordova. This will prevent console errors when deploying your app in your local browser using the command ionic serve –lab
platform.ready().then(() => {
      if (window.cordova) {
        // Okay, so the platform is ready and our plugins are available.
        // Here you can do any higher level native things you might need.
        StatusBar.styleDefault();
        self.watchForConnection();
        self.watchForDisconnect();
        Splashscreen.hide();

        console.log('in ready..');
        let array: string[] = platform.platforms();
        console.log(array);
        let isAndroid: boolean = platform.is('android');
        let isIos: boolean = platform.is('ios');
        let isWindows: boolean = platform.is('windows');
        self.sqliteService.InitDatabase();
      }
    });
  }

  watchForConnection() {
    var self = this;
    let connectSubscription = Network.onConnect().subscribe(() => {
      console.log('network connected!');
      // We just got a connection but we need to wait briefly
      // before we determine the connection type.  Might need to wait
      // prior to doing any api requests as well.
      setTimeout(() => {
        console.log(Network.connection);
          console.log('we got a connection..');
          console.log('Firebase: Go Online..');
          self.dataService.goOnline();
          self.events.publish('network:connected', true);
      }, 3000);
    });
  }

  watchForDisconnect() {
    var self = this;
    // watch network for a disconnect
    let disconnectSubscription = Network.onDisconnect().subscribe(() => {
      console.log('network was disconnected :-(');
      console.log('Firebase: Go Offline..');
      self.sqliteService.resetDatabase();
      self.dataService.goOffline();
      self.events.publish('network:connected', false);
    });
  }
On connect or disconnect we publish the network-connected event so that subscribers do what they have to do, for example save currently loaded threads in the device database. We also reset the SQLite database in order to store only the currently loaded threads. This is probably not what you would do in a production app but we ‘ll do it to keep things simple. We want SQLite database to have always the last loaded threads and only. Another plugin we used is the SplashScreen. Install it by running the following command.
ionic plugin add cordova-plugin-splashscreen
We call the Splashscreen.hide() method in order to hide the splashscreen when the app starts, otherwise you may wait for some seconds due to default timeouts.
Theming
Theming your ionic app is crusial and app/theme folder contains SASS files either platform specific or generic. In case you used custom SASS stylesheets in your pages, like we did before, you need to import those files in the app.core.scss file otherwise you will not see the changes.
// http://ionicframework.com/docs/v2/theming/


// App Shared Imports
// --------------------------------------------------
// These are the imports which make up the design of this app.
// By default each design mode includes these shared imports.
// App Shared Sass variables belong in app.variables.scss.

@import "../pages/tabs/tabs";
@import "../pages/threads/threads";
@import "../pages/thread-create/thread-create";
@import "../pages/thread-comments/thread-comments";
I have also added some styles in the app.variables.css file..
$toolbar-background : #0087be;
//$list-background-color : white;
$card-ios-background-color: #f4f4f4;
$card-md-background-color: #f4f4f4;
$card-wp-background-color: #f4f4f4;
scroll-content { background-color: whitesmoke;}
ion-list .item .item-inner {
    background: whitesmoke;
}
.item {
    background-color: whitesmoke !important;
}

ion-card {
    background: white !important;
}

.left-border-primary {
    border-left: 4px solid #0087be;
}
When you deploy your app for the first time (we will talk about this soon), you ‘ll see a default splash screen which apparently isn’t what you really want. You probably want to customise this image to reflect maybe your company’s brand. Ionic-CLI can do that for you with a sigle command but you need to make some preparations first. There is a resources folder in your application with two important files over there, the icon.png and the splash.png images. All you need to do is replace those files with your .png files. You need to make sure though that the files have proper sizes such as 1024×1024 for the icon.png and 2208×2208 for the splash.png. More over validate that your images are really .png files. Check why here. The ionic-command you need to run next in order to generate all the required files for you is the following.
ionic resources
Before running that command though you need to add at least one platform module to your app. Run one of the following commands depending which platform you wish to build for.
ionic platform add android
ionic platform add ios
ion-resources command will place new generated files inside the resources/platform/icon and resources/platform/splash respectively.
Running the Forum app
If you want run the Forum app in your browser, all you have to do is type the following command.
ionic serve --lab
This command will open the app in your default browser and display it in three different modes, IOS, Android and Windows. This mode is more than enough during development but remember, you cannot test native features such as the Camera or the Network plugins we added before. When you decide to run the app on your device, either this is an IOS, an Android or a Windows, you need to install some prerequisites first. Following are the steps you need to follow depending on the type of your device.
You do not need to follow all the steps to run the app on your phone. For example let me tell you what I did in order to deploy the Forum app on my Android device.
- I installed Java Development Kit (JDK) 7 and set the environment variables
- I installed Android Studio. Next I opened it and navigate to Tools/Android/SDK Manager

-
Install and add the SDK Android packages I was interested to build my app for.

- Set my device properly. Mind that I followed only the Run on a Real Device steps.
- Run the command ionic platform add android
- Connect my device on my computer and run the command ionic run android.
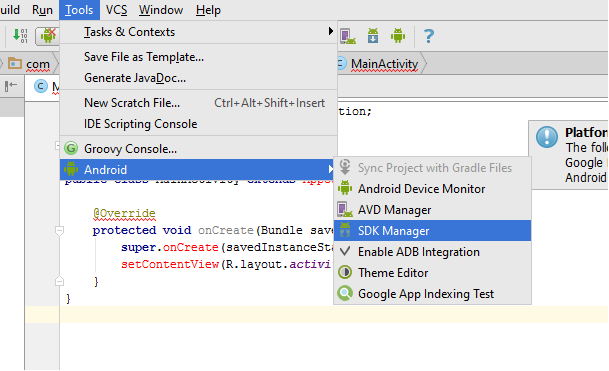
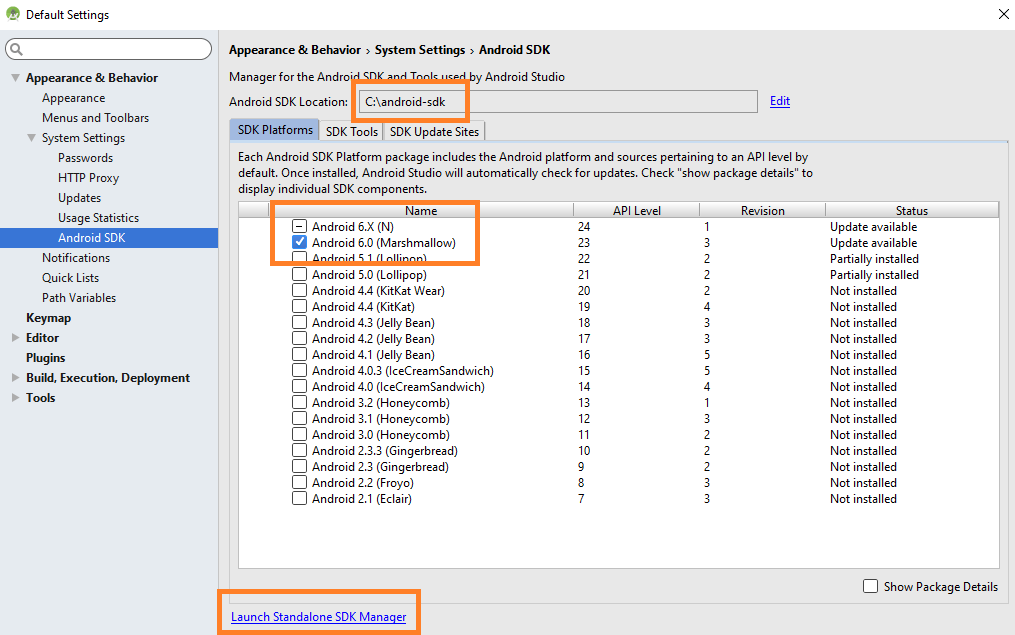
In case you have trouble deploying the app on your phone, check your environment variables. Here’s what I have.
Debugging in Chrome
You may ask yourself how do I know if my app crashes or throws an exception while running on the device? Fortunatelly, Chrome gives you the ability to check what is going on in your app while running on the device. All you have to do is connect your device to your computer, open developer tools or press F12 and select More tools -> Insperct devices.
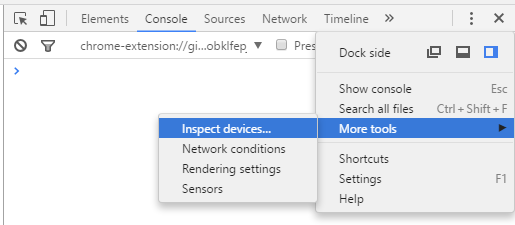
Open the Forum app and Chrome will detect your device and WebView running the app.
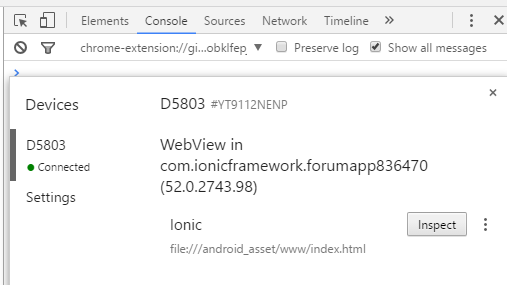
Click Inspect and a new window will open, display the contents of your device in real time. You can even control your app running in WebView from the browser. Mind that is very possible for the app to get slow when debuggin in Chrome but the important thing is that you can see all your logs in the console.
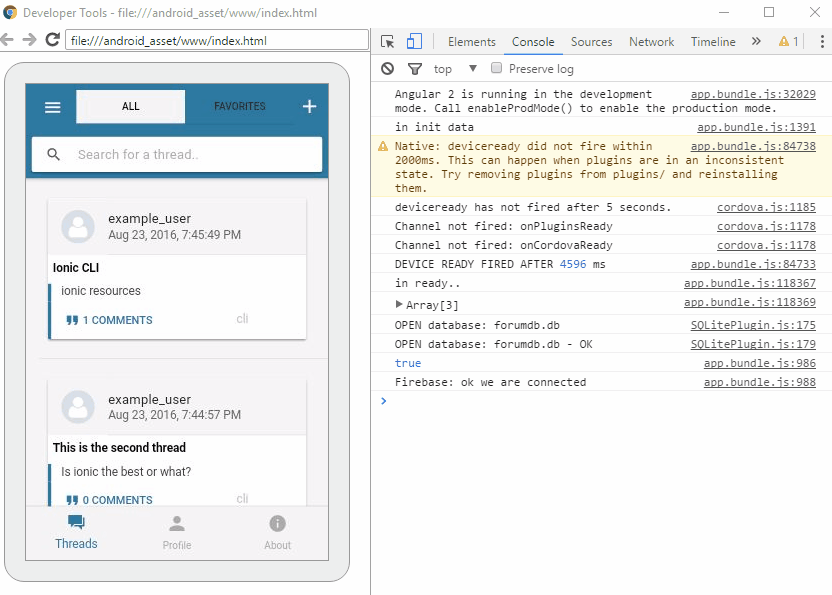
Discussion – Architecture
What we created is a mobile app running on client devices and a backend infrastructure hosted on Firebase that not only stores and serves all data but also handles all the authentication logic itself. More over it syncs all data instantly to all connected clients.
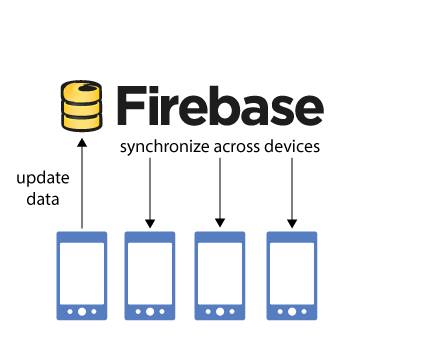
Is this schema sufficient? Maybe for smalls apps, apps that handle notes or todo items but certainly not for complicated ones. The latter require business logic which in turn may require complex operations which is kind of difficult to execute on Firebase. Even if you could execute complex queries on Firebase, it is unacceptable to keep the business logic on the client’s device. The missing part on the previous architecture is a web server, an API that could execute server side code and also communicate with Firebase as well. In many cases, a relational database is required too. Both the API and app clients may communicate directly with Firebase but for different reasons. Let’s take a look how that architecture would look like and then give an example.
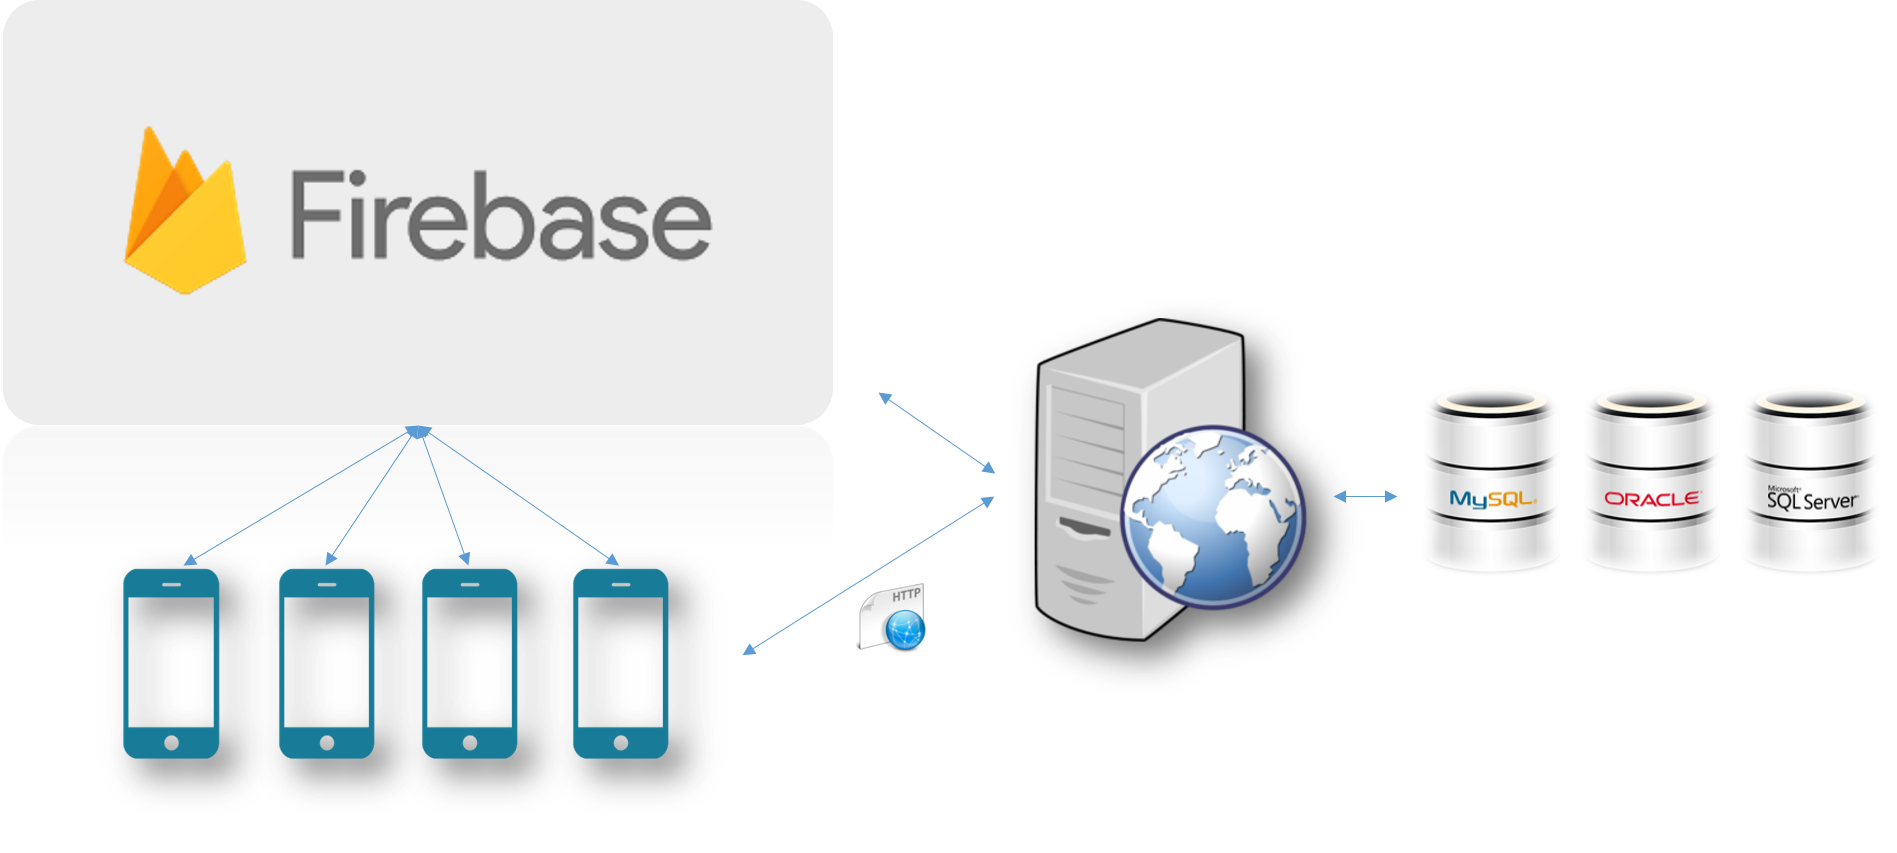
Consider the scenario where a user decides to post a comment on a thread. The app doesn’t submit the comment directly to Firebase but instead sends an HTTP POST request to the API, containing all comment’s data (content, user, thread key, etc..). The API runs validation logic such as to ensure that the comment doesn’t contain offensive words which in turn are stored in an SQL Server database. Or it could check that the user posted the comment is eligible / allowed to post comments on that thread. On successfull validation the API would submit only the ammount of data needed to the corresponding location in Firebase which finally will make sure to sync the comment to all connected clients.
Conclusion
That’s it we have finished! We have seen how to build a full featured Ionic 2 application using Firebase infrastucture. We started from scratch, setting the Firebase envrironment and installing Ionic 2 CLI. We described how to use native device features by installing Cordova plugins and how to build for a specific flatform. I hope you enjoyed this post as much as I did.
Source Code: You can find the source code for this project here where you will also find instructions on how to run the application.
In case you find my blog’s content interesting, register your email to receive notifications of new posts and follow chsakell’s Blog on its Facebook or Twitter accounts.
| .NET Web Application Development by Chris S. | |||

|

|
||
Categories: Angular, Best practices

Amazing post Chris.. I think it will take more than one coffee this time to read 🙂
Awesome tutorial, and works like charm, many thanks for sharing!
Another great article with excellence completed tutorial, learn a lot from this.
Thanks for sharing.
Definitely a great demo and article. Well done mate (:
Well done for this great demo and article. Please, do i need to create the database manually, or from the client side. Please need clarification.
The database will be created automatically. You need though to set Firebase configurations as described on the post or in repository’s README.md file.
Thank you for this tutorial and the good job you did, Do you think you’ll upgrade it to angular rc.6 or 7 ?
I will upgrade to final, probably when ionic 2.0.0-beta.12 milestone is completed.
Just did. The repo contains the latest version now. Make sure to read carefully the instructions. It’s important to re-install the ionic framework in case you had the beta version.
wonderful !! many thanks Christos,
Could you tell us how to connect with facebook login?
Absolutely amazing post. Thank you so much. This helps me in more ways you could imagine!
Absolutely amazing post! This helps me in more ways than you could imagine! THANKYOU!
May I ask you some questions?
How to show user(who log in) threads only?
Not show other person threads.
This is an amazing article, well structured and well explanatory, thanks a lot for the article.
This is a wonderful article and inspired me to start working on mobile app… one question chsakell?
How locally stored data will be sync’d back with fire base and vice versa…your help will be really appriciated!!
First of all thank you very much this tutorial is amazing the best of all.
*Why did you use ‘reversedItems’ or lodash ‘reverse’ on the searchThreads() method, it is reversing the order of the threads array, isn’t it? I didn’t understand the reason for this.
After Logged in the side menu not working properly but it’s working if reloading the page. Has anyone else seen this problem?
The “self” and “this” syntax confuse me a lot. Is this a good practice to do that?
hello peter were you able to understand the “self and this” sytax? cos i keep on getting this error
Property ‘status’ does not exist on type ‘XMLHttpRequestEventTarget’. Property ‘response’ does not exist on type ‘XMLHttpRequestEventTarget’.
Hi Tuan, i don’t really understand where i am suppose to insert the arrow function, here is the code, can you please explain better. thanks.
CreateAndUploadDefaultImage() { let self = this; let imageData = 'images/profile.png'; var xhr = new XMLHttpRequest(); xhr.open('GET', imageData, true); xhr.responseType = 'myblob'; xhr.onload = function (e) { if (this.status === 200) { var myBlob = this.response; // myBlob is now the blob that the object URL pointed to. self.startUploading(myBlob); } }; xhr.send(); }Hi Kingsley. Yes, now I understand after playing with ES6 in Ionic 1. He used “self” to refer to the variables of the current class because the variables inside the callback function doesn’t refer to those variables of this class if we use “this” syntax.
Actually, this issue is solved in ES6 by using “let” and arrow function instead of “var” and callback function in ES5. But I see sometimes the arrow function in ES6 still doesn’t refer to the variables of current class. So, the “self” syntax is still useful in some cases.
In short, the good practice is to use “let” and arrow function instead of “var” and callback function. If in some cases weird stuffs happen, then use the “self” syntax.
anyone manage to run the application after did all the steps above? i cant seem to have it running since a lot of errors occured
i managed to get it running, thanks for the tutorial. very healpful
Hi Ken,
I am not able to run it.
I run using ionic serve –lab
but I got this error.
main.css Failed to load resource: the server responded with a status of 404 (Not Found)
2main.js Failed to load resource: the server responded with a status of 404 (Not Found)
main.css Failed to load resource: the server responded with a status of 404 (Not Found)
Hi Ken,
How you manage to make it run? I have problem running the app.
waowww ,,, its amazing,,,,, thanks for sharing may god bless you
hey chris please explain storage part in firebase setting of image folder and sub folders how generate
plz give github link
amazing example thanks for that! just a comment for whoever wants to use this and it is noob as me, change the functions to arrow => and the self’s to this and you are good to go ( ofc after understanding the code, which helped me understand how firebase works).
thanks again chris for the amazing tutorial.
Hello macelo, can you please indicate where and where we will use the arrows and also replace the “self” with “this” because i just keep getting errors.
I was trying to run the app by upgrade coding to ionic 3, because I fellow all the steps here but didn’t work! get alot of error. So I upgrade most of the code ( login page, app files, sign up page) but still I’m stick with profile code 😦 like this error :
Uncaught (in promise): TypeError: Cannot read property ‘uid’ of null TypeError: Cannot read property ‘uid’ of null at ProfilePage.webpackJsonp.53.ProfilePage.getUserData
REALLY nice work