During this year we had the chance to build several Web applications using ASP.NET Core combined with frameworks and libraries such as Angular 2 or SignalR. Since then I have been receiving requests to post about how to deploy that kind of applications on Microsoft Azure so this is what we are going to do on this post. The truth is that despite the fact that those apps were built with the same technologies, they were created and can be run using different tools. For example, the PhotoGallery application was built entirely in Visual Studio which means it can be opened, run and deployed to Azure using Azure Tools for Visual Studio. On the other hand, the Scheduler app has two parts, the server part with the API which can be opened, run and deployed through Visual Studio as well and the client side one which was built outside Visual Studio using NodeJS packages and other client-side libraries. The LiveGameFeed app is an ASP.NET Core – Angular 2 – SignalR app built entirely outside of Visual Studio. Those kind of apps will be deployed using a different techniques that are supported by Azure. More over, we are going to see the way we will handle NodeJS dependencies/packages, in other words the node_modules folder in our app. This folder usually contains a large number of files and would be pain in the ass to get them all in Azure. The interesting thing is that the apps we have built, handles NodeJS depenencies in different ways and hence will be deployed accordingly. Let’s see in detail the contents of the post. Each section denotes the basic app’s features that will affect the way it will be deployed to Azure.
Deploy ASP.NET Core – Angular 2 app using Visual Studio –
PhotoGallery
- Both server and client-side code exists in the same solution
- App uses an SQL Server database which must be deployed as well
- NodeJS depenencies are copied and served through www folder as static files
- The app can be opened, run and deployed through Visual Studio
Deploy Angular 2 app without Visual Studio – Scheduler UI
- The server side contains the MVC API controllers, an SQL Server database and will be deployed through Visual Studio
- The client side is built outside of Visual Studio (no .sln file)
- For the client-side we need to create build-automation tasks and use the build/production folder as the hosting app on Azure
- The app will be deployed using Git tools and integrating a Github branch as an Azure Deployment source
Deploy ASP.NET Core – Angular 2 – SignalR app without Visual Studio – LiveGameFeed
- Both server and client-side code exists in the same solution
- The app is built entirely in a text-editor such as Visual Studio Code (no .sln file)
- Firstly, the app will be published locally and then deployed to Azure using Git tools and a Local Git repository
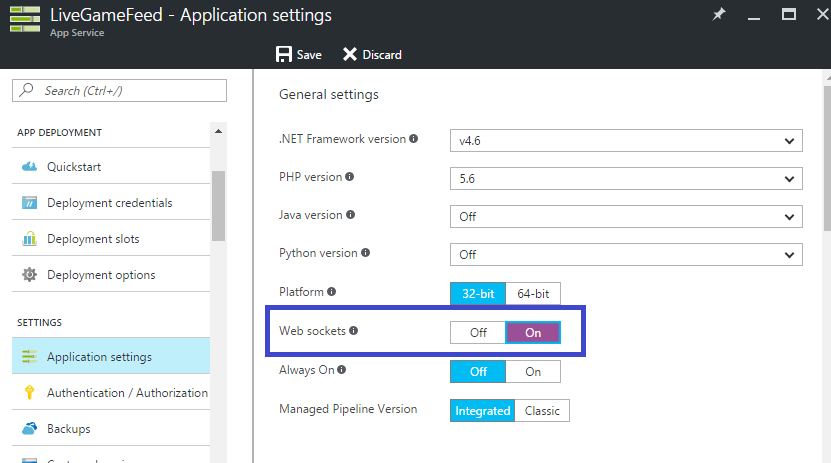
- Additional configuration needed up on Microsoft Azure in order to enable Web-Sockets and leverage SignalR features
In the post we will deploy the apps that mentioned before but in case you want to deploy your app, just follow the instructions that suits best on your app.
Prerequisites
In you are a Windows user, make sure to install the Azure Tools for Visual Studio. Also, you must have an Azure subscription, which is a plan that gives you access to a variety of Azure services. You can get started with Azure with a free account. Once you decide to purchase a subscription plan, you can choose from a variety of purchase options. If you’re an MSDN subscriber, you get free monthly credits that you can use with Azure services, including Azure Storage. See Azure Storage Pricing for information on volume pricing.
Deploy ASP.NET Core – Angular 2 app using Visual Studio – PhotoGallery
The PhotoGallery app, is an app built using Visual Studio 2015, it uses an SQL database for data store and Angular 2 on the client side. For start, clone the repository and follow the instructions in the README.md file. Even if you haven’t an SQL Server instance installed on your machine (maybe Linux or MAC user) make sure to run at least the command that initializes mirgrations.
dotnet ef migrations add initial
This is important for initializing the respective SQL Server database on Microsoft Azure. When you finish setting up the application right click the PhotoGallery app and select Publish….

This will open the Publish wizard which requires that you are a signed user. You can sign in in Visual Studio on the upper right, with your Microsoft Account for which you have an Azure subscription or add that account in the next step.

We are going to use the Platform as a service (PaaS) deployment enviromnent to host our application. Click the Microsoft Azure App Service button and click the New… button in order to declare a Resource Group, an App Service Plan and any additional Azure services that our app requires. In case you are unfamiliar with those terms, that’s all right, all you need to know is that all the resources such as Web Applications, SQL Servers are contained in a Resource Group. Deleting that Resource Group will also delete the contained services. Typically, all resources in a Resource Group share the same lifecycle. The App Service Plan declares the region that your resources are going to be deployed and the type of Virtual Machines to be used (how many instances, cores, memory etc..). Name the Resource Group PhotoGalleryRG and click New… to configure an App Service Plan. Leave the App Service Plan name as it is, set the Location that you are closest at and select any size you wish. I chose West Europe and S1 (1 core, 1,75 GR RAM) as size.

Click OK and then click Explore additional Azure services in order to create an SQL Server and a database.

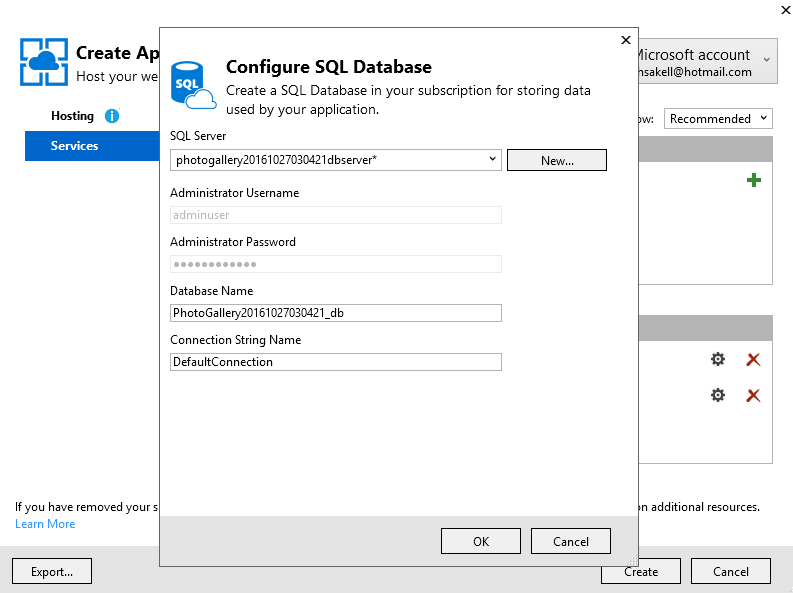
Click the green plus (+) button to add an SQL Database. Click New… on the SQL Server textbox to create an SQL Server and enter an administrator’s username and password. Click OK and your credentials will fill the textboxes as shown below. Leave the connection string name DefaultConnection and click OK.

Attention: It’s important that the connection string name matches the one in the appsettings.json file.
{
  "ConnectionStrings": {
    "DefaultConnection": "Server=(localdb)\\mssqllocaldb;Database=PhotoGallery;Trusted_Connection=True;MultipleActiveResultSets=true"
  },
  "Data": {
    "PhotoGalleryConnection": {
      "InMemoryProvider": false
    }
  }
}
Mind that you don’t need to change the connection string in the appsettings.json to point the new SQL Database on Microsoft Azure. Azure will be responsible to inject the right connection string when required.
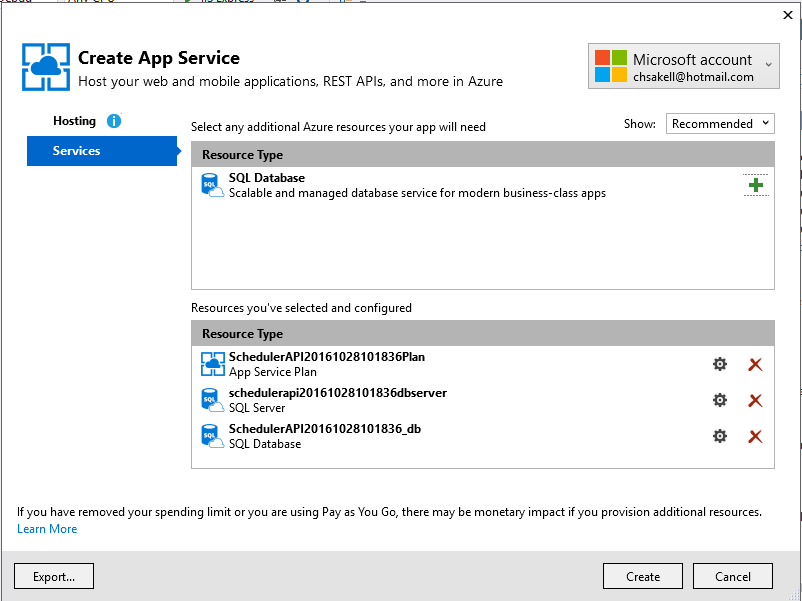
At this point you should have a window such as the following..

Click the Create button and Visual Studio will deploy the configured services up in Azure. Before procceeding let’s take a look what happend on your Microsoft Azure subscription. Navigate and sign in in the Azure Portal. Then click the All resources button..

The App Service resource is the actuall web application where the PhotoGallery app will be deployed. At the moment, it is just an empty web site. You can click it and you will find various properties. Find the URL and Navigate to it.

Back in Visual Studio and with the Connection tab textboxes all filled, click the Settings tab.

Make sure to check the checkboxes related to your database configuration. The first one will make sure that Azure will inject the right connection string when required and the second one is required in order to initialize the database.

Click next and finally Publish!!! Visual Studio will build the app in Release mode and deploy the PhotoGallery app up in Azure. After finishing it will probably open the deployed web app in your default browser.

Notes
You may wonder, what happend with the NodeJS depenencies. First of all, if you check the project.json file you will notice that we certainly didn’t deploy that folder.
"publishOptions": {
    "include": [
      "wwwroot",
      "Views",
      "appsettings.json",
      "web.config"
    ],
    "exclude": [
      "node_modules"
    ]
  }
What happend is that we deployed only the packages using the setup-ventors gulp task, that copies all required packages into the www folder. This means that when you publish your app those packages will also be deployed at least the first time. Of course you need to run the build-spa task that runs all the neccessary gulp tasks before publishing the app.
Deploy Angular 2 app without Visual Studio – Scheduler UI
Now lets move to the Scheduler app that consists of two different projects. The first one is the server side which contains the MVC API controllers, an SQL Server database and can be deployed in the exact same way we did with the PhotoGallery app. For this reason, I ‘ll assume you can deploy the app on your own, just follow the previous steps we saw before. Clone the repository and follow the instructions on the README.md file. The project you need to deploy is the Scheduler.API. As you can see I have deployed the API on a separated Resource Group and Plan..
And here’s what the Azure Portal resources look like. I have filter them by typing Scheduler on the filter box.

Deploy an Angular 2 application
The client side of the Scheduler app is build outside of Visual Studio (no .sln file), in fact I used my favorite text editor, Visual Studio Code. This is a classic Angular 2 application and certainly cannot be deployed on the same way we did with the previous two. First of all, go ahead, fork the repo and follow the instructions to install the app. I said fork because later on we will authorize Azure to access our Github projects so we can set the deployment source. This repo has two branches, the master and the production. I have created the production branch in order to integrate it with the Azure deployment services (we ‘ll see it later on). I assume you have already hosted the Scheduler.API project by now so in order to test the Angular 2 app, switch to the production branch and make sure to alter the API URL in the utils/config.service.ts to point the previously deployed Scheduler.API. Next run npm start.
import { Injectable } from '@angular/core';

@Injectable()
export class ConfigService {

    _apiURI : string;

    constructor() {
        // Replace the following line with your deployed API URL
        this._apiURI = 'http://localhost:5000/api/';
     }

     getApiURI() {
         return this._apiURI;
     }

     getApiHost() {
         return this._apiURI.replace('api/','');
     }
}
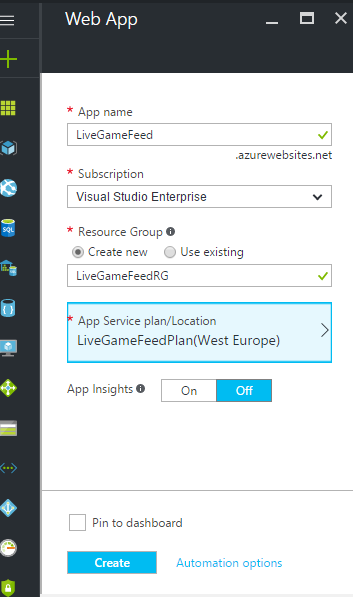
Publishing a pure Angular 2 app on Azure is another story. First of all we will create the App Service on the portal, instead of letting Visual Studio creating it for us, as we did in the previous examples. Login to Azure Portal and create a new Web App.

Give it a name (mind that all App Services should have uniquely identified names) and assign it to a resource group. I assigned the app under the same Resource Group that the Scheduler API service belongs.

Click create to provision the App Service. Switch back to the Angular app, open a terminal and run the following gulp task. Make sure you are on the production branch and you have changed the API URL to point tha Azure API.
gulp
This command will run the default gulp task existing in the gulpfile.js and creates a production build inside a build folder. This folder is the one that hosts our application and the one that we want Azure to run. If you take a good look at the generated build folder, you will find an app folder that contains the actual SPA and a lib folder that has only the required NPM packages. It also changes folder references in the index.html file and the systemjs.config.js one. The most important files though are the index.js and the package.json files that are copied from the src/server folder. The package.json contains only an express server depedency to be installed up on Azure and a post-install event for installing the bower packages. Microsoft Azure will notice the package.json file and will assume that this is a node.js application. After installing the dependencies it will run the node index.js command which in turn starts the express server.. If you want to test the production build before commiting any changes to the production branch, navigate to the build folder, run npm install and node index.js. This will emulate what Azure does on cloud.
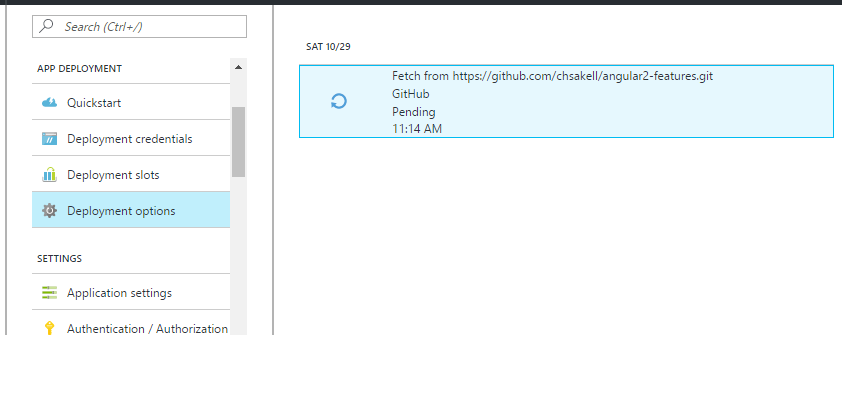
Now that we have our production branch with our latest build, we need to configure the App Service on Azure to hook with that branch and use it for continuous integration and deployment. Click on the Web app, then select Deployment options and click the Github option.

In order to associate a Github project first you need to authorize Azure accessing your Github account. This means that you will not be able to use my Github project through my account and it would be better to simply fork it to yours and use that instead. After authorizing Azure, click Choose project, find the angular2-features from your Github account and finally select the production branch. Click OK.

Azure will set the deployment source and will try to sync and deploy the app.
When deployment finished, I got an error (awesome).

From the logs you can understand that Azure tried to run the root’s package.json and the npm start command which means that there is somemthing missing here. Azure needs to be aware that our project exists inside the build folder not the root. To do this, go the Application settings and add an App setting with a key-value pair Project – build. Click Save.

Now you need to trigger a deployment so the easiest way to do this is push a change to the production branch. This time the deployment succeeded and we are ready to run the app!


Deploy ASP.NET Core – Angular 2 – SignalR app without Visual Studio – LiveGameFeed
The moment you start thinking “OK, I believe I can deploy any app I want up on Azure now, the LiveGameFeed comes in to the scene. This app is an ASP.NET Core – Angular 2 – SignalR Web Application and certainly cannot be deployed using Visual Studio (maybe Visual Studio 15 Preview though). It was created in Visual Studio Code leveraging all the cross-platform features in .NET Core. This means that we need to deal both with the Angular 2 features and .NET Core at the same time but without the Visual Studio Azure tools. Clone the repo, follow the instructions to install it and make sure you can run it locally. Switch to Azure Portal, create a new Web App and give it a uniquely identified name.
Switch to Visual Studio Code or your editor where you opened the source code and make sure to change the apiURL in the appsettings.json file to match your newly created Web app url.
{
  "Logging": {
    "IncludeScopes": false,
    "LogLevel": {
      "Default": "Debug",
      "System": "Information",
      "Microsoft": "Information"
    }
  },
  "apiURL" : "http://livegamefeed.azurewebsites.net/api/"
}
Make sure you run tsc command in order to compile the app. The idea is to produce a build of our app in a folder, in or outside the app. Then we configure a Local repository up on Azure and we will set it as remote for our local. Finally we will push the build to Azure Git repository. I will publish the app by running the following command.
dotnet publish
This published the app in Release mode on the bin/Release folder. Swith to Azure and from the Deployment options select Local Git repository. Click OK.

Next click Deployment credentials and set username and password for this repository. Click Save.

Open the Overview Blade and you will find a Git clone url for your project. Copy it.

All we need to do now is push the published folder up on the remote repository. I will make something dirty on this example by simply coping the contents from bin/Release/netcoreapp1.0/publish to another directory.

Then I will open that folder in a terminal, init a local repository and commit all files on the master branch.
git init
git add .
git commit -m "init repo"
Then add the remote repository on Azure.
git remote add azure your_clone_url_git_here
Push the changes and enter the credentials you configured previously if asked.
git push azure master

In Azure Portal, go to Application settings and enable Web sockets. Otherwise you wont be able to leverage SignalR features which are needed by our app.
.. and voila!!

Conclusion
We ‘ve seen several ways to deploy a Web App up on Azure but this doesn’t mean that they are just them. There are a few more deployment options such as the classic FTP or Visual Studio Online integration. Microsoft Azure gives you the options to set your deployment plan that best fits your application and your organization’s source control tools. I will stand for a moment in the way we deployed the Angular 2 ScedulerUI app. You can have only one Github repository for your app and create for example 3 branches, dev, stage and production. Up on azure you can create the respective slots and map each one of them to the respective Github branch. When your stage branch reaches a stable and ready to deploy state, all you have to do is merge it with the production one. The Azure App Service production slot will be synced and redeployed automatically. Amazing isn’t it? Or you could set only the stage slot work on this way and when it ‘s time to deploy on the production, swap the stage and the production slots.
In case you find my blog’s content interesting, register your email to receive notifications of new posts and follow chsakell’s Blog on its Facebook or Twitter accounts.
| .NET Web Application Development by Chris S. | |||

|

|
||
Categories: asp.net core, Azure

That’s exactly what I was looking for, thanks!
Another superb article.
Nice article for me and beginners
cool