Microsoft.Extensions.Identity.Core is the minimum ASP.NET Core Identity package you need to install in order to get start working with the core functionality of the library. We have seen how to do this in the Getting Started part of these ASP.NET Core Identity Series blog posts. As a quick reminder, what we did on the first part is implement and register a custom IUserStore along with a custom user entity to be used by the library’s managers. User entities were quite simple and saved at an in-memory store.
// User Entity
public class AppUser
{
    public string Id { get; set; }
    public string UserName { get; set; }
    public string Email { get; set; }
    public string NormalizeUserName { get; set; }
    public string PasswordHash { get; set; }
}

// Implement a custom IUserStore
public class AppUserStore : IUserStore<AppUser>, IUserPasswordStore<AppUser></AppUser>

// register services at Startup
services.AddIdentityCore<AppUser>(options => { });
services.AddScoped<IUserStore<AppUser>, AppUserStore>();
This configuration though is not sufficient (not even close) to leverage all ASP.NET Core Identity library’s features. To make this more clearer just switch to the AccountController and check the functions provided by a UserManager through the intellisense.

As you can see you there are many things you can do using a UserManager such as adding claims or assigning roles to a user. But the custom user entity AppUser we created doesn’t have this type of properties and we didn’t provide any type of store that manages these properties either (obviously). For example, when UserManager tries to add a claim to a user, first it checks if there’s a registered implementation for IUserClaimStore.
public virtual Task<IdentityResult> AddClaimAsync(TUser user, Claim claim)
{
    ThrowIfDisposed();
    var claimStore = GetClaimStore();
    if (claim == null)
    {
        throw new ArgumentNullException(nameof(claim));
    }
    if (user == null)
    {
        throw new ArgumentNullException(nameof(user));
    }
    return AddClaimsAsync(user, new Claim[] { claim });
}

private IUserClaimStore<TUser> GetClaimStore()
{
    var cast = Store as IUserClaimStore<TUser>;
    if (cast == null)
    {
        throw new NotSupportedException(Resources.StoreNotIUserClaimStore);
    }
    return cast;
}
So what is the solution to our problem? The answer is hidden inside the Microsoft.Extensions.Identity.Stores NuGet package where you can find two important classes:
- IdentityUser: Represents a user in the identity system and it contains all the properties for ASP.NET Core library to be fully functional (claims, roles, etc..). It’s the default ASP.NET Core library’s user entity
- UserStoreBase: A store that implements most of the
IUserStoreinterfaces while havingIdentityUserrepresenting a user
The source code for the series is available here. Each part has a related branch on the repository. To follow along with this part clone the repository and checkout the getting-started branch as follow:
git clone https://github.com/chsakell/aspnet-core-identity.git
cd .\aspnet-core-identity
git fetch
git checkout getting-started
This post is part of the ASP.NET Core Identity Series:
- Part 1: Getting Started
- Part 2: Integrate Entity Framework
- Part 3: Deep Dive in authorization
- Part 4: OAuth 2.0, OpenID Connect & IdentityServer
- Part 5: External Provider authentication & registration strategy
- Part 6: Two-Factor Authentication
Having said all these, the first thing we ‘ll do to support more features available in ASP.NET Core Identity library, is to install the Microsoft.Extensions.Identity.Stores NuGet package. Do it either through NuGet Package Manager or running the following command in the Package Manager Console
install-package Microsoft.Extensions.Identity.Stores
Remove all the code inside the AppUserStore class and replace it with the following:
public class AppUserStore : UserStoreBase<IdentityUser, string, IdentityUserClaim<string>,
    IdentityUserLogin<string>, IdentityUserToken<string>> {

        public AppUserStore(IdentityErrorDescriber describer) : base(describer)  {  }
    }
Next, use Visual Studio’s intellisense features and implement all the interfaces (just leave them throwing a NotImplementedException). Now let’s examine what’s really happening here and what we have actually gained using UserStoreBase and IdentityUser. UserStoreBase comes in two flavors, one that can support user related operations and another that supports both user and role operations.
/// <summary>
/// Represents a new instance of a persistence store for the specified user type.
/// </summary>
/// <typeparam name="TUser">The type representing a user.</typeparam>
/// <typeparam name="TKey">The type of the primary key for a user.</typeparam>
/// <typeparam name="TUserClaim">The type representing a claim.</typeparam>
/// <typeparam name="TUserLogin">The type representing a user external login.</typeparam>
/// <typeparam name="TUserToken">The type representing a user token.</typeparam>
public abstract class UserStoreBase<TUser, TKey, TUserClaim, TUserLogin, TUserToken> :
    IUserLoginStore<TUser>,
    IUserClaimStore<TUser>,
    IUserPasswordStore<TUser>,
    IUserSecurityStampStore<TUser>,
    IUserEmailStore<TUser>,
    IUserLockoutStore<TUser>,
    IUserPhoneNumberStore<TUser>,
    IQueryableUserStore<TUser>,
    IUserTwoFactorStore<TUser>,
    IUserAuthenticationTokenStore<TUser>,
    IUserAuthenticatorKeyStore<TUser>,
    IUserTwoFactorRecoveryCodeStore<TUser>
    where TUser : IdentityUser<TKey>
    where TKey : IEquatable<TKey>
    where TUserClaim : IdentityUserClaim<TKey>, new()
    where TUserLogin : IdentityUserLogin<TKey>, new()
    where TUserToken : IdentityUserToken<TKey>, new()
{
    // Code omitted
/// <summary>
/// Represents a new instance of a persistence store for the specified user and role types.
/// </summary>
/// <typeparam name="TUser">The type representing a user.</typeparam>
/// <typeparam name="TRole">The type representing a role.</typeparam>
/// <typeparam name="TKey">The type of the primary key for a role.</typeparam>
/// <typeparam name="TUserClaim">The type representing a claim.</typeparam>
/// <typeparam name="TUserRole">The type representing a user role.</typeparam>
/// <typeparam name="TUserLogin">The type representing a user external login.</typeparam>
/// <typeparam name="TUserToken">The type representing a user token.</typeparam>
/// <typeparam name="TRoleClaim">The type representing a role claim.</typeparam>
public abstract class UserStoreBase<TUser, TRole, TKey, TUserClaim, TUserRole, TUserLogin, TUserToken, TRoleClaim> :
    UserStoreBase<TUser, TKey, TUserClaim, TUserLogin, TUserToken>,
    IUserRoleStore<TUser>
    where TUser : IdentityUser<TKey>
    where TRole : IdentityRole<TKey>
    where TKey : IEquatable<TKey>
    where TUserClaim : IdentityUserClaim<TKey>, new()
    where TUserRole : IdentityUserRole<TKey>, new()
    where TUserLogin : IdentityUserLogin<TKey>, new()
    where TUserToken : IdentityUserToken<TKey>, new()
    where TRoleClaim : IdentityRoleClaim<TKey>, new()
{
    // Code omitted
We used the first one cause we won’t be dealing with roles yet. IdentityUser is a dependency of the UserStoreBase since lots of the interfaces that implements are based on its properties. For example IdentityUser has a property named TwoFactorEnabled that is used by the IUserTwoFactorRecoveryCodeStore. There is a method in UserManager implementation that checks whether a recovery code is valid for a user and looks like this:
/// <summary>
/// Returns whether a recovery code is valid for a user. Note: recovery codes are only valid
/// once, and will be invalid after use.
/// </summary>
/// <param name="user">The user who owns the recovery code.</param>
/// <param name="code">The recovery code to use.</param>
/// <returns>True if the recovery code was found for the user.</returns>
public virtual async Task<IdentityResult> RedeemTwoFactorRecoveryCodeAsync(TUser user, string code)
{
    ThrowIfDisposed();
    var store = GetRecoveryCodeStore();
    if (user == null)
    {
        throw new ArgumentNullException(nameof(user));
    }

    var success = await store.RedeemCodeAsync(user, code, CancellationToken);
    if (success)
    {
        return await UpdateAsync(user);
    }
    // code omitted
}
private IUserTwoFactorRecoveryCodeStore<TUser> GetRecoveryCodeStore()
{
    var cast = Store as IUserTwoFactorRecoveryCodeStore<TUser>;
    if (cast == null)
    {
        throw new NotSupportedException(Resources.StoreNotIUserTwoFactorRecoveryCodeStore);
    }
    return cast;
}
As you can see the code searches for an implementation of the IUserTwoFactorRecoveryCodeStore in order to call the ReplaceCodesAsync method. Luckilly, UserStoreBase allready provides an implementation for you..
public virtual Task ReplaceCodesAsync(TUser user, IEnumerable<string> recoveryCodes, CancellationToken cancellationToken)
{
    var mergedCodes = string.Join(";", recoveryCodes);
    return SetTokenAsync(user, InternalLoginProvider, RecoveryCodeTokenName, mergedCodes, cancellationToken);
}
UserStoreBase has done much of the hard work for you by implementing interfaces and also providing getters and setters for the IdentityUser properties but this doesn’t mean that you are ready to go and start using the library. You need to provide implementations for all the abstract methods in the AppUserStore class. Here you have two choices: Either create your own SQL Schema and write you own data access layer using pure ADO.NET or some ORM library such as Dapper or integrate and use Entity Framework Core which by the way comes with a pre-defined SQL Schema. Since this part is about integrating Entity Framework with ASP.NET Core Identity we won’t provide custom implementations but I believe its worthy to take a quick look how it would look like to provide your own implementations. Check this file where you can see a class quite similar to the UserStoreBase you used before. It implements the interfaces by saving and updating DapperIdentityUser properties in the database using Dapper. If you were to use a real AppUserStore implementation along with the IdentityUser you would need to configure it at Startup as follow:
services.AddIdentityCore<IdentityUser>(options => { });
services.AddScoped<IUserStore<IdentityUser>, AppUserStore>();
Entity Framework Core
So where does Entity Framework fits in all these? Entity Framework provides default store implementations (for both user and roles) that can be easily plugged in using the Microsoft.AspNetCore.Identity.EntityFrameworkCore NuGet package. All you have to do is install the package and configure it at the Startup ConfigureServices method. Go ahead and install the package either from the manager or the console by typing:
install-package Microsoft.AspNetCore.Identity.EntityFrameworkCore
Next switch to the Startup file and configure Identity as follow:
public void ConfigureServices(IServiceCollection services)
{
    services.AddMvc();

    services.AddDbContext<IdentityDbContext>(options =>
        options.UseSqlServer(Configuration.GetConnectionString("AspNetCoreIdentityDb"),
            optionsBuilder =>
            optionsBuilder.MigrationsAssembly(typeof(Startup).Assembly.GetName().Name)));

    services.AddIdentityCore<IdentityUser>(options => { });
    services.AddScoped<IUserStore<IdentityUser>, UserOnlyStore<IdentityUser, IdentityDbContext>>();

    services.AddAuthentication(CookieAuthenticationDefaults.AuthenticationScheme)
        .AddCookie(CookieAuthenticationDefaults.AuthenticationScheme, options =>
        {
            options.Events.OnRedirectToAccessDenied = ReplaceRedirector(HttpStatusCode.Forbidden, options.Events.OnRedirectToAccessDenied);
            options.Events.OnRedirectToLogin = ReplaceRedirector(HttpStatusCode.Unauthorized, options.Events.OnRedirectToLogin);
        });
}
Let’s break down the highlighted lines. UserOnlyStore is nothing different than another implementation very similar to the UserStoreBase described previously. IdentityDbContext is the DbContext to be used for accessing Identity entities in the database using Entity Framework. We used a simple generic definition providing only two parameters of the UserOnlyStore but it’s just sugar for the default constructor as shown below..
/// <summary>
/// Represents a new instance of a persistence store for the specified user type.
/// </summary>
/// <typeparam name="TUser">The type representing a user.</typeparam>
/// <typeparam name="TContext">The type of the data context class used to access the store.</typeparam>
/// <typeparam name="TKey">The type of the primary key for a role.</typeparam>
/// <typeparam name="TUserClaim">The type representing a claim.</typeparam>
/// <typeparam name="TUserLogin">The type representing a user external login.</typeparam>
/// <typeparam name="TUserToken">The type representing a user token.</typeparam>
public class UserOnlyStore<TUser, TContext, TKey, TUserClaim, TUserLogin, TUserToken> :
    UserStoreBase<TUser, TKey, TUserClaim, TUserLogin, TUserToken>,
    IUserLoginStore<TUser>,
    IUserClaimStore<TUser>,
    IUserPasswordStore<TUser>,
    IUserSecurityStampStore<TUser>,
    IUserEmailStore<TUser>,
    IUserLockoutStore<TUser>,
    IUserPhoneNumberStore<TUser>,
    IQueryableUserStore<TUser>,
    IUserTwoFactorStore<TUser>,
    IUserAuthenticationTokenStore<TUser>,
    IUserAuthenticatorKeyStore<TUser>,
    IUserTwoFactorRecoveryCodeStore<TUser>,
    IProtectedUserStore<TUser>
    where TUser : IdentityUser<TKey>
    where TContext : DbContext
    where TKey : IEquatable<TKey>
    where TUserClaim : IdentityUserClaim<TKey>, new()
    where TUserLogin : IdentityUserLogin<TKey>, new()
    where TUserToken : IdentityUserToken<TKey>, new()
{
    /// <summary>
    /// Creates a new instance of the store.
    /// </summary>
    /// <param name="context">The context used to access the store.</param>
    /// <param name="describer">The <see cref="IdentityErrorDescriber"/> used to describe store errors.</param>
    public UserOnlyStore(TContext context, IdentityErrorDescriber describer = null) : base(describer ?? new IdentityErrorDescriber())
    {
        if (context == null)
        {
            throw new ArgumentNullException(nameof(context));
        }
        Context = context;
    }

    /// <summary>
    /// Gets the database context for this store.
    /// </summary>
    public TContext Context { get; private set; }

    /// <summary>
    /// DbSet of users.
    /// </summary>
    protected DbSet<TUser> UsersSet { get { return Context.Set<TUser>(); } }

    /// <summary>
    /// DbSet of user claims.
    /// </summary>
    protected DbSet<TUserClaim> UserClaims { get { return Context.Set<TUserClaim>(); } }

    /// <summary>
    /// DbSet of user logins.
    /// </summary>
    protected DbSet<TUserLogin> UserLogins { get { return Context.Set<TUserLogin>(); } }

    /// <summary>
    /// DbSet of user tokens.
    /// </summary>
    protected DbSet<TUserToken> UserTokens { get { return Context.Set<TUserToken>(); } }

    /// <summary>
    /// Gets or sets a flag indicating if changes should be persisted after CreateAsync, UpdateAsync and DeleteAsync are called.
    /// </summary>
    /// <value>
    /// True if changes should be automatically persisted, otherwise false.
    /// </value>
    public bool AutoSaveChanges { get; set; } = true;

    /// <summary>Saves the current store.</summary>
    /// <param name="cancellationToken">The <see cref="CancellationToken"/> used to propagate notifications that the operation should be canceled.</param>
    /// <returns>The <see cref="Task"/> that represents the asynchronous operation.</returns>
    protected Task SaveChanges(CancellationToken cancellationToken)
    {
        return AutoSaveChanges ? Context.SaveChangesAsync(cancellationToken) : Task.CompletedTask;
    }

    // Code omitted
Notice that you get DbSet<T> properties to access entities using the DbContext. Entity Framework comes with 3 different implementations for stores. The one we used, that is UserOnlyStore which provides implementations for managing users only, the RoleStore<TRole> for managing roles and UserStore for managing both of them. Another thing that worths to mention is that in case you have previously used ASP.NET Core Identity with Entity Framework, it’s most likely that you plugged EF as follow:
services.AddIdentity<IdentityUser, IdentityRole>();
.. rather that the way we did. AddIdentity<IdentityUser, IdentityRole> adds the default identity system configuration for the specified User and Role types and also configures several other features for you, such as the default authentication scheme, cookie expiration time, cookie name for external logins etc.. Let’s take a quick look how it looks like:
public static IdentityBuilder AddIdentity<TUser, TRole>(
    this IServiceCollection services,
    Action<IdentityOptions> setupAction)
    where TUser : class
    where TRole : class
{
    // Services used by identity
    services.AddAuthentication(options =>
    {
        options.DefaultAuthenticateScheme = IdentityConstants.ApplicationScheme;
        options.DefaultChallengeScheme = IdentityConstants.ApplicationScheme;
        options.DefaultSignInScheme = IdentityConstants.ExternalScheme;
    })
    .AddCookie(IdentityConstants.ApplicationScheme, o =>
    {
        o.LoginPath = new PathString("/Account/Login");
        o.Events = new CookieAuthenticationEvents
        {
            OnValidatePrincipal = SecurityStampValidator.ValidatePrincipalAsync
        };
    })
    .AddCookie(IdentityConstants.ExternalScheme, o =>
    {
        o.Cookie.Name = IdentityConstants.ExternalScheme;
        o.ExpireTimeSpan = TimeSpan.FromMinutes(5);
    })
    .AddCookie(IdentityConstants.TwoFactorRememberMeScheme, o =>
    {
        o.Cookie.Name = IdentityConstants.TwoFactorRememberMeScheme;
        o.Events = new CookieAuthenticationEvents
        {
            OnValidatePrincipal = SecurityStampValidator.ValidateAsync<ITwoFactorSecurityStampValidator>
        };
    })
    .AddCookie(IdentityConstants.TwoFactorUserIdScheme, o =>
    {
        o.Cookie.Name = IdentityConstants.TwoFactorUserIdScheme;
        o.ExpireTimeSpan = TimeSpan.FromMinutes(5);
    });

    // Hosting doesn't add IHttpContextAccessor by default
    services.AddHttpContextAccessor();
    // Identity services
    services.TryAddScoped<IUserValidator<TUser>, UserValidator<TUser>>();
    services.TryAddScoped<IPasswordValidator<TUser>, PasswordValidator<TUser>>();
    services.TryAddScoped<IPasswordHasher<TUser>, PasswordHasher<TUser>>();
    services.TryAddScoped<ILookupNormalizer, UpperInvariantLookupNormalizer>();
    services.TryAddScoped<IRoleValidator<TRole>, RoleValidator<TRole>>();
    // No interface for the error describer so we can add errors without rev'ing the interface
    services.TryAddScoped<IdentityErrorDescriber>();
    services.TryAddScoped<ISecurityStampValidator, SecurityStampValidator<TUser>>();
    services.TryAddScoped<ITwoFactorSecurityStampValidator, TwoFactorSecurityStampValidator<TUser>>();
    services.TryAddScoped<IUserClaimsPrincipalFactory<TUser>, UserClaimsPrincipalFactory<TUser, TRole>>();
    services.TryAddScoped<UserManager<TUser>, AspNetUserManager<TUser>>();
    services.TryAddScoped<SignInManager<TUser>, SignInManager<TUser>>();
    services.TryAddScoped<RoleManager<TRole>, AspNetRoleManager<TRole>>();

    if (setupAction != null)
    {
        services.Configure(setupAction);
    }

    return new IdentityBuilder(typeof(TUser), typeof(TRole), services);
}
We might switch to this default configuration on the next posts of these series where we will be managing roles or signing in with external providers. Back to the Startup, we used IdentityDbContext which is the base class for Entity Framework database context used for identity. We also have to configure a connection string for the database where Identity entities are stored and this has to be configured in the appsettings.json file. Place a connection string property in the appsettings.json file at the root of the web application.
{
    "ConnectionStrings": {
      "AspNetCoreIdentityDb": "Data Source=(LocalDb)\\MSSQLLocalDb;Database=AspNetCoreIdentityDb;trusted_connection=yes;MultipleActiveResultSets=true;"
    },
    "Logging": {
      "LogLevel": {
        "Default": "Warning"
      }
    }
  }
Make sure you replace the connection string to reflect your development environment
Since now we use IdentityUser as the base Identity user type, make sure to replace any reference to AppUser in the AccountController with IdentityUser.
public class AccountController : Controller
{
    private readonly UserManager<IdentityUser> _userManager;

    public AccountController(UserManager<IdentityUser> userManager)
    {
        this._userManager = userManager;
    }

    [HttpPost]
    public async Task<ResultVM> Register([FromBody]RegisterVM model)
    {
        // Code omitted
        user = new IdentityUser
        {
            Id = Guid.NewGuid().ToString(),
            UserName = model.UserName,
            Email = model.Email
        };

        // Code omitted
}
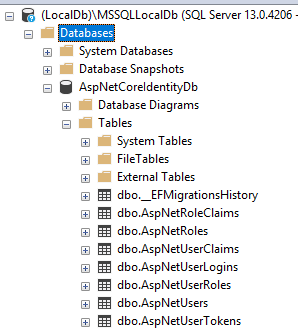
Entity Framework Migrations
Build, run the application and try to register a new user. Of course you ‘ll get exception because we configured Entity Framework in code but we haven’t created the database yet.

To solve this problem, we will use Entity Framework Migrations to create the database. Follow the next steps to enable migrations and create the database schema as well:
- Install
Microsoft.EntityFrameworkCore.DesignNuGet package by running:install-package Microsoft.EntityFrameworkCore.Design
- Right click the project and select Edit AspNetCoreIdentity.csproj. Add the required tooling to use the dotnet cli
<ItemGroup>
  <DotNetCliToolReference Include="Microsoft.VisualStudio.Web.CodeGeneration.Tools" Version="2.0.3" />
  <DotNetCliToolReference Include="Microsoft.EntityFrameworkCore.Tools.DotNet" Version="2.0.2" />
</ItemGroup>
- Open a terminal and cd to the root of your project. Type the following command to add the first migration:
dotnet ef migrations add initial_migration

- Next create the database by typing:
dotnet ef database update
Before running the previous command make sure you have re-build the application
Confirm tha the database has been created succesfully and that you can now register and login with a new user.


Discussion
Over the years I have noticed that there’s a big debate about whether you should or shouldn’t use ASP.NET Identity membership system along with Entity Framework. Here are some of the excuses I usually hear from fellows that choose not to use ASP.NET Identity with Entity Framework or simply to put, ASP.NET Identity at all.
- Entity Framework is too slow
- Entity Framework consumes lots of memory due to its tracking entities features
- I use a different database access provider, such as Dapper
These are all relatively logical thoughts but they should’t at any case prevent you for using ASP.NET Core Identity with Entity Framework. First of all, if you want to use your own custom data access provider which is lighter and faster than EF that’s totally fine, go ahead and do that. This though doesn’t mean that you can’t plug ASP.NET Core Identity with Entity Framework! Simply to put, you can use ASP.NET Core Identity library configured with Entity Framework for managing your application’s membership operations without conflicting with your different database access provider. All ASP.NET Core Identity needs is the required database tables to support its huge set of features. And believe me, you won’t have any performance penalties for using a simple DbContext accessing a few tables in the database. On the other hand, you will be able to use out of the box a set of membership features (proven security algorithms, token based authentication, external logins, Two-Factor authentication and much more..) that you would spend months to implement on your own.
In case you find my blog’s content interesting, register your email to receive notifications of new posts and follow chsakell’s Blog on its Facebook or Twitter accounts.
| .NET Web Application Development by Chris S. | |||

|

|
||

|
|||
Categories: ASP.NET, asp.net core

Hi ! Can you create a sample that use .net core 2.0 + TypeScript ? Something is different between .net core 1.0 and 2.0 with configuration. Thank you very very much!
This helps a LOT!.. I was struggling trying to configure this for almost 2 days!… until I found your blog!… god grief!.. the mistake was soo stupid!… I was subclassing from the wrong UserStore! didn’t realise I should configure the TRole for UserStore as well! duh!…
Great postt thanks