Azure Functions Proxies is serverless API toolkit that basically allows you to modify the requests and responses of your APIs. This feature might sounds a little bit simple but it’s not. With AF Proxies you can expose your multiple Azure Function apps built as a Microservice Architecture in a single unified endpoint. Also, during development you can use the proxies to mock up the responses of your APIs (Mock APIs). Last but not least, the proxies can be used to quickly switch to different versions of your APIs. In this post we will see all these in action using a a sceleton of an e-shop app built with Azure Functions using a microservice architecture. The post will also save you some time by explaining how to setup your development environment and resolve common errors when using the proxies either in development or production environment. Are your ready? Let’s start!
Download and setup the sample app
To follow along with the post clone the associated repository using the following command:
git clone https://github.com/chsakell/azure-functions-proxies
Prerequisites
In order to build and run the e-shop app locally you need to have the followings installed:
- .NET Core 2.2 SDK
-
Azure Functions Core Tools V2. Install the V2 version using the following command:
npm i -g azure-functions-core-tools --unsafe-perm true
After installing azure-functions-core-tools npm package you need to configure some application arguments for the Basket.API, Catalog.API and Ordering.API function apps projects inside the solution. azure-functions-core-tools package is usually installed (in Windows machines) inside the %userprofile%\AppData\Roaming\npm\node_modules\azure-functions-core-tools folder. For each of the following projects, right click the project, select Properties and then switch to the Debug tab. Configure the projects as follow:
- Catalog.API:
- Launch: Executable
- Executable: dotnet.exe
- Application arguments: %userprofile%\AppData\Roaming\npm\node_modules\azure-functions-core-tools\bin\func.dll host start –pause-on-error –port 1072
- Basket.API:
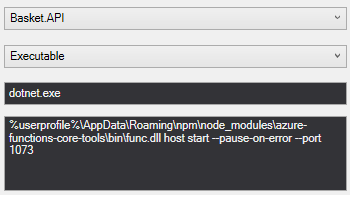
- Launch: Executable
- Executable: dotnet.exe
- Application arguments: %userprofile%\AppData\Roaming\npm\node_modules\azure-functions-core-tools\bin\func.dll host start –pause-on-error –port 1073
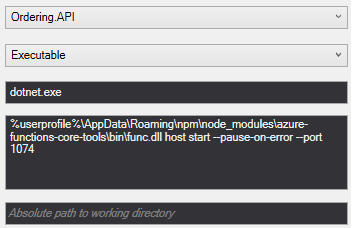
- Ordering.API:
- Launch: Executable
- Executable: dotnet.exe
- Application arguments: %userprofile%\AppData\Roaming\npm\node_modules\azure-functions-core-tools\bin\func.dll host start –pause-on-error –port 1074
In case azure-functions-core-tools have been installed in some other path or you are on Linux or Mac environment you need to alter the Application arguments func.dll path accordingly
The configurations should look like this:

Mocking APIs
We will start by using AF Proxies for mocking API responses. Mocks are useful in scenarios when backend implementation takes time to finish and you don’t want to block and make the front-end team waiting for it. We will use the Catalog.API function app to test our first proxy. Catalog.API microservice is supposed to expose two endpoints for accessing catalog items: /api/items for retrieving all items and /api/items/{id} for accessing a specific item. Before implementing those endpoints in backend we want to provide mock data to front-end developers so that they can move forward with their implementation. Proxies are defined inside a proxies.json configuration file at the root of the project. Create a new proxies.json file at the root of Catalog.API project and set its contents as follow:
{
    "$schema": "http://json.schemastore.org/proxies",
    "proxies": {
      "mock.catalog.items": {
        "matchCondition": {
          "methods": [ "GET" ],
          "route": "/api/items"
        },
        "responseOverrides": {
          "response.body": "{'message' : 'Hello world from proxies!'}",
          "response.headers.Content-Type": "application/json"
        }
      }
    }
  }
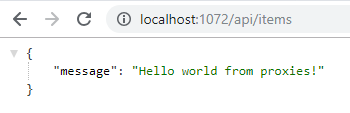
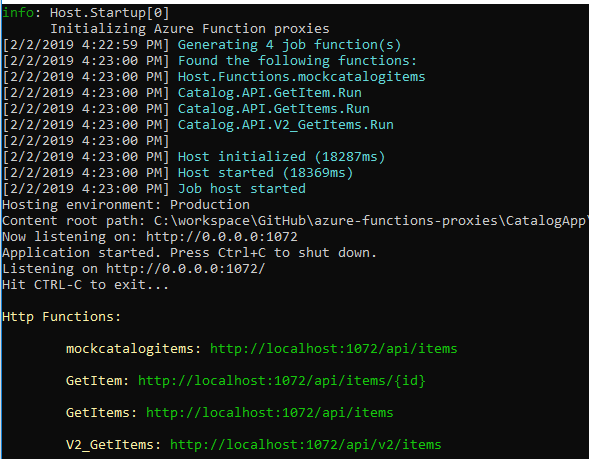
Build, right click and debug the Catalog.API app. Navigate to http://localhost:1072/api/items and confirm that you get your first proxy response: “Hello world from proxies!”.
When the app fires up, you will get some messages on the console, printing all the endpoints available on the function app.
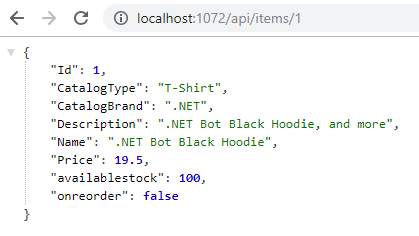
Of course the “hello world from proxies” message is not what you want, instead you want to return a valid items array:
{
    "$schema": "http://json.schemastore.org/proxies",
    "proxies": {

      "mock.catalog.items": {
        "matchCondition": {
          "methods": [ "GET" ],
          "route": "/api/items"
        },
        "responseOverrides": {
          "response.body": [
            {
              "Id": 1,
              "CatalogType": "T-Shirt",
              "CatalogBrand": ".NET",
              "Description": ".NET Bot Black Hoodie, and more",
              "Name": ".NET Bot Black Hoodie",
              "Price": 19.5,
              "availablestock": 100,
              "onreorder": false
            },
            {
              "Id": 2,
              "CatalogType": "Mug",
              "CatalogBrand": ".NET",
              "Description": ".NET Black & White Mug",
              "Name": ".NET Black & White Mug",
              "Price": 8.5,
              "availablestock": 89,
              "onreorder": true
            }
          ],
          "response.headers.Content-Type": "application/json"
        }

      }
    }
  }
If you build and try again the /api/items endpoint you will get back the two items defined in the request.body property. Now let’s break down how Azure function proxies.json file works. Inside the proxies property we define as many proxies we want. In our example we created a proxy named mock.catalog.items that returns some mock data for the route /api/items. The matchCondition property defines the rules that match the proxy configuration that is the HTTP methods and the route. We defined that when an HTTP GET request to /api/items reaches the app we want to override the response and send back a JSON array. We also defined that the response type is of type application/json.
"responseOverrides": {
    "response.body": [..],
    "response.headers.Content-Type": "application/json"
  }
When the actual endpoint is ready and you want to send back the real data all you need to do is remove the mock.catalog.items proxy from the proxies configuration. The GetItems HTTP triggered function is responsible to return all the items defined in the catalog.items.json file at the root of the project.
public static class GetItems
{
    [FunctionName("GetItems")]
    public static async Task<IActionResult> Run(
        [HttpTrigger(AuthorizationLevel.Function, "get",
        Route = "items")] HttpRequest req,
        ILogger log, ExecutionContext context)
    {
        string catalogItemsFile = Path.Combine(context.FunctionAppDirectory, "catalog.items.json");
        string itemsJson = File.ReadAllText(catalogItemsFile);

        var items = JsonConvert.DeserializeObject<List<CatalogItem>>(itemsJson);

        return new OkObjectResult(items);
    }
}
Now let’s see how to define a proxy that listens to the /api/items/{id} endpoint and returns a single catalog item. Add the following proxy to the proxies.json file:
{
    "$schema": "http://json.schemastore.org/proxies",
    "proxies": {
      "mock.catalog.item": {
        "matchCondition": {
          "methods": [ "GET" ],
          "route": "/api/items/{id}"
        },
        "responseOverrides": {
          "response.body": {
            "Id": 1,
            "CatalogType": "T-Shirt",
            "CatalogBrand": ".NET",
            "Description": ".NET Bot Black Hoodie, and more",
            "Name": ".NET Bot Black Hoodie",
            "Price": 19.5,
            "availablestock": 100,
            "onreorder": false
          },
          "response.headers.Content-Type": "application/json"
        }

      }
    }
  }
The mock.catalog.item proxy will return the same catalog item for all requests to /api/items/{id} where {id} is a route parameter.
The GetItem function returns the real item read from the catalog.items.json file.
[FunctionName("GetItem")]
public static async Task<IActionResult> Run(
    [HttpTrigger(AuthorizationLevel.Function, "get",
    Route = "items/{id}")] HttpRequest req,
    int id,
    ILogger log, ExecutionContext context)
{

    string catalogItemsFile = Path.Combine(context.FunctionAppDirectory, "catalog.items.json");
    string itemsJson = File.ReadAllText(catalogItemsFile);

    var items = JsonConvert.DeserializeObject<List<CatalogItem>>(itemsJson);

    var item = items.FirstOrDefault(i => i.Id == id);

    if (item != null)
        return new OkObjectResult(item);
    else
        return new NotFoundObjectResult("Item  not found");

}
API versioning
Now let’s assume you have decided to envolve your catalog api and introduce a new version where a new item property is added. Before exposing your new version you would also like to test it in the production environment and when you are sure that it works fine switch all your clients to it. The V2_GetItems function returns catalog items with a new property named Image. Notice that the new route defined is v2/items
[FunctionName("V2_GetItems")]
public static async Task<IActionResult> Run(
    [HttpTrigger(AuthorizationLevel.Function, "get",
    Route = "v2/items")] HttpRequest req,
    ILogger log, ExecutionContext context)
{
    string catalogItemsFile = Path.Combine(context.FunctionAppDirectory, "catalog.items_v2.json");
    string itemsJson = File.ReadAllText(catalogItemsFile);

    var items = JsonConvert.DeserializeObject<List<CatalogItem>>(itemsJson);

    return new OkObjectResult(items);

}
public class CatalogItem
{
    public int Id { get; set; }
    public string Name { get; set; }
    public string Description { get; set; }
    public decimal Price { get; set; }
    public string CatalogType { get; set; }
    public string CatalogBrand { get; set; }
    public int AvailableStock { get; set; }
    public bool OnReorder { get; set; }

    // Added for V2 version
    [JsonProperty(NullValueHandling = NullValueHandling.Ignore)]
    public string Image { get; set; }
}
Of course you don’t want your clients to change their endpoint to /api/v2/items but use the default /api/items instead. All you have to do is define a new proxy that forwards all requests to api/items to api/v2/items, processed by the new function.
{
    "$schema": "http://json.schemastore.org/proxies",
    "proxies": {
      "v2.catalog.items": {
        "matchCondition": {
          "methods": [ "GET" ],
          "route": "/api/items/"
        },
        "backendUri": "http://localhost:1072/api/v2/items"
      }
    }
  }
In this proxy configuration we introduced a new property named backendUri which is the URL of the back-end resource to which the request will be proxied. The backendUri could be any valid URL that may return a valid respond for your app. For example assuming you were building a weather API the “backendUri” could be https://some-weather-api.org/ (it isn’t an real weather endpoint). Also it is most likely that you would like to pass some information to the API such as the location that you wish to search the weather for or some subscription key required by the api. The requestOverrides property can be used to configure that kind of stuff as follow:
{
    "$schema": "http://json.schemastore.org/proxies",
    "proxies": {
        "some-weather-api": {
            "matchCondition": {
                "methods": [ "GET" ],
                "route": "/api/weather/{location}"
            },
            "backendUri": "https://some-weather-api.org/",
            "requestOverrides": {
                "backend.request.headers.Accept": "application/xml",
                "backend.request.headers.x-weather-key": "MY_WEATHER_API_KEY",
                "backend.request.querystring.location:": "{location}"
            }
        }
    }
}
The previous configuration listens to your function’s endpoint /api/weather/{location} and proxies the request to https://some-weather-api.org.org. Before proxying the request adds some headers required by the some-weather-api. Also notice how the {location} parameter value is added to the query string of the backend URI resulting to a https://some-weather-api.org?location={location} request.
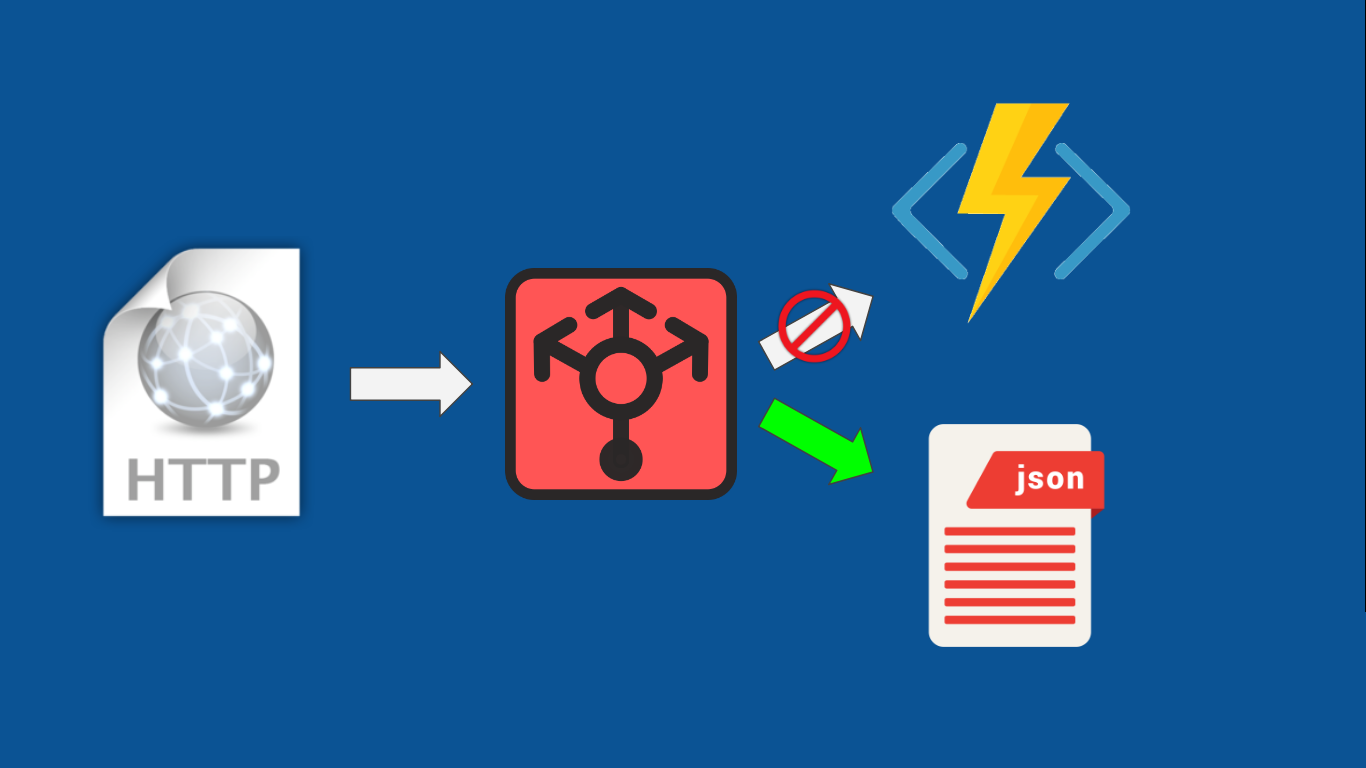
Unified API Endpoints

When building microservices using Function Apps each function app ends up with a unique endpoint as it was a different App Service. The e-shop application is broken to 3 microservices, Basket.API, Catalog.API and Ordering.API and when deployed on Azure ends up with the following hosts:
- Catalog.API: https://catalog-api/azurewebsites.net
- Basket.API: https://basket-api/azurewebsites.net
- Ordering.API: https://ordering-api/azurewebsites.net
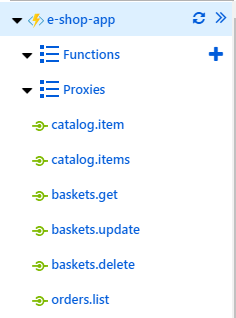
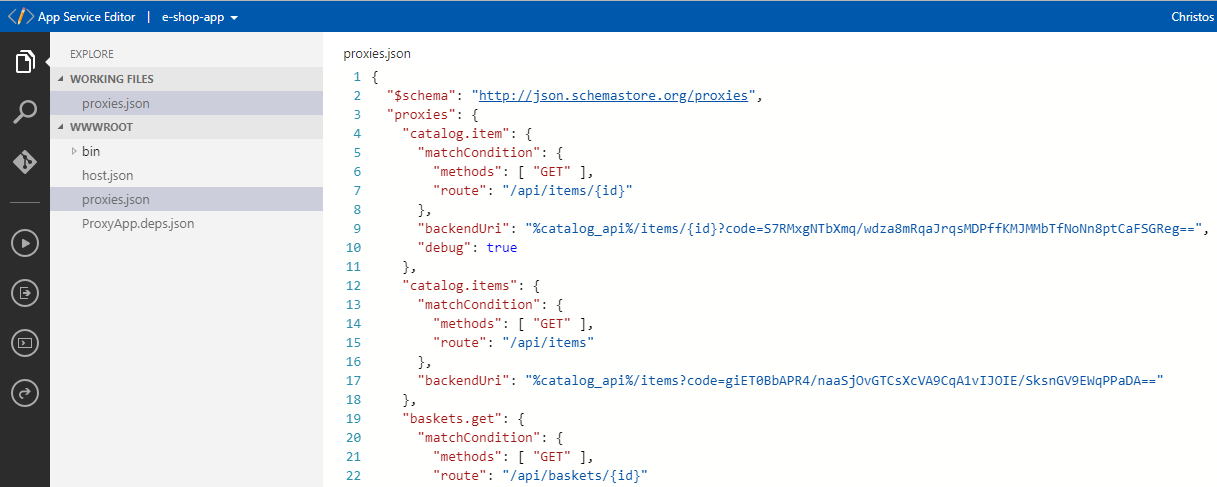
What you really want for your clients thought is a single unified endpoint for all of your APIs such as https://my-eshop/azurewebsites.net. You can use AF proxies to proxy requests to the internal function apps based on the route. In the solution you will find an Azure Function App named ProxyApp that contains the proxies required to expose all e-shop APIs as a unified API. Let’s see the proxies.json file for this app.
{
"$schema": "http://json.schemastore.org/proxies",
"proxies": {
"catalog.item": {
"matchCondition": {
"methods": [ "GET" ],
"route": "/api/items/{id}"
},
"backendUri": "%catalog_api%/items/{id}",
"debug": true
},
"catalog.items": {
"matchCondition": {
"methods": [ "GET" ],
"route": "/api/items"
},
"backendUri": "%catalog_api%/items"
},
"baskets.get": {
"matchCondition": {
"methods": [ "GET" ],
"route": "/api/baskets/{id}"
},
"backendUri": "%basket_api%/baskets/{id}"
},
"baskets.update": {
"matchCondition": {
"methods": [ "PUT" ],
"route": "/api/baskets"
},
"backendUri": "%basket_api%/baskets"
},
"baskets.delete": {
"matchCondition": {
"methods": [ "DELETE" ],
"route": "/api/baskets/{id}"
},
"backendUri": "%basket_api%/baskets/{id}"
},
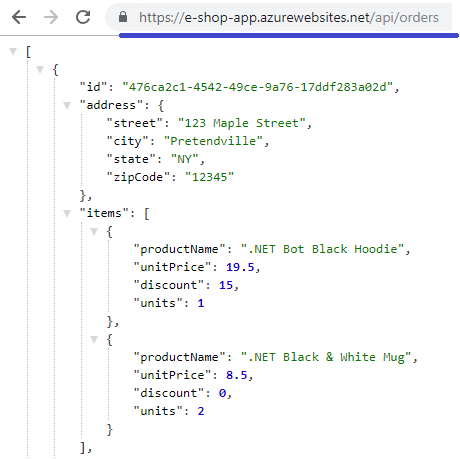
"orders.list": {
"matchCondition": {
"methods": [ "GET" ],
"route": "/api/orders"
},
"backendUri": "%ordering_api%/orders"
}
}
}
There are proxy configurations for all available endpoints in the e-shop app. The new and most interesting thing on the above configuration though is the way the backendUri properties are defined. Instead of hard-coding the different function apps endpoints, we used settings properties surrounded with percent signs (%). Anything that is surrounded with the percent sign will be replaced with the respective app setting defined in the local.settings.json locally. We will see how this works up on Azure soon. This means that %catalog_api%, %basket_api% and %ordering_api% will be replaced with the settings defined in the local.settings.json file inside the ProxyApp.
{
    "ConnectionStrings": {},
    "IsEncrypted": false,
    "Values": {
      "AZURE_FUNCTION_PROXY_DISABLE_LOCAL_CALL": true,
      "FUNCTIONS_WORKER_RUNTIME": "dotnet",
      "catalog_api": "http://localhost:1072/api",
      "basket_api": "http://localhost:1073/api",
      "ordering_api": "http://localhost:1074/api"
    }
}
Notice that the parameters are defined inside the Values property not outside.
Azure Functions App Settings
Azure Functions have many settings that can affect your functions behavior. Here we set the AZURE_FUNCTION_PROXY_DISABLE_LOCAL_CALL to true so that the proxy will trigger new HTTP requests to the different Azure function apps rather than dispatching the requests to the same app, something that would result to 404 errors. We also set the FUNCTIONS_WORKER_RUNTIME setting that is relative to the language being used in our application.
In order to fully test the ProxyApp proxies, right click the solution, select Set Startup Projects.. and configure as follow:
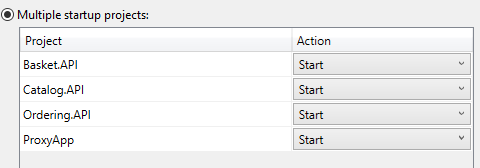
Start debugging and all function apps will be hosted as configured in the Application Arguments. ProxyApp console logs will print all the available endpoints defined on its configuration.
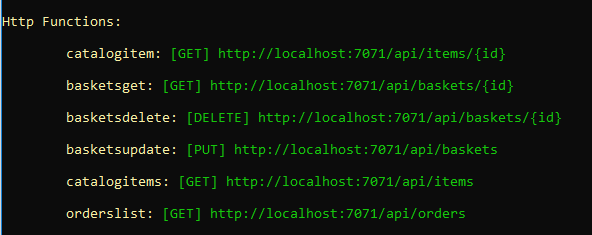
Go ahead and test this unified API endpoint and confirm that requests are properly dispatched to the correct function apps. The ProxyApp contains a Postman collection named postman-samples to help you test the APIs. Open that file in Postman and test the Catalog, Basket and Ordering APIs using the unified endpoint exposed by the ProxyApp.

Proxies configuration in Microsoft Azure
After deploying all your function apps up on Azure you need to configure the proxies and application settings. First of all you need to check all the endpoints per function app (microservice). Keep in mind that in our example, all the functions require an access code to be added on the query string in order to be consumed. This is due to the AuthorizationLevel used on each function level.
[FunctionName("GetItems")]
public static async Task<IActionResult> Run(
    [HttpTrigger(AuthorizationLevel.Function, "get",
    Route = "items")] HttpRequest req,
    ILogger log, ExecutionContext context)
// code omitted
Let’s see how these functions looks like when deployed on Azure.
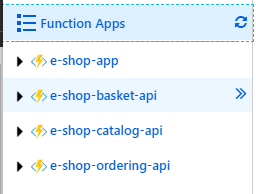
Each of the function app has a unique host and each function requires an access token.
- Proxy: https://e-shop-app.azurewebsites.net
- Catalog.API: https://e-shop-catalog-api.azurewebsites.net
- Basket.API: https://e-shop-basket-api.azurewebsites.net
- Ordering.API: https://e-shop-ordering-api.azurewebsites.net
If you try to get the URL for a specific function of an Azure Service App you will also see the required access token. Here is how the URL for the GetItems function looks like:
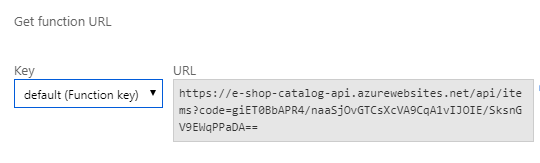
The code is different for each function so you need to get them all before setting the proxies on the root Proxy App function app.
- Catalog.API
- /api/items: https://e-shop-catalog-api.azurewebsites.net/api/items?code=giET0BbAPR4/naaSjOvGTCsXcVA9CqA1vIJOIE/SksnGV9EWqPPaDA==
- /api/v2/items: https://e-shop-catalog-api.azurewebsites.net/api/v2/items?code=NnkhwBRWudrg4bcNuovpOwi8bA7ASxwfBtnpxJTp3zDoQERTk0kDZA==
- /api/items/{id}: https://e-shop-catalog-api.azurewebsites.net/api/items/{id}?code=S7RMxgNTbXmq/wdza8mRqaJrqsMDPffKMJMMbTfNoNn8ptCaFSGReg==
- Catalog.API
- /api/baskets [PUT]: https://e-shop-basket-api.azurewebsites.net/api/baskets?code=HM4JucerPiw5KXy1TDvX2HZytr9t8z/g12xVJugWzwqUqdA43JaEaQ==
- /api/baskets [GET]: https://e-shop-basket-api.azurewebsites.net/api/baskets/{id:guid}?code=yA67pwJxa7egdRQ3Z6T2pi0RwSeUcgsLPPfzKCjfTKzGTyfOS1JzMw==
- /api/baskets [DELETE]: https://e-shop-basket-api.azurewebsites.net/api/baskets/{id}?code=HO0aK41mubtI9hGVxdbqjZOyY7clhS01h9zoIhfhsgCjbMxfbDurvg==
- Catalog.API
After gathering all this information, open the Proxies menu item in the ProxyApp app.
Azure portal let’s you configure the proxies you have defined in the proxies.json file. Clicking on the catalog.items proxy opens a view where we can configure its behavior.
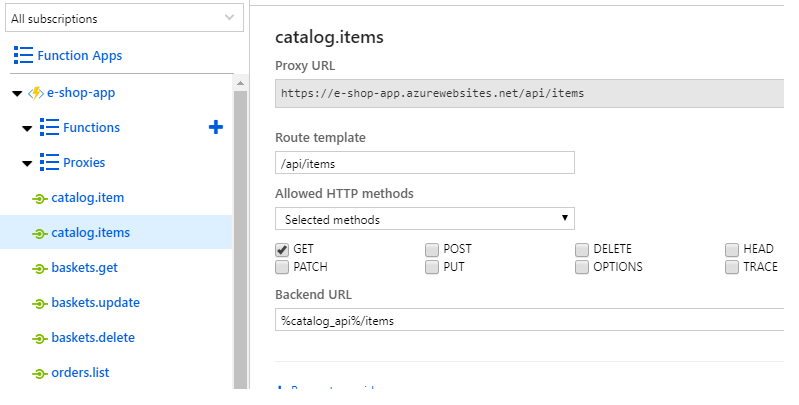
The picture shows that we need to add the code query string for this function plus to configure the catalog_api application setting for the App Service. Of course you could create an app setting parameter for the code as well and define it in the app settings. Unfortunately the UI won’t let you update the backend URL cause it requires that it starts with http or https
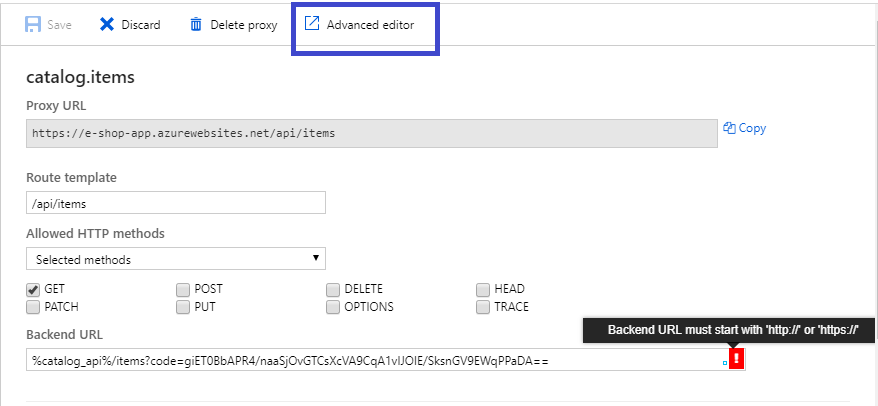
That’s ok though because you can use the Advanced editor as shown on the picture.
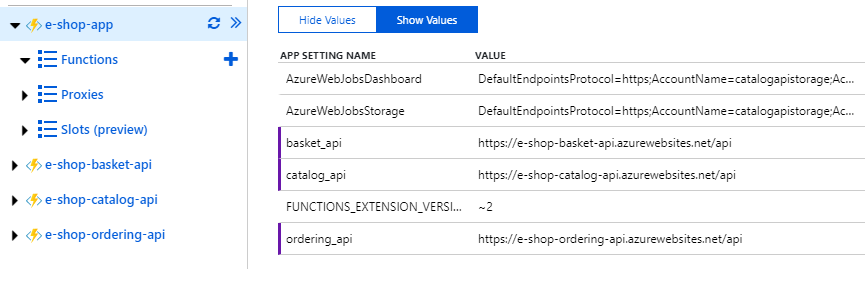
Next, open and configure the Application settings for the ProxyApp by adding all the parameters defined in the proxies:
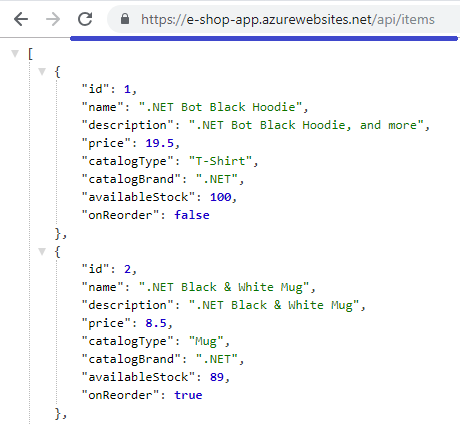
Try the root endpoint of your app and confirm that all work as indented.
Mind that you can add or configure proxies to your functions whenever you want. Just open the Advanced editor, add a new proxies.json file, define your proxies and that’s it. No restart required.
That’s it we finished! I hope you have learned a lot about Azure Functions Proxies and how they can help you when building apps using Microservice architecture.
In case you find my blog’s content interesting, register your email to receive notifications of new posts and follow chsakell’s Blog on its Facebook or Twitter accounts.
| .NET Web Application Development by Chris S. | |||

|

|
||

|
|||
Categories: asp.net core, Azure, Best practices

Leave a comment