Enabling distributed transactions in WCF services is quite complicated task since several considerations and configurations have to been done. But let’s start from the beginning and ask ourselves why on earth would someone wanted to support transactions in a WCF service? A simple example will make this clear. Let’s say you are the client and you want to consume a WCF service operation called “UpdateProducts(Product p1, Product p2)”. The operation’s implementation maybe look like this:
public void UpdateProducts(Product p1, Product p2) {
    //logic actions - Block 1
    UpdateProductInDB(p1);
    //logic actions - Block 2
    UpdateProductInDB(p2);
    return;
}
The “UpdateProductInDB” method is a call to a database asking to update a particular product’s values. Think of the scenario where the client consumes the “UpdateProducts” service operation passing two products as parameters. Unfortunately though, for some reason (database server crush for example), the operation fails at the point when the second “UpdateProductInDB” method was called. What does this mean? It means that the first UpdateProductInDB method was successfully called updating values of the first product parameter but the second call failed. This is an awkward situation for the client and definitely he isn’t satisfied with the result. What he really wanted was to update both products and not just the one. If the service call was to fail, the right functionality would be the first UpdateProductInDB to rollback and leave first product’s values unchanged, giving the opportunity to the client for a later call. This is the hall meaning of a transaction. Roll back if something fails inside a block of operations. I will describe how to enable transactions in WCF services in three posts. In this one, we will create all service layers (service – logic – data access) and make sure the service is running correctly. In the second on we will host the service in IIS and verify that by default it doesn’t support transactions. In the last post of these series, we will enable transactions and see the difference. So let’s start by creating our solution.
Open Visual Studio 2012 and create a black solution called Transactions. Right click the solution and add a new WCF Service library project named “NorthwindService”. We give that name because we are going to use the Northwind database for our operations. Rename the IService1.cs file to “INorthwindService.cs”, remove all it’s contents except the using statements and paste the following code.
namespace NorthwindService
{
    [ServiceContract]
    public interface INorthwindService
    {
        [OperationContract]
        [FaultContract(typeof(ProductFault))]
        Product GetProduct(int id);
        [OperationContract]
        [FaultContract(typeof(ProductFault))]
        bool UpdateProduct(ref Product product,
        ref string message);
    }

    [DataContract]
    public class Product
    {
        [DataMember]
        public int ProductID { get; set; }
        [DataMember]
        public string ProductName { get; set; }
        [DataMember]
        public string QuantityPerUnit { get; set; }
        [DataMember]
        public decimal UnitPrice { get; set; }
        [DataMember]
        public bool Discontinued { get; set; }
        [DataMember]
        public byte[] RowVersion { get; set; }
    }

    [DataContract]
    public class ProductFault
    {
        public ProductFault(string msg)
        {
            FaultMessage = msg;
        }
        [DataMember]
        public string FaultMessage;
    }
}
You can understand by the code that the service will support operations to get information about products as long as to update product values. It will also support SOAP Faults in the way we have seen in other post. Before implementing the service we need to create first the business and data access interfaces. Right click the solution and add a C# Class library project called “NorthwindBDO”. Rename Class1.cs file to ProductBDO. This will be our Product Domain Object and as you will see, it will contain extra property fields than the “Product” DataContract class we declared in the service interface.
namespace NorthwindBDO
{
    public class ProductBDO
    {
        public int ProductID { get; set; }
        public string ProductName { get; set; }
        public string QuantityPerUnit { get; set; }
        public decimal UnitPrice { get; set; }
        public int UnitsInStock { get; set; }
        public int ReorderLevel { get; set; }
        public int UnitsOnOrder { get; set; }
        public bool Discontinued { get; set; }
        public byte[] RowVersion { get; set; }
    }
}
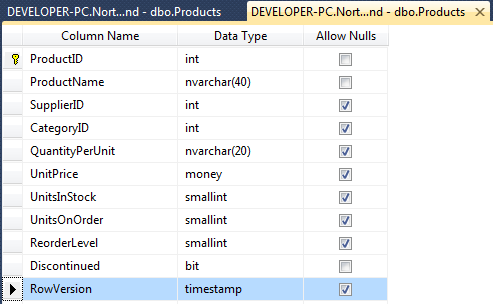
Notice the last property “RowVersion”. We will use that property later to indicate whether a record has been modified since it was last retrieved. We will have to add an extra column of type “timestamp” in the Northwind’s Product table to support that functionality. In the next step we are going to create the data access service layer but first we need to make sure our database is ready. Go, download the “Northwind” sample database (it’s free) and attach it to your SQL Server. Open the Product table and add a new column named “RowVersion” of type “timestamp”.
Go back to your visual studio, right click the solution and add a new C# class library project named “NorthwindDAL”. This will be the data access layer and it will contain only one class (Rename Class.cs to ProductDAO”) with data access operations. All database access operations will be trough Entity Framework, so we need to add a new Entity Model. Right click the project, add a new item of ADO.NET Entity model named “Northwind”, select “Create from database” and point the Northwind database attached in your SQL Server. Leave the default names for App.config connectionStrings element as long as the Model Namespace. Make sure you add the “Products” table and click finish. Right click the NorthwindDAL project and add a reference to the NorthwindBDO project. We need to have access to the ProductBDO class. Paste the following code in your ProductDAO.cs file.
using NorthwindBDO;

namespace NorthwindDAL
{
    public class ProductDAO
    {
        public ProductBDO GetProduct(int id)
        {
            ProductBDO productBDO = null;
            using (var NWEntities = new NorthwindEntities())
            {
                Product product = (from p in NWEntities.Products
                                   where p.ProductID == id
                                   select p).FirstOrDefault();
                if (product != null)
                    productBDO = new ProductBDO()
                    {
                        ProductID = product.ProductID,
                        ProductName = product.ProductName,
                        QuantityPerUnit = product.QuantityPerUnit,
                        UnitPrice = (decimal)product.UnitPrice,
                        UnitsInStock = (int)product.UnitsInStock,
                        ReorderLevel = (int)product.ReorderLevel,
                        UnitsOnOrder = (int)product.UnitsOnOrder,
                        Discontinued = product.Discontinued,
                        RowVersion = product.RowVersion
                    };
            }
            return productBDO;
        }

        public bool UpdateProduct(ref ProductBDO productBDO, ref string message)
        {
            message = "product updated successfully";
            bool ret = true;
            using (var NWEntities = new NorthwindEntities())
            {
                var productID = productBDO.ProductID;
                Product productInDB = (from p in NWEntities.Products
                                       where p.ProductID == productID
                                       select p).FirstOrDefault();
                // check product
                if (productInDB == null)
                {
                    throw new Exception("No product with ID " + productBDO.ProductID);
                }
                NWEntities.Products.Remove(productInDB);
                // update product
                productInDB.ProductName = productBDO.ProductName;
                productInDB.QuantityPerUnit = productBDO.QuantityPerUnit;
                productInDB.UnitPrice = productBDO.UnitPrice;
                productInDB.Discontinued = productBDO.Discontinued;
                productInDB.RowVersion = productBDO.RowVersion;
                NWEntities.Products.Attach(productInDB);
                NWEntities.Entry(productInDB).State = System.Data.EntityState.Modified;
                int num = NWEntities.SaveChanges();
                productBDO.RowVersion = productInDB.RowVersion;
                if (num != 1)
                {
                    ret = false;
                    message = "no product is updated";
                }
            }
            return ret;
        }
    }
}
These are the GetProduct and UpdateProduct data access layer operations. They are quite simple to understand what they do but it’s ok if you don’t want to. Nevertheless, the subject of the post is the transactions. It’s time to implement the Business Logic service interface. Go and add a new C# class library called “NorthwindLogic” and rename the Class.cs file to “ProductLogic”. Add two references, to the NorthwindDAL and NorthwindBDO projects. Paste the following code to the ProductLogic class.
using NorthwindBDO;
using NorthwindDAL;

namespace NorthwindLogic
{
    public class ProductLogic
    {
        ProductDAO productDAO = new ProductDAO();

        public ProductBDO GetProduct(int id)
        {
            return productDAO.GetProduct(id);
        }

        public bool UpdateProduct(ref ProductBDO productBDO, ref string message)
        {
            var productInDB = GetProduct(productBDO.ProductID);
            // invalid product to update
            if (productInDB == null)
            {
                message = "cannot get product for this ID";
                return false;
            }
            // a product cannot be discontinued
            // if there are non-fulfilled orders
            if (productBDO.Discontinued == true && productInDB.UnitsOnOrder > 0)
            {
                message = "cannot discontinue this product";
                return false;
            }
            else
            {
                return productDAO.UpdateProduct(ref productBDO, ref message);
            }
        }
    }
}
You will see that the Logic layer make calls to the DAL layer to get and update products. It contains also some logic operations such as to check if the product which the client wants to update and discontinue has UnitsOnOrder in database. This means that it cannot be discontinued yet. Go to your Service layer project “NorthwindService”. Add references to NorthwindBDO and NorthwindLogic projects and paste the following code to the “NorthwindService.cs” file.
using NorthwindBDO;
using NorthwindLogic;

namespace NorthwindService
{
    // NOTE: You can use the "Rename" command on the "Refactor" menu to change the class name "Service1" in both code and config file together.
    public class NorthwindService : INorthwindService
    {
        ProductLogic productLogic = new ProductLogic();

        public Product GetProduct(int id)
        {
            ProductBDO productBDO = null;
            try
            {
                productBDO = productLogic.GetProduct(id);
            }
            catch (Exception e)
            {
                string msg = e.Message;
                string reason = "GetProduct Exception";
                throw new FaultException<ProductFault>(new ProductFault(msg), reason);
            }
            if (productBDO == null)
            {
                string msg = string.Format("No product found for id {0}", id);
                string reason = "GetProduct Empty Product";
                throw new FaultException<ProductFault>(new ProductFault(msg), reason);
            }
            Product product = new Product();
            TranslateProductBDOToProductDTO(productBDO, product);
            return product;
        }

        public bool UpdateProduct(ref Product product, ref string message)
        {
            bool result = true;
            // first check to see if it is a valid price
            /*if (product.UnitPrice <= 0)
            {
                message = "Price cannot be <= 0";
                result = false;
            }*/
            // ProductName can't be empty
            if (string.IsNullOrEmpty(product.ProductName))
            {
                message = "Product name cannot be empty";
                result = false;
            }
            // QuantityPerUnit can't be empty
            else if (string.IsNullOrEmpty(product.QuantityPerUnit))
            {
                message = "Quantity cannot be empty";
                result = false;
            }
            else
            {
                try
                {
                    var productBDO = new ProductBDO();
                    TranslateProductDTOToProductBDO(product, productBDO);
                    result = productLogic.UpdateProduct(ref productBDO, ref message);
                    product.RowVersion = productBDO.RowVersion;
                }
                catch (Exception e)
                {
                    string msg = e.Message;
                    throw new FaultException<ProductFault>(new ProductFault(msg), msg);
                }
            }
            return result;
        }

        private void TranslateProductBDOToProductDTO(ProductBDO productBDO, Product product)
        {
            product.ProductID = productBDO.ProductID;
            product.ProductName = productBDO.ProductName;
            product.QuantityPerUnit = productBDO.QuantityPerUnit;
            product.UnitPrice = productBDO.UnitPrice;
            product.Discontinued = productBDO.Discontinued;
            product.RowVersion = productBDO.RowVersion;
        }
        private void TranslateProductDTOToProductBDO(Product product, ProductBDO productBDO)
        {
            productBDO.ProductID = product.ProductID;
            productBDO.ProductName = product.ProductName;
            productBDO.QuantityPerUnit = product.QuantityPerUnit;
            productBDO.UnitPrice = product.UnitPrice;
            productBDO.Discontinued = product.Discontinued;
            productBDO.RowVersion = product.RowVersion;
        }
    }
}
Before try to host our service we need to make some configurations in the App.config file of the NorthwindService project. First add the connectionStrings element exist in the NorthwindDAO project and then modify the base address of the host element (you need to change it because we renamed the default names and we will host it in IIS).
<?xml version="1.0" encoding="utf-8" ?>
<configuration>
<connectionStrings>
<add name="NorthwindEntities" connectionString="metadata=res://*/Northwind.csdl|res://*/Northwind.ssdl|res://*/Northwind.msl;provider=System.Data.SqlClient;provider connection string="data source=DEVELOPER-PC;initial catalog=Northwind;integrated security=True;MultipleActiveResultSets=True;App=EntityFramework"" providerName="System.Data.EntityClient" />
</connectionStrings>
<appSettings>
<add key="aspnet:UseTaskFriendlySynchronizationContext" value="true" />
</appSettings>
<system.web>
<compilation debug="true" />
</system.web>
<!-- When deploying the service library project, the content of the config file must be added to the host's
app.config file. System.Configuration does not support config files for libraries. -->
<system.serviceModel>
<services>
<service name="NorthwindService.NorthwindService">
<endpoint address="" binding="basicHttpBinding" contract="NorthwindService.INorthwindService">
<identity>
<dns value="localhost" />
</identity>
</endpoint>
<endpoint address="mex" binding="mexHttpBinding" contract="IMetadataExchange" />
<host>
<baseAddresses>
<add baseAddress="http://localhost:8090//NorthwindService/NorthwindService/" />
</baseAddresses>
</host>
</service>
</services>
<behaviors>
<serviceBehaviors>
<behavior>
<!-- To avoid disclosing metadata information,
set the values below to false before deployment -->
<serviceMetadata httpGetEnabled="True" httpsGetEnabled="True"/>
<!-- To receive exception details in faults for debugging purposes,
set the value below to true. Set to false before deployment
to avoid disclosing exception information -->
<serviceDebug includeExceptionDetailInFaults="False" />
</behavior>
</serviceBehaviors>
</behaviors>
</system.serviceModel>
</configuration>
Finally your solution should look this way now. Build it, you should get no errors.

Set the NorthwindService project as the Startup project and run it without debugging. The WcfSvcHost will start and the WCF Client window will appear. Double click the GetProduct operation and enter a valid id. You will get the product details. Test if you want the UpdateProduct operation too. Make sure you enter valid values. This is the end of the first part of these series discussing how to enable transactions in WCF services. In the next post we ‘ll host the service in IIS and verify that by default, transactions aren’t supported.
Categories: WCF

Leave a comment