By default distributed transactions aren’t supported in WCF services in this post is going to prove it. We will continue from the Part 1 from these series, where we created all our service layers. Next thing we have to do is host the service in IIS and test it. I assume you have read Part 1 and you follow along.
In the NorthwindService project (WCF Service library) right click the App.config file, select copy and paste it again in the project. This will create a “Copy of App.config” file. Rename that new file to “Web.config”. IIS needs that file to host the service. Withing the Web.config file add a “serviceHostingEnvironment” element and delete the existing host element.
<?xml version="1.0" encoding="utf-8" ?>
<configuration>
<connectionStrings>
<add name="NorthwindEntities" connectionString="metadata=res://*/Northwind.csdl|res://*/Northwind.ssdl|res://*/Northwind.msl;provider=System.Data.SqlClient;provider connection string="data source=DEVELOPER-PC;initial catalog=Northwind;integrated security=True;MultipleActiveResultSets=True;App=EntityFramework"" providerName="System.Data.EntityClient" />
</connectionStrings>
<appSettings>
<add key="aspnet:UseTaskFriendlySynchronizationContext" value="true" />
</appSettings>
<system.web>
<compilation debug="true" />
</system.web>
<!-- When deploying the service library project, the content of the config file must be added to the host's
app.config file. System.Configuration does not support config files for libraries. -->
<system.serviceModel>
<serviceHostingEnvironment >
<serviceActivations>
<add factory="System.ServiceModel.Activation.ServiceHostFactory"
relativeAddress="./NorthwindService.svc"
service="NorthwindService.NorthwindService"/>
</serviceActivations>
</serviceHostingEnvironment>
<services>
<service name="NorthwindService.NorthwindService">
<endpoint address="" binding="wsHttpBinding" contract="NorthwindService.INorthwindService">
<identity>
<dns value="localhost" />
</identity>
</endpoint>
<endpoint address="mex" binding="mexHttpBinding" contract="IMetadataExchange" />
</service>
</services>
<behaviors>
<serviceBehaviors>
<behavior>
<!-- To avoid disclosing metadata information,
set the values below to false before deployment -->
<serviceMetadata httpGetEnabled="True" httpsGetEnabled="True"/>
<!-- To receive exception details in faults for debugging purposes,
set the value below to true. Set to false before deployment
to avoid disclosing exception information -->
<serviceDebug includeExceptionDetailInFaults="False" />
</behavior>
</serviceBehaviors>
</behaviors>
</system.serviceModel>
</configuration>
Now it’s time to host the service in IIS. Open IIS manager, right click the Default Web Site and add a new application called “NorthwindService”. Set it’s physical path to the “NorthwindService” project folder. Make sure that the DefaultAppPool is selected as the application pool and it is a .NET 4.0 application pool. Right click the Nonrthwind project and select properties. Select the Build events tab and paste the following code to the Post Build event command line.
copy .\*.* ..\

This will ensure that the service hosted in IIS will be always up-to-date. Right click the Northwind project and select Rebuilt. Open your browser and enter the following url. You should see your service hosted in IIS running.
http://localhost/NorthwindService/NorthwindService.svc
Now it’s time to get serious. We are going to create an ASP.NET website which will play the role of our client. Right click the solution and add an empty ASP.NET website named “NorthwindClient” under solution’s folder. Add a new web form leaving it’s default name (Default.aspx). Paste the following code to that page and run in in your browser to see how it looks like.
<%@ Page Language="C#" AutoEventWireup="true" CodeFile="Default.aspx.cs" Inherits="_Default" %>
<!DOCTYPE html>
<html xmlns="http://www.w3.org/1999/xhtml">
<head runat="server">
<title></title>
<style type="text/css">
.auto-style1 {
width: 100%;
}
.auto-style2 {
width: 365px;
}
</style>
</head>
<body style="background-color:lightsteelblue">
<form id="form1" runat="server">
<div>
<asp:Label ID="Label1" runat="server" Text="Product ID:"></asp:Label>
<asp:TextBox ID="txtProductID1" runat="server"></asp:TextBox>
<asp:TextBox ID="txtProductID2" runat="server"></asp:TextBox>
<asp:Button ID="btnGetProduct" runat="server" Text="Get Product Details" />
<hr /><br />
<table class="auto-style1">
<tr>
<td class="auto-style2">
<asp:Label ID="Label2" runat="server" Text="Product1 Details"></asp:Label>
</td>
<td>
<asp:Label ID="Label3" runat="server" Text="Product2 Details"></asp:Label>
</td>
</tr>
<tr>
<td class="auto-style2">
<asp:TextBox ID="txtProduct1Details" runat="server" Height="116px" ReadOnly="True" TextMode="MultiLine" Width="350px"></asp:TextBox>
</td>
<td>
<asp:TextBox ID="txtProduct2Details" runat="server" Height="116px" ReadOnly="True" TextMode="MultiLine" Width="350px"></asp:TextBox>
</td>
</tr>
</table>
<hr />
<asp:Label ID="Label4" runat="server" Text="New Price"></asp:Label>
<asp:TextBox ID="txtNewPrice1" runat="server"></asp:TextBox>
<asp:TextBox ID="txtNewPrice2" runat="server"></asp:TextBox>
<asp:Button ID="btnUpdatePrice" runat="server" Text="Update Price" />
<br /><br />
<hr /><br />
<table class="auto-style1">
<tr>
<td class="auto-style2">
<asp:Label ID="Label5" runat="server" Text="Update 1 Results"></asp:Label>
</td>
<td>
<asp:Label ID="Label6" runat="server" Text="Update 2 Results"></asp:Label>
</td>
</tr>
<tr>
<td class="auto-style2">
<asp:TextBox ID="txtUpdate1Results" runat="server" Height="116px" ReadOnly="True" TextMode="MultiLine" Width="350px"></asp:TextBox>
</td>
<td>
<asp:TextBox ID="txtUpdate2Results" runat="server" Height="116px" ReadOnly="True" TextMode="MultiLine" Width="350px"></asp:TextBox>
</td>
</tr>
</table>
</div>
</form>
</body>
</html>

As you can see I created two textboxes to retrieve details for two products by clicking the “Get Product Details” button.. We will try to update prices of these products by clicking the “Update Price” button. On purpose the one update operation will fail. We will see that the other one succeeded by checking the price in the database. We will try the same scenario by including the two update calls in a transaction scope and see that again, the database was updated (which means transactions are NOT supported yet). Right click the website and select “Add a service reference..”. As address put the address of the service hosted in IIS and as namespace “NorthwindServiceProxy”.
We need to add some code to the code behind file of Default.aspx page. Switch to Default.aspx.cs and paste the following code. What it does is to retrieve product details for both product ids entered and maintain these products in the product1 and product2 variables. Before pasting the code, make sure you switch to Design view and double click the two buttons so the handler functions will be created and also relative code will be added to the Default.aspx page.
using NorthwindServiceProxy;
using System.Text;

public partial class _Default : System.Web.UI.Page
{
    Product product1, product2;

    protected void Page_Load(object sender, EventArgs e)
    {
        if (Page.IsPostBack)
        {
            txtProduct1Details.Text = GetProduct(txtProductID1, ref product1);
            txtProduct2Details.Text = GetProduct(txtProductID2, ref product2);
        }
    }
    protected void btnGetProduct_Click(object sender, EventArgs e)
    {
        txtProduct1Details.Text = GetProduct(txtProductID1, ref product1);
        txtProduct2Details.Text = GetProduct(txtProductID2, ref product2);
    }
    private string GetProduct(TextBox txtProductID, ref Product product)
    {
        string result = "";
        try
        {
            int productID = Int32.Parse(txtProductID.Text);
            var client = new NorthwindServiceClient();
            product = client.GetProduct(productID);
            var sb = new StringBuilder();
            sb.Append("ProductID:" + product.ProductID.ToString() + "\n");
            sb.Append("ProductName:" + product.ProductName + "\n");
            sb.Append("UnitPrice:" + product.UnitPrice.ToString() + "\n");
            sb.Append("RowVersion:");
            foreach (var x in
            product.RowVersion.AsEnumerable())
            {
                sb.Append(x.ToString());
                sb.Append(" ");
            }
            result = sb.ToString();
        }
        catch (Exception ex)
        {
            result = "Exception: " + ex.Message.ToString();
        }
        return result;
    }
}
Set the client’s website project as the Startup project and run without debugging. Enter two valid values for product id and click the “Get product details” button. I entered 20,21.
Add the following code in the code behind file. This code updates product prices for the above products retrieved.
private string UpdatePrice(TextBox txtNewPrice, ref Product product, ref bool updateResult)
    {
        string result = "";
        string message = "";
        try
        {
            product.UnitPrice = Decimal.Parse(txtNewPrice.Text);
            var client = new NorthwindServiceClient();
            updateResult = client.UpdateProduct(ref product, ref message);
            var sb = new StringBuilder();
            if (updateResult == true)
            {
                sb.Append("Price updated to ");
                sb.Append(txtNewPrice.Text.ToString());
                sb.Append("\n");
                sb.Append("Update result:");
                sb.Append(updateResult.ToString());
                sb.Append("\n");
                sb.Append("Update message:");
                sb.Append(message);
                sb.Append("\n");
                sb.Append("New RowVersion:");
            }
            else
            {
                sb.Append("Price not updated to ");
                sb.Append(txtNewPrice.Text.ToString());
                sb.Append("\n");
                sb.Append("Update result:");
                sb.Append(updateResult.ToString());
                sb.Append("\n");
                sb.Append("Update message:");
                sb.Append(message);
                sb.Append("\n");
                sb.Append("Old RowVersion:");
            }
            foreach (var x in product.RowVersion.AsEnumerable())
            {
                sb.Append(x.ToString());
                sb.Append(" ");
            }
            result = sb.ToString();
        }
        catch (Exception ex)
        {
            result = "Exception: " + ex.Message;
        }
        return result;
    }

    protected void btnUpdatePrice_Click(object sender, EventArgs e)
    {
        if (product1 == null)
        {
            txtUpdate1Results.Text = "Get product details first";
        }
        else if (product2 == null)
        {
            txtUpdate2Results.Text = "Get product details first";
        }
        else
        {
            bool update1Result = false, update2Result = false;
            txtUpdate1Results.Text = UpdatePrice(txtNewPrice1, ref product1, ref update1Result);
            txtUpdate2Results.Text = UpdatePrice(txtNewPrice2, ref product2, ref update2Result);
        }
    }
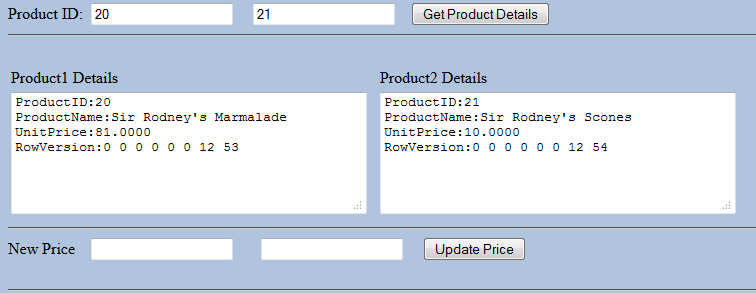
Finally it’s time to start testing the distributed transaction support. Run the website without debugging. First we will ensure that the service works normal with valid values. Enter 20 and 21 for product ids and click to retrieve the details. You can see that Unit Price for product1 = 81 and for second’s = 10. Put new price for the first product 82 and for second’s 11. Click “Update Price” button and make sure that prices are updated (you can click again “Get Product Details” button and verify).

Absolute perfect till now.Now enter 83 for first product’s Unit Price and a negative value for second’s product Unit Price. Can you see what happened?
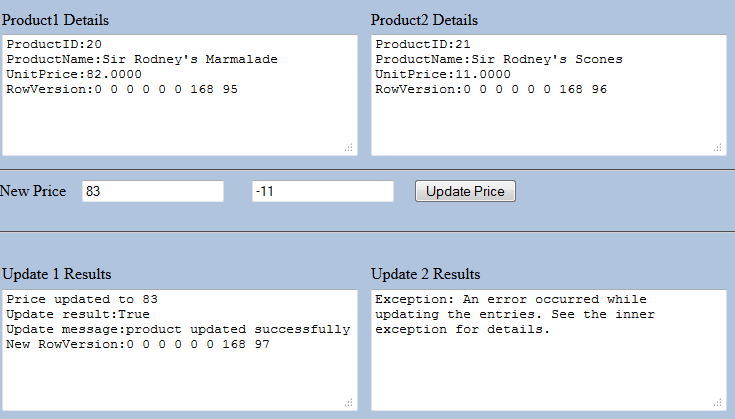
The Unit Price of first product was successfully updated (you can verify it from database “Products” table) while the second update failed. This is normal though, we actually knew what’s gonna happen. Now we want to wrap both of the update calls in a Transaction Scope and see if the first update operation will roll back. Add a “System.Transactions” reference in the client project. Add a using statement for System.Transaction namespace in the code behind file. Modify the handler for the “Update Price” button to enclose update operations into a TransactionScope as follow.
protected void btnUpdatePrice_Click(object sender, EventArgs e)
    {
        if (product1 == null)
        {
            txtUpdate1Results.Text = "Get product details first";
        }
        else if (product2 == null)
        {
            txtUpdate2Results.Text = "Get product details first";
        }
        else
        {
            bool update1Result = false, update2Result = false;
            using (var transaction = new TransactionScope())
            {
                txtUpdate1Results.Text = UpdatePrice(txtNewPrice1, ref product1, ref update1Result);
                txtUpdate2Results.Text = UpdatePrice(txtNewPrice2, ref product2, ref update2Result);
                if (update1Result == true && update2Result == true)
                    transaction.Complete();
            }
        }
    }
Run the client website again in the same way we did before. You will be disappointed seeing that still transaction isn’t supported! Despite the fact that we wrapped both the update calls into a TransactionScope, the first update call wasn’t rolled back as it should, but instead, committed to the database.
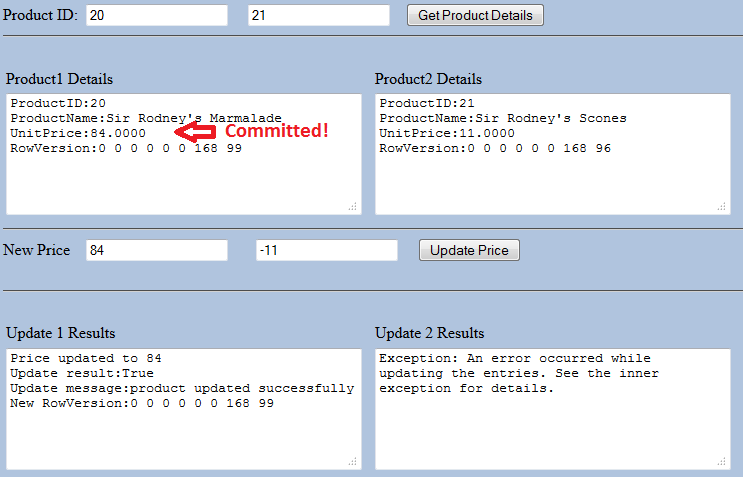
The above picture shows the result after I clicked the “Update Button” to update first product’s Unit Price from 83 to 84 and second product’s from 11 to -11. Then I clicked the “Get Product Details” button again to see if the new Unit Price for the first product was committed to the database. Apparently, it did.
We are almost there so hang on, in the next post we are going to see how to finally support transactions in our WCF service. I hope you enjoyed the post.

Leave a comment