If you are an ASP.NET developer you should definitely understand the Page’s Life Cycle stages and all events raise during that cycle. Server controls also raise their own events and because of the fact that their life cycle is strongly connected to the Page’s one, you must know the exact page’s stage and event to dynamically initialize them or populate their properties. This post will try to make things a little bit more clearer. Open Visual Studio and create a new empty ASP.NET website. You will need only one page to run the examples so go and add a new web form. You may leave it’s default name. Make sure the “Place code in separate file checkbox” is checked. Switch to the Source view and add a table with one row and two columns as follow. Add a button in order to cause PostBacks. The first thing we gonna see is the Page’s Life Cycle events and the order they occur when the page is requested for first time or during a PostBack.
<%@ Page Language="C#" AutoEventWireup="true" CodeFile="Default.aspx.cs" Inherits="_Default" %>

<!DOCTYPE html>

<html xmlns="http://www.w3.org/1999/xhtml">
<head runat="server">
    <title></title>
</head>
<body style="background-color:lightsteelblue">
    <form id="form1" runat="server">
    <div>
    <table>
        <tr>
            <td>
                <h1 style="color:green">No PostBack</h1>
                <asp:Label ID="NoPostBack" runat="server" /></td>
            <td>
                <h1 style="color:red">PostBack</h1>
                <asp:Label ID="PostBack" runat="server" /></td>
        </tr>
    </table>
        <br /><br />
        <asp:Button ID="btnPostBack" runat="server" Text="Cause PostBack" />
    </div>
    </form>
</body>
</html>
In order to see the time that page’s event occur, we will add some code in the code behind file. Add the following private method in the Default.aspx.cs file. Also, add a using statement in the page, for the “System.Runtime.CompilerServices” namespace.
private void WriteMessage([CallerMemberName] string handlerName = "")
    {
        if (Page.IsPostBack)
        {
            PostBack.Text += handlerName + "<br />";
        }
        else
        {
            NoPostBack.Text += handlerName + "<br />";
        }
    }
This simple method when called with no parameter passed, does nothing but writing in the page the name of the caller method (handlerName). If the method is called with a string parameter then this string will be written in the page. Now bind this method in each Page’s lice cycle event, so when you run the Default.aspx page, see the order that Page’s events occur.
using System.Runtime.CompilerServices;

public partial class _Default : System.Web.UI.Page
{

    protected void Page_PreInit(object sender, EventArgs e)
    {
        WriteMessage();
    }

    protected void Page_Init(object sender, EventArgs e)
    {
        WriteMessage();
    }

    protected void Page_InitComplete(object sender, EventArgs e)
    {
        WriteMessage();
    }

    protected void Page_PreLoad(object sender, EventArgs e)
    {
        WriteMessage();
    }

    protected void Page_Load(object sender, EventArgs e)
    {
        WriteMessage();
    }

    protected void Page_LoadComplete(object sender, EventArgs e)
    {
        WriteMessage();
    }

    protected void Page_PreRender(object sender, EventArgs e)
    {
        WriteMessage();
    }

    protected void Page_PreRenderComplete(object sender, EventArgs e)
    {
        WriteMessage("Page_PreRenderComplete<br /> — — — — — — — — ");
    }

    private void WriteMessage([CallerMemberName] string handlerName = "")
    {
        if (Page.IsPostBack)
        {
            PostBack.Text += handlerName + "<br />";
        }
        else
        {
            NoPostBack.Text += handlerName + "<br />";
        }
    }
}
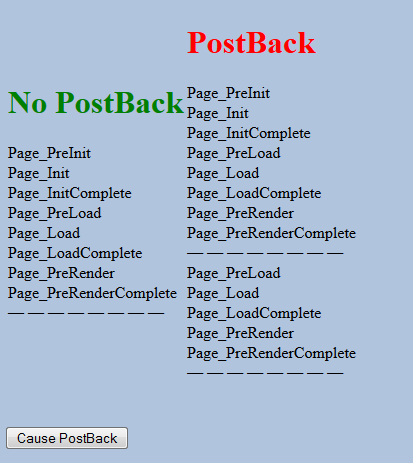
Run the Default.aspx page in your browser and notice the order that Page’s events occur when the page is loading for first time. Cause two PostBacks by clicking the “Cause PostBack” button and see the difference. You can see that after the second PostBack the “Init” events don’t occur.
Now let’s see the life cycle’s events of a data control. Right click your website and create a new ADO.NET Entity Model adding only one table to that model. I created a “VideoGamesModel.edmx” where I added only one table called “Genres” with three columns, “Id”, “Name”, “SortOrder”. When you finish, drop a GridView control in your page, under the table, switch to Design View and bind it’s datasource to an EntityDataSource through it’s Smart Tasks panel (choose new Data Source -> Entity -> Choose the connectionString added when you created your Entity Model -> Select your column and click finish. Enable sorting in your GridView control.

My GridView control source code look like this. (Yours may look different since you chose different database table).
<asp:GridView ID="GridView1" runat="server" AllowPaging="True" AutoGenerateColumns="False" DataKeyNames="Id" DataSourceID="EntityDataSource1">
            <Columns>
                <asp:BoundField DataField="Id" HeaderText="Id" ReadOnly="True" SortExpression="Id" />
                <asp:BoundField DataField="Name" HeaderText="Name" SortExpression="Name" />
                <asp:BoundField DataField="SortOrder" HeaderText="SortOrder" SortExpression="SortOrder" />
            </Columns>
        </asp:GridView>
        <asp:EntityDataSource ID="EntityDataSource1" runat="server"
           ConnectionString="name=VideoGamesEntities"
            DefaultContainerName="VideoGamesEntities" EnableFlattening="False" EntitySetName="Genres">
        </asp:EntityDataSource>
While in Design view, click the GridView control and find the events tab in the properties window. Double click as many events as you want and set up their respective handlers in the code behind file (You will have to go back and forward between the Code behind file and the Design view). I double clicked the Sorted, Sorting, RowCreated, DataBinding, DataBound, RowDataBound events. Do the same for the EntityDataSource control by setting handlers for the ContextCreating and Selecting events. To each of these handlers you have added, just add a call to WriteMessage() method we created before.
protected void GridView1_Sorted(object sender, EventArgs e)
    {
        WriteMessage();
    }
    protected void GridView1_Sorting(object sender, GridViewSortEventArgs e)
    {
        WriteMessage();
    }
    protected void GridView1_DataBinding(object sender, EventArgs e)
    {
        WriteMessage();
    }
    protected void GridView1_DataBound(object sender, EventArgs e)
    {
        WriteMessage();
    }
    protected void GridView1_RowDataBound(object sender, GridViewRowEventArgs e)
    {
        WriteMessage();
    }
    protected void GridView1_RowCreated(object sender, GridViewRowEventArgs e)
    {
        WriteMessage();
    }
    protected void EntityDataSource1_ContextCreating(object sender, EntityDataSourceContextCreatingEventArgs e)
    {
        WriteMessage();
    }
    protected void EntityDataSource1_Selecting(object sender, EntityDataSourceSelectingEventArgs e)
    {
        WriteMessage();
    }
Save all your changes and run the Default.aspx page again. Press the button to cause a PostBack. Too much to notice this time.
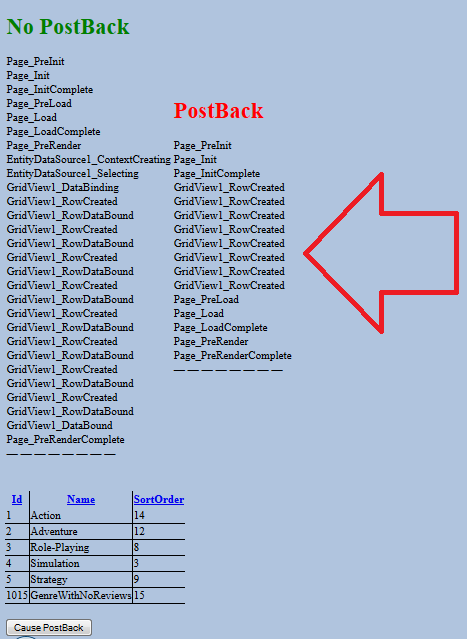
The RowCreated and RowDataBound events are repeated once for each Genre record (6) plus two for header and footer records. When the Page loads for first time and after the Page_LoadComplete and Page_PreRender events, the GridView control sees that is hooked up to an Entity DataSource control and asks it to retrieve the respective data. This causes the ContextCreating and Selecting events to be triggered and as soon as the GridView receives data from the Entity DataSource, the DataBinding event fires. For each item in the datasource, the RowCreated and RowDataBound events are triggered. When all data are bound the DataBound event occurs. On the other hand, when PostBack occurs, you don’t see either any RowDataBound, DataBound or Entity’s DataSource events. This is because the GridView control is able to reconstruct the entire control from the ViewState field. Add also the WriteMessage method in the Button event handler. Also try to sort the table by clicking a header text in the GridView.

Notice that the Sorting and Sorted GridView’s events, fire before the EntityDataSource gets it’s data. This is because the GridView by itself, cannot handle sorting but instead only exposes the sorting parameters to other controls. The Entity DataSource retrieves the sorting parameters from the GridView control and the actual sorting takes place only in a database level. If you want to learn more about control events and the way the occur during a Page life cycle, add any control you want in your page and work in the same way we did.
Categories: ASP.NET

very nice writeup.clearly understandable.:)
Thanx for valuable Note..
Greeat reading this