Code First is probably the most preferred way to build an Entity Data Model that can be used with Entity Framework to perform data access. Database First and Model First are the also quite important but less used. In Code First modeling, you define your domain classes and mapping in.. code (yeap this is where it’s name comes from). You need to know that Code First is all about conventions and configurations. For example, it assumes that each of your domain classes have a key property otherwise you will get an exception. If a property on a domain class ends with “Id” it is going to be treated as a key property automatically, otherwise you will have to annotate at least on property with the [Key] annotation. We ‘ll skip the theory and will go straight forward to practice. In this post we will see how to use Code First to:
- Build the Domain Classes
- Introduce Domain Classes to the Entity Framework
- Create the Database
- Configurations
- The Fluent API style
Build the Domain Classes
Start by creating a simple solution in your Visual Studio, named FighterAircrafts. Add a class library project to your solution, named Model. This is where we will define our model classes. Add the first Domain Model c# class, named “Aircraft” and paste the following code.
public class Aircraft
    {
        public int AircraftId { get; set; }
        public string Name { get; set; }
        public decimal Winspan { get; set; }
        public string Description { get; set; }
        public byte[] Photo { get; set; }

        public List<Order> Orders { get; set; }
    }
Add another Domain Class named Order with the following code:
public class Order
    {
        public int OrderId { get; set; }
        public string Customer { get; set; }
        public bool IsCompleted { get; set; }

        public Aircraft Aircraft { get; set; }
    }
This is pretty much our domain model, at least for start, where you will have already figured out that each Aircraft object is related with many Orders and an Order object can be related with only one Aircraft (One-To-Many Relationship).
Introduce Domain Classes to the Entity Framework
Let’s create the Data Layer now. Right click your solution and add another class library, named DataAccess. In order to make use of the Entity Framework you need to install it first. Right click your DataAccess project and choose Manage Nuget Packages... From the online tab, search for Entity Framework and install it. At the end of the installation you will see that an Entity Framework reference has been added to your project. At a reference to the Model project too. Add a new class named AircraftsContext that inherits from the DbContext class. Make sure you add the required using statements as well.
using System.Data.Entity;
using Model;

namespace DataAccess
{
    public class AircraftsContext : DbContext
    {
        public DbSet<Aircraft> Aircrafts { get; set; }

        public DbSet<Order> Orders { get; set; }
    }
}
Believe it or not, you have finished building your Entity Framework Code First model. Notice that we haven’t provide EF with any connection string so it’s going to work with the default behavior. That’s ok for now, we are going to see more Code First database initialization capabilities in future posts, that’s for sure.
Create the Database
Add another AircraftsClient console application project to your solution and set it as the start up project. Install Entity Framework as we did before and add two references to the DataAccess and Model projects too. We will add an InsertAircraft function which will make use of our DataAccess AircraftsContext class, in order to add an Aircraft object. Call this method in you main method as follow.
using Model;
using DataAccess;

namespace AircraftsClient
{
    class Program
    {
        static void Main(string[] args)
        {
            InsertAircraft();
        }

        static void InsertAircraft()
        {
            var aircraft = new Aircraft
            {
                Name = "F-16",
                Winspan = 9.96m,
                Description = "The General Dynamics F-16 Fighting Falcon " +
                "is a single-engine multirole fighter aircraft"
            };
            using (var context = new AircraftsContext())
            {
                context.Aircrafts.Add(aircraft);
                context.SaveChanges();
            }
        }
    }
}
That’s it, build and run your application. You will see nothing in your console but the interesting thing is what happened behind the scenes. If you have SQLEXPRESS installed on your PC then a new database named DataAccess.AircraftsContext has been created in your localhost/SqlExpress instance. If you haven’t SqlExpress installed (like me) then the database has been created in the (localdb)\v11.0 instance. Go and check it.

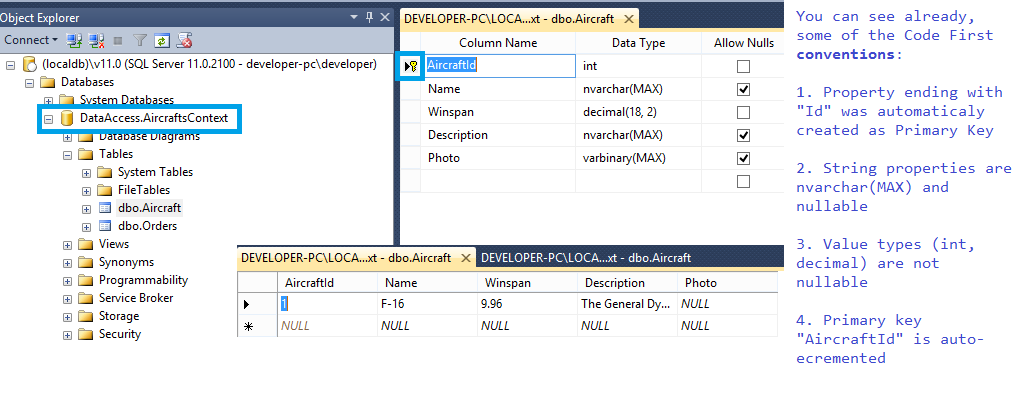
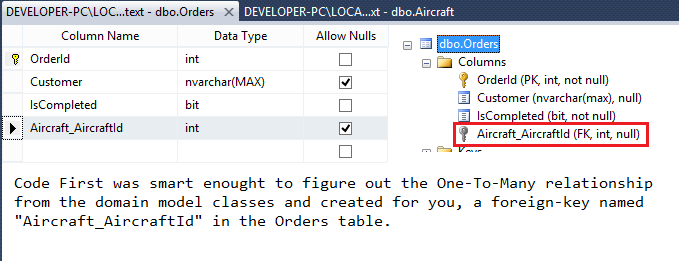
Besides the conventions are mentioned on the image above, notice something interesting: Code First was able to understand the One-To-Many relationship between Aircraft and Order domain model classes and created a foreign key in the Orders table for you.
Configurations
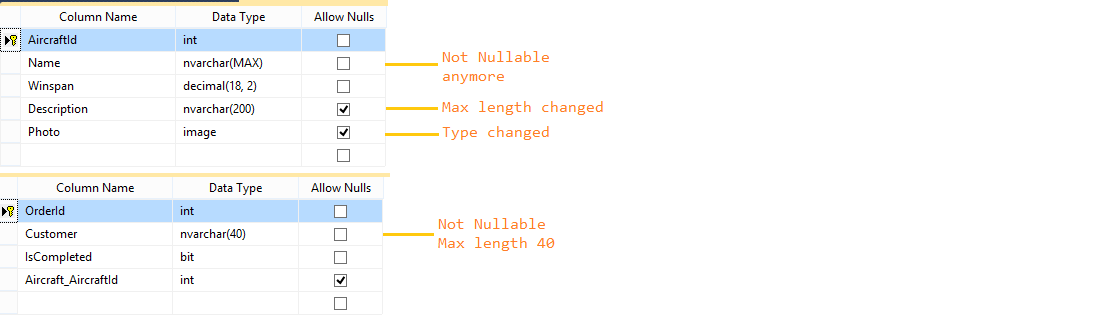
We saw how Code First handled our model classes and created a database with the default behavior-conventions for our properties. It’s time to tell EF exactly how we want the database schema to be created. Let’s assume that we want to make the “Name” property of the Aircraft class not-nullable (as a string by default it is), limit the “Description” property to 200 characters (by default nvarchar(MAX)) and change the “Photo” property from varbinary(MAX) to “image”.
There are three different ways to configure your domain model classes and the most used is Data Annotations. In this way, you annotate each property you want to configure and EF will handle the rest. Before continuing, install Entity Framework in your Model project and add a reference to System.ComponentModel.DataAnnotations Change the Aircraft class as follow to reflect the changes we want.
using System.ComponentModel.DataAnnotations;
using System.ComponentModel.DataAnnotations.Schema;

namespace Model
{
    public class Aircraft
    {
        public int AircraftId { get; set; }
        [Required]
        public string Name { get; set; }
        public decimal Winspan { get; set; }
        [MaxLength(200)]
        public string Description { get; set; }
        [Column(TypeName="image")]
        public byte[] Photo { get; set; }

        public List<Order> Orders { get; set; }
    }
}
More over, make the “Name” property in the Order class to be both Required and Maxlength(40)
using System.ComponentModel.DataAnnotations;

namespace Model
{
    public class Order
    {
        public int OrderId { get; set; }
        [Required]
        [MaxLength(40)]
        public string Customer { get; set; }
        public bool IsCompleted { get; set; }

        public Aircraft Aircraft { get; set; }
    }
}
Now if you try to build and run your application you will get a nice InvalidOperationException because by default, Code First will create the database only if it doesn’t already exist, but your
database does exist.
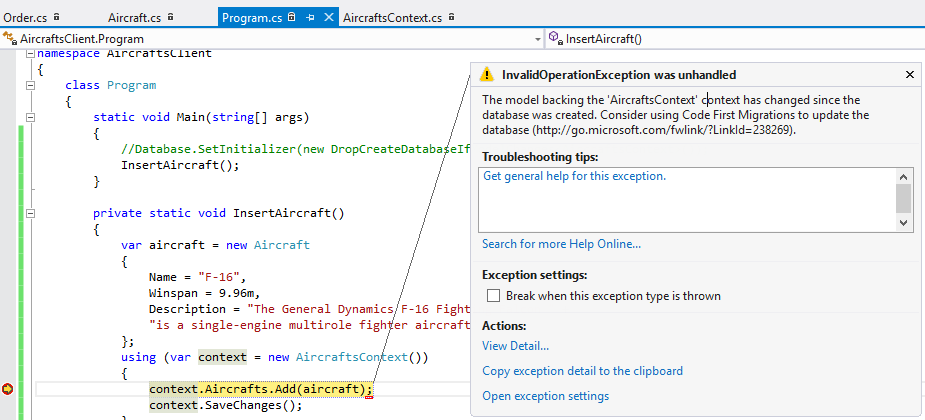
So somehow, you need to tell EF to re-create the database when Model changes. Add the following statement before the call to InsertAircraft in your main method.
using System.Data.Entity;

namespace AircraftsClient
{
    class Program
    {
        static void Main(string[] args)
        {
            Database.SetInitializer(new DropCreateDatabaseIfModelChanges<AircraftsContext>());
            InsertAircraft();
        }
        // Rest of code omitted
Again, before running your application make sure you have released the respective database (close any query commands you have opened or other windows related to your database). You don’t have to close the SQL Management Studio entirely. When you complete successfully notice the changes in your newly created database.
I could keep writing about other configurations you could make but I think we can leave it for the next post of these series. Instead, I prefer to introduce you a new way to define your configurations in the Code First model. The Fluent API.
The Fluent API style
So what is the Fluent API? Fluent API is an alternative and powerful way to overwrite the the default Code First conventions. Instead of using Annotations as we did before on the Domain Classes, you can write code somewhere else while keeping the same impact. Why on earth would someone prefer this way? I do actually prefer Fluent API and the first reason why is that in this way you can keep your Domain Classes clear. If you think it, these are Domain Model classes, nothing more. You can but you aren’t supposed to mix model class code with configuration code. The other reason I prefer Fluent API is that it has some extra features that DataAnnotations don’t support. To use Fluent API you need to override the DbContext.OnModelCreating method inside the “AircraftsContext” class. Check the following code inside the AircraftsContext that cause the same configuration we made before with DataAnnnotations. You can comment out the DataAnnotations on your model classes now.
public class AircraftsContext : DbContext
    {
        public DbSet<Aircraft> Aircrafts { get; set; }

        public DbSet<Order> Orders { get; set; }

        protected override void OnModelCreating(DbModelBuilder modelBuilder)
        {
            // Fluent API configurations for Aircraft Domain Model
            modelBuilder.Entity<Aircraft>().Property(a => a.Name).IsRequired();
            modelBuilder.Entity<Aircraft>().Property(a => a.Description).HasMaxLength(200);
            modelBuilder.Entity<Aircraft>().Property(a => a.Photo).HasColumnType("image");

            // Fluent API configurations for Order Domain Model
            modelBuilder.Entity<Order>().Property(o => o.Customer).IsRequired().HasMaxLength(40);
        }
    }
It’s quite self-explanatory how the above code works, so I won’t explain it. If you run your application with the Fluent API configurations only, you will see that your database won’t be re-created since EF is smart enough to understand that the model hasn’t changed at all. Hense, you will see two Aircraft records in your database. Fluent API has another nice feature. If you don’t like to paste all the configuration settings for all Model classes inside the DbContext.OnModelCreating method, you can create a Configuration class for each Domain Model class, write inside it the Fluent API configurations and simple add this configuration class in the DbContext.OnModelCreating method. Let’s see how this works. Add a folder named FluentAPIConfigurations in your DataAccess project and create two classes named AircraftConfiguration and OrderConfiguration as follow.
using System.Data.Entity.ModelConfiguration;
using Model;

namespace DataAccess.FluentAPIConfigurations
{
    public class AircraftConfiguration : EntityTypeConfiguration<Aircraft>
    {
        public AircraftConfiguration()
        {
            Property(a => a.Name).IsRequired();
            Property(a => a.Description).HasMaxLength(200);
            Property(a => a.Photo).HasColumnType("image");
        }
    }
}
using System.Data.Entity.ModelConfiguration;
using Model;

namespace DataAccess.FluentAPIConfigurations
{
    public class OrderConfiguration : EntityTypeConfiguration<Order>
    {
        public OrderConfiguration()
        {
            Property(o => o.Customer).IsRequired().HasMaxLength(40);
        }
    }
}
You will notice that this time you didn’t have to define the Entity type, since each T Domain class inherits from the EntityTypeConfiguration<T> class. To make use of these configuration classes all you need to do is to replace the Fluent API you wrote before with the following.
protected override void OnModelCreating(DbModelBuilder modelBuilder)
        {
            modelBuilder.Configurations.Add(new AircraftConfiguration());
            modelBuilder.Configurations.Add(new OrderConfiguration());
        }
In my opinion, this is the most clear and appropriate way to write Code First configurations. Make sure you don’t mix them, it works but it sucks (:P). To conclude, use either only DataAnnotations inside the Domain classes, either the Fluent API writing all the class configurations in the OnModelCreating method or use configuration classes for each Domain Model class.
That’s it, I hope you take a good look at Code First and how it works by default. In next post of these series will see more configuration settings and Code First initialization and migrations concepts as well. Download the FighterAircrafts project we created from here.
Categories: ADO.NET

Great tutorial. I am researching Entity Framework and using code first and I loved how easy you made it look. I am now trying to find out how to use code first on an established database. Is that possible?
Hi elliiott, yes that’s possible. You can add an ADO.NET Entity Data Model item, choosing the option “Code first from database”, select the connection string to your existing database and the database tables. You can read more about this in the following link:
https://msdn.microsoft.com/en-us/data/jj200620