Sometimes you need to run operations behind the scenes, in a different thread from the one that ASP.NET Framework uses to process Web Pages. Multitasking in Web Pages can be quite tricky and difficult cause meshing with threads can make your pages not responding. Several tutorials exist out on internet about supporting background processes in .NET, but most of them are applied in Windows Forms. If you try to run the same code in ASP.NET Web Forms Application you will probably be disappointed by the fact that pages don’t work pretty well (they usually hang). This post will show you how to use a BackgroundWorker class in order to run background processes in ASP.NET Web Forms. The idea is this: We are going to create a UI and let the user to add Person objects to a list of Person. The Person class will be the following:
public class Person
    {
        public int Id { get; set; }
        public string Name { get; set; }
        public int Age { get; set; }
        public string Address { get; set; }
    }
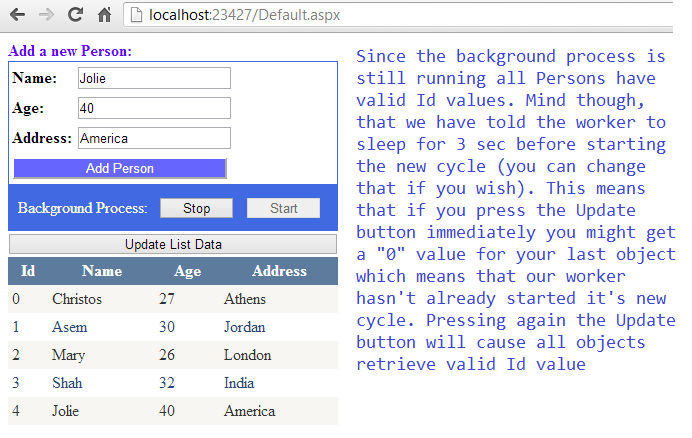
Though, user will not provide value for the Id but instead, we ‘ll let the background process do it for him. We will add a button to display current state of the list in order to check Person’s ID values. Two buttons also are going to be added. The first one will be the STOP button which is going to put the process in IDLE mode (in other words thread is going to sleep) and the START button which is going to restart the process. What we are going to see is that as long as the Background Process is running, all Id property values will have valid/updated values but as long as it’s in IDLE mode, all Person objects that haven’t be processed by the BackgroundWorker object, will have the default value 0. Mind that when I said valid values, I meant that the first Person object must have Id=0, the second Id=1 and so on.

Take a look at the following GIF image and notice that Id values are automatically increased by one by the background process running in Application level.

In VS 2012 add a new ASP.NET Empty Web Application project named AspNetBackgroundProcess. Right click your project and add an Application Configuration file leaving the default name “Global.asax”. You will use this file to create and configure our BackgroundWorker object since it make sense to keep the background process in application level and not in a simple page level. Change Global.asax file contents to the following:
using System;
using System.Collections.Generic;
using System.ComponentModel;
using System.Linq;
using System.Threading;
using System.Web;
using System.Web.Security;
using System.Web.SessionState;

namespace AspNetBackgroundProcess
{
    public class Global : System.Web.HttpApplication
    {
        public static BackgroundWorker worker = new BackgroundWorker();
        public static int ID = 0;
        public static List<Person> personList = new List<Person>();
        public static bool stopWorker = false;

        protected void Application_Start(object sender, EventArgs e)
        {
            worker.DoWork += new DoWorkEventHandler(DoWork);
            worker.WorkerReportsProgress = true;
            worker.WorkerSupportsCancellation = true;
            worker.RunWorkerCompleted += new RunWorkerCompletedEventHandler(WorkerCompleted);
            // Calling the DoWork Method Asynchronously
            worker.RunWorkerAsync();
        }

        protected void Application_End(object sender, EventArgs e)
        {
            if (worker != null)
                worker.CancelAsync();
        }

        private static void DoWork(object sender, DoWorkEventArgs e)
        {
            foreach (Person p in personList)
            {
                p.Id = ID++;
            }
        }

        private static void WorkerCompleted(object sender, RunWorkerCompletedEventArgs e)
        {
            ID = 0;
            BackgroundWorker worker = sender as BackgroundWorker;
            if (worker != null)
            {
                System.Threading.Thread.Sleep(3000);
                if (!stopWorker)
                {
                    worker.RunWorkerAsync();
                }
                else
                {
                    while (stopWorker)
                    {
                        Thread.Sleep(6000);
                    }
                    worker.RunWorkerAsync();
                }
            }
        }

    }
}
Here we have created a BackgroundWorker object named worker and we bind it’s worker.DoWork event to a DoWork function. This means that each time the worker runs, this function will run.
worker.DoWork += new DoWorkEventHandler(DoWork);
Also we defined that each time that operation is completed another function is going to run, where the worker object will decide whether to proceed to a new process cycle or to sleep depending on a stopWorker bool variable.
worker.RunWorkerCompleted += new RunWorkerCompletedEventHandler(WorkerCompleted);
The DoWork function simply put valid Id values for the Person objects exist currently in the personList. Now let’s create the User interface. Add a new Web Form page with a code behind file. Name the page Default.aspx and paste the following code.
<%@ Page Language="C#" AutoEventWireup="true" CodeBehind="Default.aspx.cs" Inherits="AspNetBackgroundProcess.Default" %>
<!DOCTYPE html>
<html xmlns="http://www.w3.org/1999/xhtml">
<head runat="server">
<title></title>
<style type="text/css">
.auto-style1 {
width: 330px;
border: 1px solid royalblue;
}
.auto-style2 {
font-weight:bold;
}
.auto-style3 {
width: 381px;
}
</style>
</head>
<body>
<form id="form1" runat="server">
<div>
<asp:Label ID="lblAddPerson" runat="server" Text="Add a new Person:" Font-Bold="True" ForeColor="#6600FF"></asp:Label>
<br />
<table class="auto-style1">
<tr>
<td class="auto-style2">Name:</td>
<td class="auto-style3">
<asp:TextBox ID="txtName" runat="server"></asp:TextBox>
</td>
</tr>
<tr>
<td class="auto-style2">Age:</td>
<td class="auto-style3">
<asp:TextBox ID="txtAge" runat="server"></asp:TextBox>
</td>
</tr>
<tr>
<td class="auto-style2">Address:</td>
<td class="auto-style3">
<asp:TextBox ID="txtAddress" runat="server"></asp:TextBox>
</td>
</tr>
<tr>
<td class="auto-style2" colspan="2">
<asp:Button ID="btnAddPerson" runat="server" Text="Add Person" Width="215px" OnClick="btnAddPerson_Click" BackColor="#6666FF" BorderColor="White" ForeColor="White" />
</td>
</tr>
</table>
<div style="background-color:royalblue;width: 310px;padding: 10px;color:cornsilk">
<asp:Label ID="lblBackgroundProc" runat="server" Text="Background Process:"></asp:Label>
<asp:Button ID="btnStop" runat="server" Text="Stop" Width="75px" OnClick="btnStop_Click" />
<asp:Button ID="btnStart" runat="server" Text="Start" Width="75px" OnClick="btnStart_Click" Enabled="False" />
</div>
<asp:Button ID="btnUpdateList" runat="server" OnClick="btnUpdateList_Click" Text="Update List Data" Width="330px" />
<br />
<asp:GridView ID="gridPersonList" runat="server" CellPadding="4" ForeColor="#333333" GridLines="None" Width="330px">
<AlternatingRowStyle BackColor="White" ForeColor="#284775" />
<EditRowStyle BackColor="#999999" />
<FooterStyle BackColor="#5D7B9D" Font-Bold="True" ForeColor="White" />
<HeaderStyle BackColor="#5D7B9D" Font-Bold="True" ForeColor="White" />
<PagerStyle BackColor="#284775" ForeColor="White" HorizontalAlign="Center" />
<RowStyle BackColor="#F7F6F3" ForeColor="#333333" />
<SelectedRowStyle BackColor="#E2DED6" Font-Bold="True" ForeColor="#333333" />
<SortedAscendingCellStyle BackColor="#E9E7E2" />
<SortedAscendingHeaderStyle BackColor="#506C8C" />
<SortedDescendingCellStyle BackColor="#FFFDF8" />
<SortedDescendingHeaderStyle BackColor="#6F8DAE" />
</asp:GridView>
</div>
</form>
</body>
</html>
Switch to the code behind file now and paste the following code:
namespace AspNetBackgroundProcess
{
    public partial class Default : System.Web.UI.Page
    {
        protected void Page_Load(object sender, EventArgs e)
        {
            if (!IsPostBack)
            {
                btnStop.Enabled = !btnStart.Enabled;
            }
        }

        protected void btnAddPerson_Click(object sender, EventArgs e)
        {
            Global.personList.Add(new Person {
                Name = txtName.Text,
                Age = Int32.Parse(txtAge.Text),
                Address = txtAddress.Text
            });
        }

        protected void btnUpdateList_Click(object sender, EventArgs e)
        {
            gridPersonList.DataSource = Global.personList;
            gridPersonList.DataBind();
        }

        protected void btnStop_Click(object sender, EventArgs e)
        {
            Global.stopWorker = true;
            btnStop.Enabled = false;
            btnStart.Enabled = true;
        }

        protected void btnStart_Click(object sender, EventArgs e)
        {
            Global.stopWorker = false;
            btnStart.Enabled = false;
            btnStop.Enabled = true;
        }
    }
}
What we do here is very simple. The Add Person button will add a new Person object to the Global.personList while Stop and Start buttons change the Global.stopWorker value to true and false respectively. That’s the value the worker checks when it’s operation has completed and decides whether to restart or to sleep. Build and run your application.

Try to add 3-4 objects and click the Update button. Ensure that All Objects have been assigned with valid Ids.
Now press the Stop button to make the worker sleep while keep adding new Persons to the list. Press Update to see the result. Then press again the Start button and ensure the your worker was restarted.

This is pretty much a simple way to use background processes in ASP.NET Web Forms. For sure there are other alternatives such as using WCF services running and listening to events but sometimes a background worker can be quite useful. You can download the AspNetBackgroundProcess project we created from here. i hope you enjoyed the post.
Categories: ASP.NET

Reblogged this on Phani Kumar Tadepally.
WHY SHOULD I START AND STOP THE BACKGROUND WORKER?
I NEED IT TO RUN AS THE CODE IS RUNNING AND STOP AUTOMATICALLY WHEN THE RESULT IS OUT