It’s almost certain that every one has filled an online form in his life, maybe a social network’s one and by the time he submitted the form he received back an email. So the question is how we can implement this functionality in ASP.NET? And more over, which is the proper way to do it? This is what we are going to discuss in this post. Let’s start.
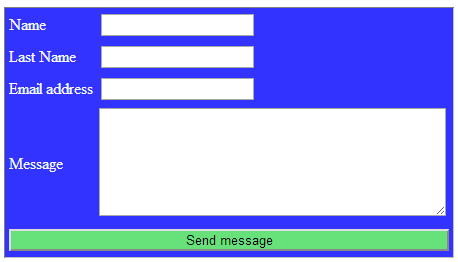
First off all, let us create a new Empty Web Application project in Visual Studio. Also, add a new Web Form page named Default.aspx. Consider the scenario where you run a Social Network company and you want through your administration page to send some emails to your clients. Add the following HMTL markup to your .aspx page.
<%@ Page Language="C#" AutoEventWireup="true" CodeBehind="Default.aspx.cs" Inherits="SendingEmailsApp.Default" %>

<!DOCTYPE html>

<html xmlns="http://www.w3.org/1999/xhtml">
<head runat="server">
    <title></title>
    <style type="text/css">
        .auto-style1 {
            width: 450px;
            border-left-style: solid;
            border-left-width: 1px;
            border-right: 1px solid #C0C0C0;
            border-top-style: solid;
            border-top-width: 1px;
            border-bottom: 1px solid #C0C0C0;
            background-color: #3333FF;
        }
        .auto-style2 {
            width: 212px;
            color:ghostwhite;
        }
        .auto-style3 {
            width: 151px;
            color: ghostwhite;
        }
        .auto-style4 {
            width: 356px;
        }
        .txtClass {
            width:220;
        }
        .btnClass {
            width:100%;
            background-color: rgb(103, 226, 123);
        }
    </style>
</head>
<body>
    <form id="form1" runat="server">
    <div>

        <table cellpadding="2" class="auto-style1">
            <tr>
                <td class="auto-style3">
                    <asp:Label ID="lblName" runat="server" Text="Name"></asp:Label>
                </td>
                <td class="auto-style4">
                    <asp:TextBox ID="txtName" CssClass="txtClass" runat="server"></asp:TextBox>
                </td>
            </tr>
            <tr>
                <td class="auto-style3">
                    <asp:Label ID="lblLastName" runat="server" Text="Last Name"></asp:Label>
                </td>
                <td class="auto-style4">
                    <asp:TextBox ID="txtLastName" CssClass="txtClass" runat="server"></asp:TextBox>
                </td>
            </tr>
            <tr>
                <td class="auto-style3">
                    <asp:Label ID="lblEmail" runat="server" Text="Email address"></asp:Label>
                </td>
                <td class="auto-style4">
                    <asp:TextBox ID="txtEmail" CssClass="txtClass" runat="server"></asp:TextBox>
                </td>
            </tr>
            <tr>
                <td class="auto-style3">
                    <asp:Label ID="lblMessage" runat="server" Text="Message"></asp:Label>
                </td>
                <td class="auto-style4">
                    <asp:TextBox ID="txtMessage" runat="server" Height="102px" TextMode="MultiLine" Width="341px"></asp:TextBox>
                </td>
            </tr>
            <tr>
                <td class="auto-style2" colspan="2">
                    <asp:Button ID="btnSend" runat="server" Text="Send message" CssClass="btnClass" OnClick="btnSend_Click" />
                </td>

            </tr>
        </table>

    </div>
    </form>
</body>
</html>
Before start sending emails you need to set an email account to your Web.config file. In my case I will configure a Gmail account. Mind to replace the respective elements with your own when you run this application.
<configuration>
<system.web>
<compilation debug="true" targetFramework="4.5" />
<httpRuntime targetFramework="4.5" />
</system.web>
<system.net>
<mailSettings>
<smtp deliveryMethod="Network" from="SocialNetwork <chsakells.blog@gmail.com >">
<network enableSsl="true" host="smtp.gmail.com" userName="PUT_YOUR_USERNAME_HERE@gmail.com" password="**PUT_YOUR_PASSWORD_HERE" port="587" />
</smtp>
</mailSettings>
</system.net>
</configuration>
Right click your project and add a new ASP.NET Folder of type “App_Data”. Add a .txt file there with the following content.
Dear @@name@@ @@lastName@@,

@@message@@

Login: @@loginLink@@

SocialNetwork
Generally speaking, in case you want to send the same Email to many clients it’s good practice to create some templates. This is why we created the previous .txt file. Every time we need to send an email, we are going to read those contents and replace only what it needs to be replaced.
Now the good part. We have bound the send button to a btnSend_Click event. Here is the button’s event code inside the Default.aspx.cs file.
protected void btnSend_Click(object sender, EventArgs e)
        {
            string messageForm = HttpContext.Current.Server.MapPath("~/App_Data/MessageForm.txt");
            string messageToSend = File.ReadAllText(messageForm);
            messageToSend = messageToSend.Replace("@@name@@", txtName.Text);
            messageToSend = messageToSend.Replace("@@lastName@@", txtLastName.Text);
            messageToSend = messageToSend.Replace("@@message@@", txtMessage.Text);
            messageToSend = messageToSend.Replace("@@loginLink@@", "http://socialnetwork?login=" + txtLastName.Text);

            MailMessage myMessage = new MailMessage();
            myMessage.Subject = "SocialNetwork account activation";
            myMessage.Body = messageToSend;
            myMessage.From = new MailAddress("PUT_YOUR_USERNAME_HERE@gmail.com", "SocialNetwork");
            myMessage.To.Add(new MailAddress(txtEmail.Text, txtName.Text +  " " + txtLastName.Text));
            SmtpClient mySmtpClient = new SmtpClient();
            mySmtpClient.Send(myMessage);
        }
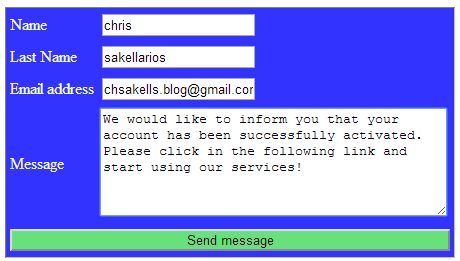
What we do here is to read the template we created, construct the email’s body from the form’s values and finally create a MailMessage object to send the email. The most important line of the above code is the highlighted one, where the binding-matching with the configured email account in the Web.config file is taking place. Build and run your application. In the Email Address field put an account that you own in order to confirm that the email has been send. Also notice the contents of the email received.

That’s it, we managed to send an email. Are we done? YES. Was this the best practice? NO. Let’s explain why. First of all you will have noticed that pressing the send button, the page was hanged till the email was finally sent. This isn’t good especially if responsiveness is the top priority of your website. One of the best practices to send emails is to decouple the hall sending email functionality to different procedures and processes. Here’s the plan:
- You need to use a table in a database. This table will be used to store requests for mails to be send
- The only thing the send button will do, is to insert a new record to this table
- This record will have a status column, denoting the the mail has or hasn’t been sent
- You need another process, running in intervals and retrieving all the unsent emails from the database
- This process may be a different application. In our case we will configure some threads to run asynchronously, inside a Global Configuration file
- Every time an email is sent, the record in the database must be updated and mark the email as sent
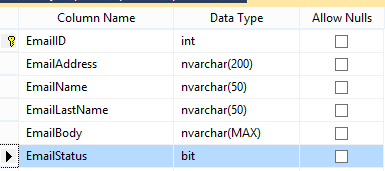
Let’s start implementing this. Comment out the button’s event code. We don’t need it anymore. First let’s create the database table we need. I created a new database named EmailsDB and add a new table named tblEmail. Notice the EmailStatus column, denoting if the email is already sent or not.
We also need 3 stored procedures to support the email functionality.
- SendEmail: That’s the stored procedure that will be called when the Send button is pressed. Just register a new email to be send (EmailStatus=0) and return. This will make the page more responsive
- GetEmailsToBeSend: That’s the stored procedure the thread responsible for sending emails will invoke.
- UpdateEmailStatus: The same process, after sending the email will be responsible to update its status so it wont be sent again
CREATE PROCEDURE [dbo].[SendEmail]
@EmailAddress nvarchar(200),
@EmailName nvarchar(50),
@EmailLastName nvarchar(50),
@EmailBody nvarchar(MAX)
AS
BEGIN
	INSERT INTO tblEmails VALUES (@EmailAddress,@EmailName,@EmailLastName,@EmailBody,0)
END
CREATE PROCEDURE [dbo].[GetEmailsToBeSend]
AS
BEGIN
	SELECT * FROM tblEmails WHERE EmailStatus = 0
END
CREATE PROCEDURE [dbo].[UpdateEmailStatus]
@EmailID int
AS
BEGIN
	UPDATE tblEmails SET EmailStatus = 1 WHERE EmailID = @EmailID
END
Replace the Send button’s event code with the following. It’s only job is to place a new record to the tblEmails table.
protected void btnSend_Click(object sender, EventArgs e)
        {
            string messageForm = HttpContext.Current.Server.MapPath("~/App_Data/MessageForm.txt");
            string messageToSend = File.ReadAllText(messageForm);

            SqlConnection conn = new SqlConnection("Data Source=localhost;Initial Catalog=EmailsDB;Integrated Security=SSPI;");
            SqlCommand cmd = new SqlCommand("SendEmail",conn);
            cmd.CommandType = CommandType.StoredProcedure;
            cmd.Parameters.AddWithValue("@EmailAddress", txtEmail.Text);
            cmd.Parameters.AddWithValue("@EmailName", txtName.Text);
            cmd.Parameters.AddWithValue("@EmailLastName", txtLastName.Text);
            cmd.Parameters.AddWithValue("@EmailBody", txtMessage.Text);

            conn.Open();
            cmd.ExecuteNonQuery();
            conn.Close();
        }
Mind to use your own connection string. Now, as I have told you, the best practise is to have a different project for the process responsible for sending the emails. In our case we are going to add a Global Configuration file and place the code there. We will use the BackgroundWorker objects to create asynchronous processes for sending emails. This class is out of the scope of this post so I’m just gonna show the code directly. Though, If you do want to learn more about implementing background processes with that class, you can take a look at this post I have created.
public class Global : System.Web.HttpApplication
    {
        private const string connectionString = "Data Source=localhost;Initial Catalog=EmailsDB;Integrated Security=SSPI;";
        public static BackgroundWorker worker = new BackgroundWorker();
        public static bool stopWorker = false;

        protected void Application_Start(object sender, EventArgs e)
        {
            worker.DoWork += new DoWorkEventHandler(DoWork);
            worker.WorkerReportsProgress = true;
            worker.WorkerSupportsCancellation = true;
            worker.RunWorkerCompleted += new RunWorkerCompletedEventHandler(WorkerCompleted);
            // Calling the DoWork Method Asynchronously
            worker.RunWorkerAsync();
        }

        protected void Application_End(object sender, EventArgs e)
        {
            if (worker != null)
                worker.CancelAsync();
        }

        private static void DoWork(object sender, DoWorkEventArgs e)
        {
            // Here we read and send unread emails
            SqlConnection conn = new SqlConnection(connectionString);
            SqlCommand cmd = new SqlCommand("GetEmailsToBeSend", conn);
            cmd.CommandType = CommandType.StoredProcedure;
            DataSet ds = new DataSet();
            SqlDataAdapter da = new SqlDataAdapter(cmd);
            da.Fill(ds);
            if(ds.Tables.Count > 0)
            {
                foreach(DataRow row in ds.Tables[0].Rows)
                {
                    SendEmail(Int32.Parse(row[0].ToString()), row[1].ToString(), row[2].ToString(),
                        row[3].ToString(),row[4].ToString());
                }
            }
        }

        private static void WorkerCompleted(object sender, RunWorkerCompletedEventArgs e)
        {
            BackgroundWorker worker = sender as BackgroundWorker;
            if (worker != null)
            {
                System.Threading.Thread.Sleep(3000);
                if (!stopWorker)
                {
                    worker.RunWorkerAsync();
                }
                else
                {
                    while (stopWorker)
                    {
                        Thread.Sleep(6000);
                    }
                    worker.RunWorkerAsync();
                }
            }
        }

        private static void SendEmail(int EmailID,string emailAddress, string name,string lastName, string mailBody)
        {
            string messageForm = HttpRuntime.AppDomainAppPath +"App_Data\\MessageForm.txt";
            string messageToSend = File.ReadAllText(messageForm);
            messageToSend = messageToSend.Replace("@@name@@", name);
            messageToSend = messageToSend.Replace("@@lastName@@", lastName);
            messageToSend = messageToSend.Replace("@@message@@", mailBody);
            messageToSend = messageToSend.Replace("@@loginLink@@", "http://socialnetwork?login=" + lastName);

            MailMessage myMessage = new MailMessage();
            myMessage.Subject = "SocialNetwork account activation";
            myMessage.Body = messageToSend;
            myMessage.From = new MailAddress(emailAddress, "SocialNetwork");
            myMessage.To.Add(new MailAddress(emailAddress, name + " " + lastName));
            SmtpClient mySmtpClient = new SmtpClient();
            mySmtpClient.Send(myMessage);
            UpdateEmailStatus(EmailID);
        }

        private static void UpdateEmailStatus(int EmailID)
        {
            SqlConnection conn = new SqlConnection(connectionString);
            SqlCommand cmd = new SqlCommand("UpdateEmailStatus", conn);
            cmd.CommandType = CommandType.StoredProcedure;
            cmd.Parameters.AddWithValue("@EmailID", EmailID);

            conn.Open();
            cmd.ExecuteNonQuery();
            conn.Close();
        }
    }
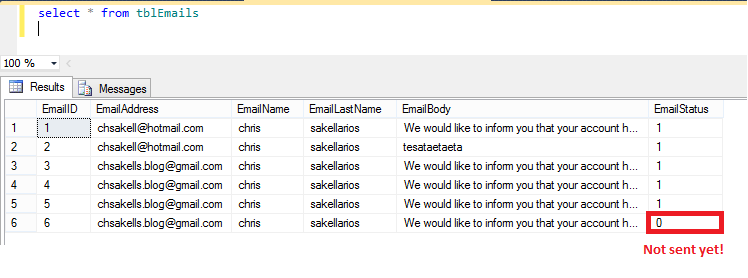
Use the WorkerCompleted event to configure the interval time you want your processes to run in. Build and run your application. Try to send a new email and check that confirm that you receive it successfully. Also take a look at your tblEmails table and check your records.
That’s it. We saw some interesting concepts here about sending emails and keeping the web application responsive. I hope you liked the post. You can download the project from here. Mind to replace mock values you will find (username, password) with your real ones. Try to send me an email at chsakells.blog@gmail.com and tell me your thoughts!
Categories: ASP.NET, Best practices

Thanks for your time and work.
Nice work. Can this procedure be used to just send a list of emails from a database table?
I don’t need the form part and just want to read a bunch of emails from a table and send an email to each one. Won’t be hard to modify the code to do this, but would this be the best way to do something like? Thanks
Thanks for sharing the POST with best practices. Is there any best practice to send the bulk messages also. Please share.
sir….i need same using mvc .net
Thanks for sharing the POST with best practices. Is there any best practice to send the bulk SMS also. Please share.
Hi.
What will happen when the context is switched from one worker process(w3wp.exe) to another worker process (w3wp.exe). Shouldn’t we go for Hangfire like feature which queues the request coming to server rather than using Backgroundworker class? Just a thought